
Owner's Manual
Page 286
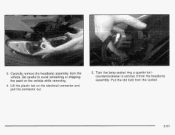
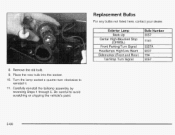
Pull the old bulb from the headlamp assembly. Lift the plastic tab on the vehicle while removing. 5. Turn the lamp socket ring a quarter turn counterclockwise to avoid scratching or chipping the paint on the electrical connector and pull the connector out. 5-61 Carefully remove the headlamp assembly from the vehicle. 3. Be careful to remove it from the socket. 4.
Pull the old bulb from the headlamp assembly. Lift the plastic tab on the vehicle while removing. 5. Turn the lamp socket ring a quarter turn counterclockwise to avoid scratching or chipping the paint on the electrical connector and pull the connector out. 5-61 Carefully remove the headlamp assembly from the vehicle. 3. Be careful to remove it from the socket. 4.
Owner's Manual
Page 287
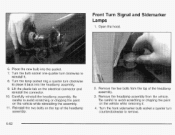
...top of the headlamp assembly. 2. Carefully reinstall the headlamp assembly. Remove the two bolts from the vehicle. Be careful to avoid scratching or chipping the paint on the top of the headlamp assembly. 3. Turn the front sidemarker bulb socket a quarter turn clockwise to place it back ...Lift the plastic tab on the vehicle while removing it . 8. Front Turn Signal and Sidemarker Lamps 1. Be careful to avoid scratching or chipping the paint on the electrical connector and reinstall the connector. 10. Turn the bulb socket one-quarter turn clockwise to remove. 5-62
...top of the headlamp assembly. 2. Carefully reinstall the headlamp assembly. Remove the two bolts from the vehicle. Be careful to avoid scratching or chipping the paint on the top of the headlamp assembly. 3. Turn the front sidemarker bulb socket a quarter turn clockwise to place it back ...Lift the plastic tab on the vehicle while removing it . 8. Front Turn Signal and Sidemarker Lamps 1. Be careful to avoid scratching or chipping the paint on the electrical connector and reinstall the connector. 10. Turn the bulb socket one-quarter turn clockwise to remove. 5-62
Owner's Manual
Page 288
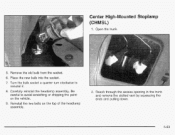
Center High-Mounted Stoplamp (CHMSL) 1. Reinstall the two bolts on the vehicle. 2. Reach through the access opening in the trunk and remove the slotted vent by squeezing the ends and pulling down. 9. Remove the old bulb from the socket. 6. Open the trunk. 5. Place the new bulb into the socket. 7. Be careful to reinstall it. 8. Carefully reinstall the headlamp assembly. Turn the bulb socket a quarter turn clockwise to avoid scratching or chipping the paint on the top of the headlamp assembly. 5-63
Center High-Mounted Stoplamp (CHMSL) 1. Reinstall the two bolts on the vehicle. 2. Reach through the access opening in the trunk and remove the slotted vent by squeezing the ends and pulling down. 9. Remove the old bulb from the socket. 6. Open the trunk. 5. Place the new bulb into the socket. 7. Be careful to reinstall it. 8. Carefully reinstall the headlamp assembly. Turn the bulb socket a quarter turn clockwise to avoid scratching or chipping the paint on the top of the headlamp assembly. 5-63
Owner's Manual
Page 290
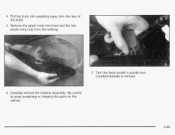
Remove the upper trunk trim hook and the two plastic wing nuts from the rear of the trunk. 5. Be careful to remove. 6. Pull the trunk trim carpeting away from the taillamp. 7. Carefully remove the taillamp assembly. 4. Turn the lamp socket a quarter turn counterclockwise to avoid scratching or chipping the paint on the vehicle. 5-65
Remove the upper trunk trim hook and the two plastic wing nuts from the rear of the trunk. 5. Be careful to remove. 6. Pull the trunk trim carpeting away from the taillamp. 7. Carefully remove the taillamp assembly. 4. Turn the lamp socket a quarter turn counterclockwise to avoid scratching or chipping the paint on the vehicle. 5-65
Owner's Manual
Page 291
Carefully reinstall the taillamp assembly by reversing Steps 1 through 5. Turn the lamp socket a quarter turn clockwise to avoid scratching or chipping the vehicle's paint. 5-66 Be careful to reinstall it. 11. IO. Place the new bulb into the socket. Remove the old bulb. 9. 8.
Carefully reinstall the taillamp assembly by reversing Steps 1 through 5. Turn the lamp socket a quarter turn clockwise to avoid scratching or chipping the vehicle's paint. 5-66 Be careful to reinstall it. 11. IO. Place the new bulb into the socket. Remove the old bulb. 9. 8.
Owner's Manual
Page 318
... clean using a soft clean cloth with clean water. After rinsing thoroughly, dry with touch-up materials avaliable from all painted surfaces on aluminum wheels. Minor chips and scratches can occur on the underbody parts such as fuel lines, frame, floor pan and exhaust system even though they have corrosion protection. 5-93...parts repaired or replaced to the painted surface of finish damage can collect on them because you could damage the surface. Finish Damage Any stone chips, fractures or deep scratches in your vehicle. Larger areas of your dealer's body and paint shop.
... clean using a soft clean cloth with clean water. After rinsing thoroughly, dry with touch-up materials avaliable from all painted surfaces on aluminum wheels. Minor chips and scratches can occur on the underbody parts such as fuel lines, frame, floor pan and exhaust system even though they have corrosion protection. 5-93...parts repaired or replaced to the painted surface of finish damage can collect on them because you could damage the surface. Finish Damage Any stone chips, fractures or deep scratches in your vehicle. Larger areas of your dealer's body and paint shop.
