

Owner's Manual
Page 302
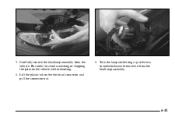
Remove the two bolts from the top of replacement bulb, see "Replacement Bulbs" in this section, contact your dealer. For any bulb changing procedure not listed in the Index. You or others could be injured. Be sure to read and follow the instructions on the bulb package. 6-40 Open the hood. 2. Halogen Bulbs CAUTION: Halogen bulbs have pressurized gas inside and can burst if you drop or scratch the bulb. Headlamps 1. Bulb Replacement For the proper type of the headlamp assembly.
Remove the two bolts from the top of replacement bulb, see "Replacement Bulbs" in this section, contact your dealer. For any bulb changing procedure not listed in the Index. You or others could be injured. Be sure to read and follow the instructions on the bulb package. 6-40 Open the hood. 2. Halogen Bulbs CAUTION: Halogen bulbs have pressurized gas inside and can burst if you drop or scratch the bulb. Headlamps 1. Bulb Replacement For the proper type of the headlamp assembly.
Owner's Manual
Page 303
Be careful to remove it from the vehicle. Turn the lamp socket ring a quarter turn counterclockwise to avoid scratching or chipping the paint on the electrical connector and pull the connector out. 5. Lift the plastic tab on the vehicle while removing. 4. Carefully remove the headlamp assembly from the headlamp assembly. 6-41 3.
Be careful to remove it from the vehicle. Turn the lamp socket ring a quarter turn counterclockwise to avoid scratching or chipping the paint on the electrical connector and pull the connector out. 5. Lift the plastic tab on the vehicle while removing. 4. Carefully remove the headlamp assembly from the headlamp assembly. 6-41 3.
Owner's Manual
Page 304
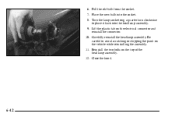
Close the hood. 6-42 Be careful to place it back into the socket. 8. Turn the lamp socket ring a quarter turn clockwise to avoid scratching or chipping the paint on the vehicle while reinstalling the assembly. 11. Reinstall the two bolts on the electrical connector and reinstall the connector. 10. Place the new bulb into the headlamp assembly. 9. Carefully reinstall the headlamp assembly. Lift the plastic tab on the top of the headlamp assembly. 12. Pull the old bulb from the socket. 7. 6.
Close the hood. 6-42 Be careful to place it back into the socket. 8. Turn the lamp socket ring a quarter turn clockwise to avoid scratching or chipping the paint on the vehicle while reinstalling the assembly. 11. Reinstall the two bolts on the electrical connector and reinstall the connector. 10. Place the new bulb into the headlamp assembly. 9. Carefully reinstall the headlamp assembly. Lift the plastic tab on the top of the headlamp assembly. 12. Pull the old bulb from the socket. 7. 6.

Owner's Manual
Page 305
... you (for horizontal aim), or if oncoming drivers flash their high beams at the factory and should need to be re-aimed, it . 4. Remove the headlamp assembly from the top of the lens. Be careful to avoid scratching or chipping the paint on the outer surface of the... headlamp assembly. 3. If your vehicle's headlamps can be adjusted by using aim tips located on the vehicle while removing it is difficult to see lane markers (for vertical aim). Open the ...
... you (for horizontal aim), or if oncoming drivers flash their high beams at the factory and should need to be re-aimed, it . 4. Remove the headlamp assembly from the top of the lens. Be careful to avoid scratching or chipping the paint on the outer surface of the... headlamp assembly. 3. If your vehicle's headlamps can be adjusted by using aim tips located on the vehicle while removing it is difficult to see lane markers (for vertical aim). Open the ...

Owner's Manual
Page 306
Place the new bulb into the socket. 7. Carefully reinstall the headlamp assembly. Close the hood. 2. Reach through the access opening in the trunk and remove the slotted vent by squeezing the ends and pulling down. 6-44 Remove the old bulb from the socket. 6. Turn the bulb socket a quarter turn clockwise to avoid scratching or chipping the paint on the top of the headlamp assembly. 10. Be careful to reinstall it. 8. Open the trunk. 5. Reinstall the two bolts on the vehicle. 9. Center High-Mounted Stoplamp (CHMSL) 1.
Place the new bulb into the socket. 7. Carefully reinstall the headlamp assembly. Close the hood. 2. Reach through the access opening in the trunk and remove the slotted vent by squeezing the ends and pulling down. 6-44 Remove the old bulb from the socket. 6. Turn the bulb socket a quarter turn clockwise to avoid scratching or chipping the paint on the top of the headlamp assembly. 10. Be careful to reinstall it. 8. Open the trunk. 5. Reinstall the two bolts on the vehicle. 9. Center High-Mounted Stoplamp (CHMSL) 1.


