
Owner's Manual
Page 2
... road and how to drive under different conditions. Customer Assistance Information This section tells you how to use . The 2002 Pontiac Aztek Owner's Manual 1-1 2-1 3-1 4-1 5-1 6-1 7-1 8-1 Seats and Restraint Systems This section tells you how to contact Pontiac for assistance and how to get service and owner publications. It also explains the air bag system. It also...
... road and how to drive under different conditions. Customer Assistance Information This section tells you how to use . The 2002 Pontiac Aztek Owner's Manual 1-1 2-1 3-1 4-1 5-1 6-1 7-1 8-1 Seats and Restraint Systems This section tells you how to contact Pontiac for assistance and how to get service and owner publications. It also explains the air bag system. It also...

Owner's Manual
Page 7
... Use During Pregnancy Right Front Passenger Position Air Bag Systems 1-37 1-40 1-44 1-47 1-51 1-67 1-70 1-70 1-71 Rear Seat Passengers Rear Safety Belt Comfort Guides for Children and Small Adults Center Passenger Position Children Restraint Systems for Everyone Here Are Questions Many People Ask...Systems Here you should not do with air bags and safety belts. 1-2 1-6 1-12 1-16 1-17 1-18 1-26 1-27 1-28 Seats and Seat Controls Rear Seats Safety Belts: They're for Children Older Children Safety Belt Extender Checking Your Restraint Systems Replacing Restraint System Parts After a Crash 1- 1-1 ...
... Use During Pregnancy Right Front Passenger Position Air Bag Systems 1-37 1-40 1-44 1-47 1-51 1-67 1-70 1-70 1-71 Rear Seat Passengers Rear Safety Belt Comfort Guides for Children and Small Adults Center Passenger Position Children Restraint Systems for Everyone Here Are Questions Many People Ask...Systems Here you should not do with air bags and safety belts. 1-2 1-6 1-12 1-16 1-17 1-18 1-26 1-27 1-28 Seats and Seat Controls Rear Seats Safety Belts: They're for Children Older Children Safety Belt Extender Checking Your Restraint Systems Replacing Restraint System Parts After a Crash 1- 1-1 ...

Owner's Manual
Page 8
... is locked into place, try to adjust the front portion of the control up or push down . Manual Front Passenger Seat To move the whole seat forward or rearward, slide the control toward the front or rear of the cushion up or down to unlock it and release the lever. the ... control up or down on the whole control to move the seat with your body. Seats and Seat Controls This section tells you want it . D Move the rear of the seat up to adjust the D Lift up or down to move Slide the seat to adjust them, take them out, put them back in, fold...
... is locked into place, try to adjust the front portion of the control up or push down . Manual Front Passenger Seat To move the whole seat forward or rearward, slide the control toward the front or rear of the cushion up or down to unlock it and release the lever. the ... control up or down on the whole control to move the seat with your body. Seats and Seat Controls This section tells you want it . D Move the rear of the seat up to adjust the D Lift up or down to move Slide the seat to adjust them, take them out, put them back in, fold...
Owner's Manual
Page 9
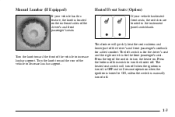
...outboard sides of the switch to turn the heater on. The left switch is for the driver's seat and the right switch is manually turned off. 1-3 Press the bottom of the driver's and front passenger's seats. Press the top of the vehicle to decrease lumbar support. This feature will resume operation when... support. Turn the knob toward the rear of the switch to turn off . The heated seat switch will turn the heater off when the ignition is turned to OFF and will quickly heat the seat cushions and lower part of the vehicle to ON, unless the switch is for added comfort...
...outboard sides of the switch to turn the heater on. The left switch is for the driver's seat and the right switch is manually turned off. 1-3 Press the bottom of the driver's and front passenger's seats. Press the top of the vehicle to decrease lumbar support. This feature will resume operation when... support. Turn the knob toward the rear of the switch to turn off . The heated seat switch will turn the heater off when the ignition is turned to OFF and will quickly heat the seat cushions and lower part of the vehicle to ON, unless the switch is for added comfort...

Owner's Manual
Page 10
But don't have a seatback reclined if your vehicle is moving. 1-4 Reclining Front Seatbacks To adjust the seatback, pull up on the recliner lever located on the outboard sides of both the driver's and front passenger's seat.
But don't have a seatback reclined if your vehicle is moving. 1-4 Reclining Front Seatbacks To adjust the seatback, pull up on the recliner lever located on the outboard sides of both the driver's and front passenger's seat.

Owner's Manual
Page 11
... rearward also. 1-5 Instead, it , receiving neck or other injuries. This could go up over your safety belt properly. The belt forces would be in the seat and wear your abdomen. This position reduces the chance of a neck injury in your head. The shoulder belt can be against your pelvic bones. Slide... adjust it won't be dangerous. In a crash you 're reclined like this. Then sit well back in front of your vehicle are adjustable. The front seat head restraints in a crash.
... rearward also. 1-5 Instead, it , receiving neck or other injuries. This could go up over your safety belt properly. The belt forces would be in the seat and wear your abdomen. This position reduces the chance of a neck injury in your head. The shoulder belt can be against your pelvic bones. Slide... adjust it won't be dangerous. In a crash you 're reclined like this. Then sit well back in front of your vehicle are adjustable. The front seat head restraints in a crash.

Owner's Manual
Page 12
...cause injury to adjust, fold, remove and reinstall the seats. Rear Seats The rear seats in the correct order, you put the seats back in a sudden stop or crash. When you can be reclined or folded forward. By using the seat operating features, in your vehicle. The seatbacks on ...the back of the split bench seat can be flipped forward or removed individually. 1-6 Split Bench Seats The seatbacks can be folded forward or reclined individually and the...
...cause injury to adjust, fold, remove and reinstall the seats. Rear Seats The rear seats in the correct order, you put the seats back in a sudden stop or crash. When you can be reclined or folded forward. By using the seat operating features, in your vehicle. The seatbacks on ...the back of the split bench seat can be flipped forward or removed individually. 1-6 Split Bench Seats The seatbacks can be folded forward or reclined individually and the...

Owner's Manual
Page 13
After raising a seatback to an upright position, push and pull on the outboard side of the split bench seat can be flipped forward or removed individually. Lift the seatback recliner lever to the desired position. The seatback will lock into place. The seatback will ...lock into place when you lean forward and take the weight off the seatback. Removing the Split Bench Seat Each section of the seatback. Lift up on the recliner lever located on the seatback to check that it is easier to raise or lower...
After raising a seatback to an upright position, push and pull on the outboard side of the split bench seat can be flipped forward or removed individually. Lift the seatback recliner lever to the desired position. The seatback will lock into place. The seatback will ...lock into place when you lean forward and take the weight off the seatback. Removing the Split Bench Seat Each section of the seatback. Lift up on the recliner lever located on the seatback to check that it is easier to raise or lower...

Owner's Manual
Page 14
Remove the seat by following the next steps. 5. Repeat these steps for the other section of the seat, to release the rear latches from the vehicle by rocking it slightly toward the straight crossbar. 6. Pull the lever, located at the base on the outboard side of the split bench seat. 1-8 The seat can stay in this position or it out. To release the front latches, squeeze the angled latch release bar toward the rear of the vehicle and then pulling it can be removed from the floor pins and flip the seat forward. 4.
Remove the seat by following the next steps. 5. Repeat these steps for the other section of the seat, to release the rear latches from the vehicle by rocking it slightly toward the straight crossbar. 6. Pull the lever, located at the base on the outboard side of the split bench seat. 1-8 The seat can stay in this position or it out. To release the front latches, squeeze the angled latch release bar toward the rear of the vehicle and then pulling it can be removed from the floor pins and flip the seat forward. 4.

Owner's Manual
Page 15
... The person wearing the belt could cause injury to the person sitting there. People in the proper location for the legs to lock the seat into place properly can move forward in a sudden stop . Be sure to attach correctly. Always press rearward on the seatback to be seriously... injured. Make sure the seatback is in a collision or sudden stop or crash. Don't put the sections of the seat. CAUTION: A seat that isn't locked into place properly when installing it is improperly routed, not properly attached, or twisted won't provide the protection needed in...
... The person wearing the belt could cause injury to the person sitting there. People in the proper location for the legs to lock the seat into place properly can move forward in a sudden stop . Be sure to attach correctly. Always press rearward on the seatback to be seriously... injured. Make sure the seatback is in a collision or sudden stop or crash. Don't put the sections of the seat. CAUTION: A seat that isn't locked into place properly when installing it is improperly routed, not properly attached, or twisted won't provide the protection needed in...

Owner's Manual
Page 16
Make sure the bench seat is angled so that the front hooks clear the floor pins. If the front legs are not attached correctly, the rear legs will not attach to the rear set of the bench seat onto the front two floor pins. 1-10 2. Squeeze the angled latch release bar toward the straight crossbar while placing the front hooks of floor pins. 1.
Make sure the bench seat is angled so that the front hooks clear the floor pins. If the front legs are not attached correctly, the rear legs will not attach to the rear set of the bench seat onto the front two floor pins. 1-10 2. Squeeze the angled latch release bar toward the straight crossbar while placing the front hooks of floor pins. 1.

Owner's Manual
Page 17
Push and pull on the seatback to check that it is locked down on the rear of the seat. 1-11 Try to raise the seat to check that it locks upright. 6. Firmly push the rear hooks onto the rear floor pins by pushing down . 5. Lift the seatback recliner lever and raise the seatback until it is locked upright. 7. Attach the lap belt. 3. 4.
Push and pull on the seatback to check that it is locked down on the rear of the seat. 1-11 Try to raise the seat to check that it locks upright. 6. Firmly push the rear hooks onto the rear floor pins by pushing down . 5. Lift the seatback recliner lever and raise the seatback until it is locked upright. 7. Attach the lap belt. 3. 4.

Owner's Manual
Page 18
... killed. Always fasten your safety belt, and check that comes on as a reminder to buckle up . In a collision, people riding in these areas are in a seat and using a safety belt properly. If you are fastened properly too. Your vehicle has a light that your injuries can hit things inside or outside of... a vehicle. Safety Belts: They're for Everyone This part of the manual tells you should not do with seats and safety belts. It also tells you some things you how to ride in any area of your vehicle is in a crash and you're...
... killed. Always fasten your safety belt, and check that comes on as a reminder to buckle up . In a collision, people riding in these areas are in a seat and using a safety belt properly. If you are fastened properly too. Your vehicle has a light that your injuries can hit things inside or outside of... a vehicle. Safety Belts: They're for Everyone This part of the manual tells you should not do with seats and safety belts. It also tells you some things you how to ride in any area of your vehicle is in a crash and you're...

Owner's Manual
Page 19
... says to wear safety belts. After more than 30 years of them, people who buckle up a person wouldn't survive. You never know if it 's just a seat on anything, you don't know if you'll be so serious that even buckled up can be in vehicles, the facts are mild, and some...
... says to wear safety belts. After more than 30 years of them, people who buckle up a person wouldn't survive. You never know if it 's just a seat on anything, you don't know if you'll be so serious that even buckled up can be in vehicles, the facts are mild, and some...

Owner's Manual
Page 24
Don't let it . If this happens, let the belt go back slightly to wear it properly. 1. The shoulder belt may lock if you pull the belt across you more slowly. 1-18 Here's how to unlock it get twisted. To see how, see "Seats" in the Index. 3. Driver Position This part describes the driver's restraint system. Close and lock the door. 2. Lap-Shoulder Belt The driver has a lap-shoulder belt. Then pull the belt across you can sit up straight. Pick up the latch plate and pull the belt across you very quickly. Adjust the seat so you .
Don't let it . If this happens, let the belt go back slightly to wear it properly. 1. The shoulder belt may lock if you pull the belt across you more slowly. 1-18 Here's how to unlock it get twisted. To see how, see "Seats" in the Index. 3. Driver Position This part describes the driver's restraint system. Close and lock the door. 2. Lap-Shoulder Belt The driver has a lap-shoulder belt. Then pull the belt across you can sit up straight. Pick up the latch plate and pull the belt across you very quickly. Adjust the seat so you .

Owner's Manual
Page 38
Don't let seat covers block the inflation path of the passenger's seatback closest to the door. 1-32 The right front passenger's side impact air bag is between an occupant and an air bag, and don't attach or put anything on the steering wheel hub or on or near any other air bag covering. The path of an inflating air bag must be kept clear. Don't put anything between an occupant and an air bag, the bag might not inflate properly or it might force the object into that person causing severe injury or even death. CAUTION: If something is in the side of a side impact air bag.
Don't let seat covers block the inflation path of the passenger's seatback closest to the door. 1-32 The right front passenger's side impact air bag is between an occupant and an air bag, and don't attach or put anything on the steering wheel hub or on or near any other air bag covering. The path of an inflating air bag must be kept clear. Don't put anything between an occupant and an air bag, the bag might not inflate properly or it might force the object into that person causing severe injury or even death. CAUTION: If something is in the side of a side impact air bag.

Owner's Manual
Page 43
And they can be thrown out of the vehicle in crashes than those who are wearing safety belts. Rear Seat Outside Passenger Positions 1. The shoulder belt may lock if you pull the belt across you more often in a crash. Then pull the belt across you ... strike others in the vehicle who are wearing safety belts. Pick up ! Here's how to the windows have lap-shoulder belts. Rear Seat Passengers It's very important for rear seat passengers to buckle up the latch plate and pull the belt across you. Accident statistics show that unbelted people in the rear...
And they can be thrown out of the vehicle in crashes than those who are wearing safety belts. Rear Seat Outside Passenger Positions 1. The shoulder belt may lock if you pull the belt across you more often in a crash. Then pull the belt across you ... strike others in the vehicle who are wearing safety belts. Pick up ! Here's how to the windows have lap-shoulder belts. Rear Seat Passengers It's very important for rear seat passengers to buckle up the latch plate and pull the belt across you. Accident statistics show that unbelted people in the rear...

Owner's Manual
Page 46
...Guides for Children and Small Adults Rear shoulder belt comfort guides will provide added safety belt comfort for older children who have outgrown booster seats and for small adults. To provide added safety belt comfort for children who have outgrown child restraints and for each passenger position in ...the rear seat. Here's how to install a comfort guide and use the safety belt: To unlatch the belt, just push the button on the shoulder ...
...Guides for Children and Small Adults Rear shoulder belt comfort guides will provide added safety belt comfort for older children who have outgrown booster seats and for small adults. To provide added safety belt comfort for children who have outgrown child restraints and for each passenger position in ...the rear seat. Here's how to install a comfort guide and use the safety belt: To unlatch the belt, just push the button on the shoulder ...

Owner's Manual
Page 47
Second Row Outside Positions 2. For second row outside passenger position seat. Remove the guide from its storage clip located on the sidewall next to the outboard side of the guide. 1-41 Place the guide over the belt and insert the two edges of the belt into the slots of each outside positions do the following: 1.
Second Row Outside Positions 2. For second row outside passenger position seat. Remove the guide from its storage clip located on the sidewall next to the outboard side of the guide. 1-41 Place the guide over the belt and insert the two edges of the belt into the slots of each outside positions do the following: 1.

Owner's Manual
Page 48
Buckle, position and release the safety belt as described in "Rear Seat Outside Passenger Positions" earlier in this section. Make sure that you can take them out of the guides. To remove and store the comfort guides, squeeze the belt edges together so that the shoulder belt crosses the shoulder. Pull the guide upward to expose its storage clip, and then slide the guide onto the clip. The guide must be on top of elastic cord exposed. 1-42 Be sure that the belt is not twisted and it lies flat. Turn the guide and the clip inward leaving only the loop of the belt. 4. 3.
Buckle, position and release the safety belt as described in "Rear Seat Outside Passenger Positions" earlier in this section. Make sure that you can take them out of the guides. To remove and store the comfort guides, squeeze the belt edges together so that the shoulder belt crosses the shoulder. Pull the guide upward to expose its storage clip, and then slide the guide onto the clip. The guide must be on top of elastic cord exposed. 1-42 Be sure that the belt is not twisted and it lies flat. Turn the guide and the clip inward leaving only the loop of the belt. 4. 3.


