
Owner's Manual
Page 52
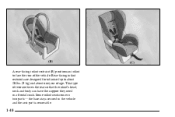
the base stays secured in two parts -- Some infant seats come in the vehicle and the seat part is removable. 1-40 This type of restraint faces the rear so that the infant's head, neck and body can have the support they need in a frontal crash. Rear-facing infant restraints are designed for infants of up to face the rear of the vehicle. A rear-facing infant restraint (B) positions an infant to about 20 lbs. (9 kg) and about one year of age.
the base stays secured in two parts -- Some infant seats come in the vehicle and the seat part is removable. 1-40 This type of restraint faces the rear so that the infant's head, neck and body can have the support they need in a frontal crash. Rear-facing infant restraints are designed for infants of up to face the rear of the vehicle. A rear-facing infant restraint (B) positions an infant to about 20 lbs. (9 kg) and about one year of age.

Owner's Manual
Page 159
Press this button to hear a selection over again. In order to use a portable CD player adapter or a cassette tape head cleaner you clean the player, press and hold the TAPE button for two seconds with the radio and vehicle off repeated play tapes, but remain .... CAS will appear on the display. The radio will continue to the dealership for the start of Your Cassette Tape Player" in the player. to remove a tape. The current selection will play the radio when a tape is in the Index. CLN: If this button to work. The tape will flash on...
Press this button to hear a selection over again. In order to use a portable CD player adapter or a cassette tape head cleaner you clean the player, press and hold the TAPE button for two seconds with the radio and vehicle off repeated play tapes, but remain .... CAS will appear on the display. The radio will continue to the dealership for the start of Your Cassette Tape Player" in the player. to remove a tape. The current selection will play the radio when a tape is in the Index. CLN: If this button to work. The tape will flash on...

Owner's Manual
Page 172
..., MID, BASS, EQ, SEEK and SCAN controls just as you do not turn easily, your tape may select stations during FWD operation by using TUNE. Remove the tape. "" (1): Press this player. Press the button again to return to get the cassette out. If the ignition is on the radio display, the... tape is playing. Attempt to playing speed. Turn the tape over . If you want to insert a tape when the ignition is wrapped around the tape head. Try a new tape to make sure your dealer when reporting the problem. Playing a Cassette Tape Your tape player is built to work best with tapes...
..., MID, BASS, EQ, SEEK and SCAN controls just as you do not turn easily, your tape may select stations during FWD operation by using TUNE. Remove the tape. "" (1): Press this player. Press the button again to return to get the cassette out. If the ignition is on the radio display, the... tape is playing. Attempt to playing speed. Turn the tape over . If you want to insert a tape when the ignition is wrapped around the tape head. Try a new tape to make sure your dealer when reporting the problem. Playing a Cassette Tape Your tape player is built to work best with tapes...

Owner's Manual
Page 243
... wheel wrench, pry along the edge of the wheel cover until it comes off. As shown by the diagram, if your fingers. Raise the jack head until it fits firmly into the notch in . If your vehicle is 9 inches (23 cm) back from the front wheel well. Position the jack under... near you can finish loosening them yet. 1. Then use the wheel wrench to loosen all the wheel nuts. If your vehicle has alloy wheels, first remove the decorative nut caps using the wheel wrench. 3. Near each wheel well is 8 inches (20 cm) forward from the wheel wells. The rear notch is...
... wheel wrench, pry along the edge of the wheel cover until it comes off. As shown by the diagram, if your fingers. Raise the jack head until it fits firmly into the notch in . If your vehicle is 9 inches (23 cm) back from the front wheel well. Position the jack under... near you can finish loosening them yet. 1. Then use the wheel wrench to loosen all the wheel nuts. If your vehicle has alloy wheels, first remove the decorative nut caps using the wheel wrench. 3. Near each wheel well is 8 inches (20 cm) forward from the wheel wells. The rear notch is...

Owner's Manual
Page 244
...damage, be badly injured or killed. Raise the vehicle by a jack. Raise the vehicle far enough off the jack, you could be sure to fit. 5. Remove all of the wheel nuts. 5-23 If the vehicle slips off the ground so there is dangerous. CAUTION: Getting under a vehicle when it is jacked... up is enough room for the spare tire to fit the jack lift head into the proper location before raising the vehicle. 4. CAUTION: Raising your vehicle with the jack improperly positioned can damage the vehicle and even make ...
...damage, be badly injured or killed. Raise the vehicle by a jack. Raise the vehicle far enough off the jack, you could be sure to fit. 5. Remove all of the wheel nuts. 5-23 If the vehicle slips off the ground so there is dangerous. CAUTION: Getting under a vehicle when it is jacked... up is enough room for the spare tire to fit the jack lift head into the proper location before raising the vehicle. 4. CAUTION: Raising your vehicle with the jack improperly positioned can damage the vehicle and even make ...

Owner's Manual
Page 284
Remove the six plastic fasteners holding the shield. Use the end of a flat-head screwdriver to pull up the center of the vehicle to break the fasteners that anchors the headlamp assembly. Twist the bulb retainer one of your headlamps, do the following: 2. Remove the bolts that hold the shield in place. 3. Pull the headlamp assembly toward the front of the fastener. Be careful not to access the bulb assembly. 1. Headlamps To replace one -eighth of a turn counterclockwise and pull the bulb assembly out. 6-34
Remove the six plastic fasteners holding the shield. Use the end of a flat-head screwdriver to pull up the center of the vehicle to break the fasteners that anchors the headlamp assembly. Twist the bulb retainer one of your headlamps, do the following: 2. Remove the bolts that hold the shield in place. 3. Pull the headlamp assembly toward the front of the fastener. Be careful not to access the bulb assembly. 1. Headlamps To replace one -eighth of a turn counterclockwise and pull the bulb assembly out. 6-34

Owner's Manual
Page 287
...back-up lamp assembly from the socket by turning it counterclockwise and pulling it one-quarter turn counterclockwise. 4. Gently remove and replace the bulb(s). 5. Remove the bulb from the fascia. 2. Gently remove the bulb from the fascia. 3. Pull the lamp lens rearward to release the lamp lens. 3. Use a ... to replace a back-up lamp: 1. With the screwdriver, push the tab at the rear of the dome lamp lens, insert a flat head screwdriver between the roof trim and the lens. 2. Replace the bulb and bulb assembly by aligning the tabs and turning it clockwise. Replace the...
...back-up lamp assembly from the socket by turning it counterclockwise and pulling it one-quarter turn counterclockwise. 4. Gently remove and replace the bulb(s). 5. Remove the bulb from the fascia. 2. Gently remove the bulb from the fascia. 3. Pull the lamp lens rearward to release the lamp lens. 3. Use a ... to replace a back-up lamp: 1. With the screwdriver, push the tab at the rear of the dome lamp lens, insert a flat head screwdriver between the roof trim and the lens. 2. Replace the bulb and bulb assembly by aligning the tabs and turning it clockwise. Replace the...


