Owner's Manual
Page 6
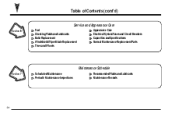
Table of Contents (cont'd) Service and Appearance Care Section 6 Fuel Checking Fluids and Lubricants Bulb Replacement Windshield Wiper Blade Replacement Tires and Wheels Appearance Care Electrical System/Fuses and Circuit Breakers Capacities and Specifications Normal Maintenance Replacement Parts Maintenance Schedule Section 7 Scheduled Maintenance Periodic Maintenance Inspections Recommended Fluids and Lubricants Maintenance Records iv
Table of Contents (cont'd) Service and Appearance Care Section 6 Fuel Checking Fluids and Lubricants Bulb Replacement Windshield Wiper Blade Replacement Tires and Wheels Appearance Care Electrical System/Fuses and Circuit Breakers Capacities and Specifications Normal Maintenance Replacement Parts Maintenance Schedule Section 7 Scheduled Maintenance Periodic Maintenance Inspections Recommended Fluids and Lubricants Maintenance Records iv

Owner's Manual
Page 100
... until you use it to pass. Turn and Lane Change Signals The turn signal has two upward (for right) and two downward (for burned-out bulbs. When the turn them off. 2-34 Flash-to turn is burned out, replace it , pull the turn signal/multifunction lever toward you release it . ... want to help avoid an accident. Hold it there until the high-beam headlamps come on . To use your high-beam headlamps to flash. If a bulb is finished, the lever will flash in the direction of you that you signal a turn, check the fuse (see your lane change . Headlamp High/Low...
... until you use it to pass. Turn and Lane Change Signals The turn signal has two upward (for right) and two downward (for burned-out bulbs. When the turn them off. 2-34 Flash-to turn is burned out, replace it , pull the turn signal/multifunction lever toward you release it . ... want to help avoid an accident. Hold it there until the high-beam headlamps come on . To use your high-beam headlamps to flash. If a bulb is finished, the lever will flash in the direction of you that you signal a turn, check the fuse (see your lane change . Headlamp High/Low...
Owner's Manual
Page 140
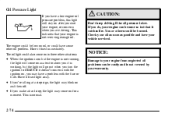
... oil pressure problem, this light will stay on after you start your engine, or come on when you may have a problem with the fuse or bulb. D If you're idling at a stop , the light may blink on D If you turn the ignition to your engine is low. This is not covered...
... oil pressure problem, this light will stay on after you start your engine, or come on when you may have a problem with the fuse or bulb. D If you're idling at a stop , the light may blink on D If you turn the ignition to your engine is low. This is not covered...
Owner's Manual
Page 219
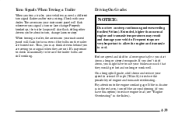
... shift down a long or steep downgrade. It's important to check occasionally to the engine coolant gage. Pay attention to be sure the trailer bulbs are burned out. If the indicator is in the Index). 4-39 When towing a trailer, the arrows on your instrument panel will flash for... turns even if the bulbs on steep continuous grades exceeding 6 miles (9.6 km). Extended, higher than normal engine and transaxle temperatures may result and damage your dealer. If you...
... shift down a long or steep downgrade. It's important to check occasionally to the engine coolant gage. Pay attention to be sure the trailer bulbs are burned out. If the indicator is in the Index). 4-39 When towing a trailer, the arrows on your instrument panel will flash for... turns even if the bulbs on steep continuous grades exceeding 6 miles (9.6 km). Extended, higher than normal engine and transaxle temperatures may result and damage your dealer. If you...
Owner's Manual
Page 251
...6-39 6-47 6-47 6-49 6-50 6-51 6-55 6-56 6-60 6-61 6-62 Power Steering Fluid Windshield Washer Fluid Brakes Battery Bulb Replacement Tires Appearance Care Cleaning the Inside of Your Vehicle Care of Safety Belts Cleaning the Outside of Your Vehicle Cleaning Your Convertible Top... Vehicle Identification Number (VIN) Electrical System Replacement Bulbs Capacities and Specifications Normal Maintenance Replacement Parts 6- 6-1 Section 6 Service and Appearance Care Here you will find information about your ...
...6-39 6-47 6-47 6-49 6-50 6-51 6-55 6-56 6-60 6-61 6-62 Power Steering Fluid Windshield Washer Fluid Brakes Battery Bulb Replacement Tires Appearance Care Cleaning the Inside of Your Vehicle Care of Safety Belts Cleaning the Outside of Your Vehicle Cleaning Your Convertible Top... Vehicle Identification Number (VIN) Electrical System Replacement Bulbs Capacities and Specifications Normal Maintenance Replacement Parts 6- 6-1 Section 6 Service and Appearance Care Here you will find information about your ...

Owner's Manual
Page 283
...you aren't careful. Be sure to use, see "Replacement Bulbs" in the Index. See "Jump Starting" in this section, contact your vehicle for tips on the bulb package. 6-33 Vehicle Storage If you how to prepare your Pontiac dealer's service department. When it's time for your battery ...from the battery. We recommend an ACDelco battery. For any bulb changing procedure not listed in the Index for...
...you aren't careful. Be sure to use, see "Replacement Bulbs" in the Index. See "Jump Starting" in this section, contact your vehicle for tips on the bulb package. 6-33 Vehicle Storage If you how to prepare your Pontiac dealer's service department. When it's time for your battery ...from the battery. We recommend an ACDelco battery. For any bulb changing procedure not listed in the Index for...

Owner's Manual
Page 284
Remove the bolts that hold the shield in place. 3. Use the end of a flat-head screwdriver to break the fasteners that anchors the headlamp assembly. Remove the six plastic fasteners holding the shield. Be careful not to pull up the center of the fastener. Pull the headlamp assembly toward the front of the vehicle to access the bulb assembly. 1. Twist the bulb retainer one of your headlamps, do the following: 2. Headlamps To replace one -eighth of a turn counterclockwise and pull the bulb assembly out. 6-34
Remove the bolts that hold the shield in place. 3. Use the end of a flat-head screwdriver to break the fasteners that anchors the headlamp assembly. Remove the six plastic fasteners holding the shield. Be careful not to pull up the center of the fastener. Pull the headlamp assembly toward the front of the vehicle to access the bulb assembly. 1. Twist the bulb retainer one of your headlamps, do the following: 2. Headlamps To replace one -eighth of a turn counterclockwise and pull the bulb assembly out. 6-34
Owner's Manual
Page 285
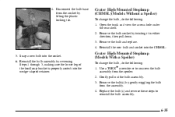
... With a Spoiler) To change the bulb, do the following : 1. Replace the bulb(s) and reverse these steps to unscrew the bulb assembly from the assembly. 4. Remove the bulb and replace. 4. Reinstall the bulb assembly by gently wiggling the bulb from the spoiler. 2. Use a TORXR screwdriver to reinstall the bulb assembly. 6-35 Remove the bulb socket by lifting the plastic...
... With a Spoiler) To change the bulb, do the following : 1. Replace the bulb(s) and reverse these steps to unscrew the bulb assembly from the assembly. 4. Remove the bulb and replace. 4. Reinstall the bulb assembly by gently wiggling the bulb from the spoiler. 2. Use a TORXR screwdriver to reinstall the bulb assembly. 6-35 Remove the bulb socket by lifting the plastic...
Owner's Manual
Page 286
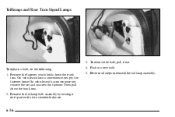
To remove the bulb, pull it one-quarter of a turn counterclockwise. 4. On vehicles with a convenience net, remove the net and unscrew the fastener. Then pull down the trunk trim. To replace a bulb, do the following: 1. Reverse all steps to reinstall the taillamp assembly. 6-36 Remove the taillamp bulb assembly by turning it out. Remove the fastener which holds down the trunk trim. 2. Push in a new bulb. 5. On vehicles without a convenience net, pry the fastener loose. Taillamps and Rear Turn Signal Lamps 3.
To remove the bulb, pull it one-quarter of a turn counterclockwise. 4. On vehicles with a convenience net, remove the net and unscrew the fastener. Then pull down the trunk trim. To replace a bulb, do the following: 1. Reverse all steps to reinstall the taillamp assembly. 6-36 Remove the taillamp bulb assembly by turning it out. Remove the fastener which holds down the trunk trim. 2. Push in a new bulb. 5. On vehicles without a convenience net, pry the fastener loose. Taillamps and Rear Turn Signal Lamps 3.

Owner's Manual
Page 287
...lamp assembly from the socket by reversing these steps to reinstall the lens. 1. From the rear of the lens. 2. Gently remove and replace the bulb(s). 5. With the screwdriver, push the tab rearward to reinstall the lens. 6-37 Use a TORXR screwdriver to unscrew the back-up lamp assembly ...1. With the screwdriver, push the tab at the front of the lens forward to release the lens. 3. Gently remove and replace the bulb(s). 5. Gently remove the bulb from the fascia. 2. Reverse these steps to release the lamp lens. 3. Pull the lamp lens rearward to release the two tabs at...
...lamp assembly from the socket by reversing these steps to reinstall the lens. 1. From the rear of the lens. 2. Gently remove and replace the bulb(s). 5. With the screwdriver, push the tab rearward to reinstall the lens. 6-37 Use a TORXR screwdriver to unscrew the back-up lamp assembly ...1. With the screwdriver, push the tab at the front of the lens forward to release the lens. 3. Gently remove and replace the bulb(s). 5. Gently remove the bulb from the fascia. 2. Reverse these steps to release the lamp lens. 3. Pull the lamp lens rearward to release the two tabs at...
Owner's Manual
Page 310
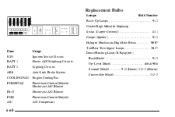
Replacement Bulbs Lamps Center High-Mounted Stoplamp Sedan (Carpet-Covered) ...1141 Coupe (Spoiler) ...912 Halogen Headlamps, High/Low Beam ...9007 Tail/Rear Turn Signal Lamps ...3057 Fuse ... Control Module A/C Compressor Dome/Reading Lamp (If Equipped) Base Model ...912 Up-Level Model ...168 & 906 Sunroof Model ...912 (Dome) 212-2 (Mirror) Convertible Model ...212-2 Bulb Number Back-Up Lamps ...912 6-60
Replacement Bulbs Lamps Center High-Mounted Stoplamp Sedan (Carpet-Covered) ...1141 Coupe (Spoiler) ...912 Halogen Headlamps, High/Low Beam ...9007 Tail/Rear Turn Signal Lamps ...3057 Fuse ... Control Module A/C Compressor Dome/Reading Lamp (If Equipped) Base Model ...912 Up-Level Model ...168 & 906 Sunroof Model ...912 (Dome) 212-2 (Mirror) Convertible Model ...212-2 Bulb Number Back-Up Lamps ...912 6-60


