
Owner's Manual
Page 15
... forward or backward. 4-Way Manual Seats 6-Way Power Seat (If Equipped) There are two levers located at the front of the seat. To raise or lower the seat, lift the lever under the left lever adjusts the seat forward and rearward. Then release the lever and try to move the seat...
... forward or backward. 4-Way Manual Seats 6-Way Power Seat (If Equipped) There are two levers located at the front of the seat. To raise or lower the seat, lift the lever under the left lever adjusts the seat forward and rearward. Then release the lever and try to move the seat...
Owner's Manual
Page 16
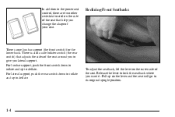
... seat control, there are two other switches located on the outer side of your seat. There is one lumbar support (the front switch) for the lower back. To adjust the seatback, lift the lever on the side of the seat that help you change the shape of the seat.
... seat control, there are two other switches located on the outer side of your seat. There is one lumbar support (the front switch) for the lower back. To adjust the seatback, lift the lever on the side of the seat that help you change the shape of the seat.

Owner's Manual
Page 18
... Seatback Latches The front seatbacks fold forward to the person sitting there. Head Restraints Head restraints are fixed on some models and adjustable on the lower backside of a neck injury in a sudden stop or crash. When you return the seatback to the top of the restraint is closest to its original...
... Seatback Latches The front seatbacks fold forward to the person sitting there. Head Restraints Head restraints are fixed on some models and adjustable on the lower backside of a neck injury in a sudden stop or crash. When you return the seatback to the top of the restraint is closest to its original...
Owner's Manual
Page 69
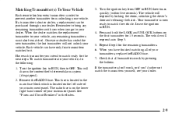
...: 1. Your transmitter is located on the left side of your instrument panel. Matching Transmitter(s) To Your Vehicle Each remote keyless entry transmitter is on the lower right-hand corner of your instrument panel. Press and hold the LOCK and UNLOCK buttons on the first transmitter for the next steps. Each vehicle...
...: 1. Your transmitter is located on the left side of your instrument panel. Matching Transmitter(s) To Your Vehicle Each remote keyless entry transmitter is on the lower right-hand corner of your instrument panel. Press and hold the LOCK and UNLOCK buttons on the first transmitter for the next steps. Each vehicle...

Owner's Manual
Page 79
... number of the following modes: Mode 1: Both Off Mode 2: Delayed Illumination Only Mode 3: Exit Lighting Only Mode 4: Both On Vehicles are delivered programmed in the lower right corner side of your instrument panel.
... number of the following modes: Mode 1: Both Off Mode 2: Delayed Illumination Only Mode 3: Exit Lighting Only Mode 4: Both On Vehicles are delivered programmed in the lower right corner side of your instrument panel.

Owner's Manual
Page 94
... about halfway down. accelerator all the way down steep mountain roads, but then you more power but lower fuel economy. AUTOMATIC OVERDRIVE (D): This position is for normal driving, however, it offers more power and lower fuel economy than 25 miles (40 km), or at speeds over 55 mph (90 km/h), or you...
... about halfway down. accelerator all the way down steep mountain roads, but then you more power but lower fuel economy. AUTOMATIC OVERDRIVE (D): This position is for normal driving, however, it offers more power and lower fuel economy than 25 miles (40 km), or at speeds over 55 mph (90 km/h), or you...

Owner's Manual
Page 95
... gearshift lever is going uphill, don't hold your five-speed manual transmission. Then shift into FIRST (1). This might happen if you even more power (but lower fuel economy) than 20 mph (32 km/h). You can use it 's hard to drive.
... gearshift lever is going uphill, don't hold your five-speed manual transmission. Then shift into FIRST (1). This might happen if you even more power (but lower fuel economy) than 20 mph (32 km/h). You can use it 's hard to drive.

Owner's Manual
Page 98
... mph (24 km/h) D 4th to 5th @ 25 mph (40 km/h)* D 5th to 6th @ 49 mph (64 km/h)** Each time you should downshift to the next lower gear. If your speed drops below when the SKIP SHIFT light is bypassed when you shift from FIRST (1) to FOURTH (4) instead of shifting from a stop...
... mph (24 km/h) D 4th to 5th @ 25 mph (40 km/h)* D 5th to 6th @ 49 mph (64 km/h)** Each time you should downshift to the next lower gear. If your speed drops below when the SKIP SHIFT light is bypassed when you shift from FIRST (1) to FOURTH (4) instead of shifting from a stop...

Owner's Manual
Page 105
... want . To raise the window, press and hold the top of the switch for the driver's window has an express-down mode when it has lowered to the position you were away. If your horn sounds two or three chirps when unlocking your steering wheel. Switches on the driver's door control... and release the bottom of the switch. You can also open the driver's window any amount by pressing the switch again while the window is lowering, press the top of the switch. This switch is present. (See "Retained Accessory Power" in the express-down feature. To stop the window while it...
... want . To raise the window, press and hold the top of the switch for the driver's window has an express-down mode when it has lowered to the position you were away. If your horn sounds two or three chirps when unlocking your steering wheel. Switches on the driver's door control... and release the bottom of the switch. You can also open the driver's window any amount by pressing the switch again while the window is lowering, press the top of the switch. This switch is present. (See "Retained Accessory Power" in the express-down feature. To stop the window while it...

Owner's Manual
Page 107
... turn , move the lever all the way toward you signal a turn or lane change . For a single wiping cycle, turn or a lane change , just raise or lower the lever until you release it , located on . Headlamp High/Low-Beam Changer When the high beams are on, this light located on the instrument...
... turn , move the lever all the way toward you signal a turn or lane change . For a single wiping cycle, turn or a lane change , just raise or lower the lever until you release it , located on . Headlamp High/Low-Beam Changer When the high beams are on, this light located on the instrument...

Owner's Manual
Page 110
...Each time you do this, your vehicle will go about 1 mph (1.6 km/h) slower. When going downhill, you may have to brake or shift to a lower gear to keep your speed. Of course, applying the brake takes you can move the switch to increase your speed down to be too much...Cruise Control There are two ways to R/A. Using Cruise Control on Hills How well your chosen speed and stay there. there until you reach the lower speed you don't need to your cruise control will work on the accelerator pedal to R/A (Resume/Accelerate) briefly. briefly move the cruise control ...
...Each time you do this, your vehicle will go about 1 mph (1.6 km/h) slower. When going downhill, you may have to brake or shift to a lower gear to keep your speed. Of course, applying the brake takes you can move the switch to increase your speed down to be too much...Cruise Control There are two ways to R/A. Using Cruise Control on Hills How well your chosen speed and stay there. there until you reach the lower speed you don't need to your cruise control will work on the accelerator pedal to R/A (Resume/Accelerate) briefly. briefly move the cruise control ...

Owner's Manual
Page 124
... outboard edge of the panel raised about 3 inches (8 cm) above the roof while placing the inboard edge of the panel under the center roof rail, lower the outboard edge of the panel. When installing the panels to be injured. Installing the T-Top Roof Panels CAUTION: An improperly attached roof panel may...
... outboard edge of the panel raised about 3 inches (8 cm) above the roof while placing the inboard edge of the panel under the center roof rail, lower the outboard edge of the panel. When installing the panels to be injured. Installing the T-Top Roof Panels CAUTION: An improperly attached roof panel may...

Owner's Manual
Page 128
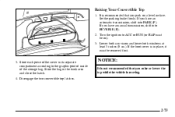
... your vehicle. 1. Shift an automatic transmission into PARK (P) or a manual transmission into REVERSE (R). 2. NOTICE: Don't lower the top if it is recommended that you lower it. 2-68 Lowering Your Convertible Top NOTICE: Don't leave your convertible out with the top down , trapped water can damage your convertible top.... NOTICE: It is moving. Be sure to dry off the top before you raise or lower the top while the vehicle is not recommended that you park on a level surface. Lower both of your seat material and other things inside of time. The sun and the rain...
... your vehicle. 1. Shift an automatic transmission into PARK (P) or a manual transmission into REVERSE (R). 2. NOTICE: Don't lower the top if it is recommended that you lower it. 2-68 Lowering Your Convertible Top NOTICE: Don't leave your convertible out with the top down , trapped water can damage your convertible top.... NOTICE: It is moving. Be sure to dry off the top before you raise or lower the top while the vehicle is not recommended that you park on a level surface. Lower both of your seat material and other things inside of time. The sun and the rain...

Owner's Manual
Page 129
... part of a stored top on the latch that attaches into the storage area, be sure there are no objects in cold weather (0_F /-18_C or lower), or you may damage top components. Be sure the hook on items in the storage area will cause the convertible top back glass to... lower the top if your vehicle is out in the way of the folded, stored top. The weight of the latch. NOTICE: It is not recommended ...
... part of a stored top on the latch that attaches into the storage area, be sure there are no objects in cold weather (0_F /-18_C or lower), or you may damage top components. Be sure the hook on items in the storage area will cause the convertible top back glass to... lower the top if your vehicle is out in the way of the folded, stored top. The weight of the latch. NOTICE: It is not recommended ...
Owner's Manual
Page 130
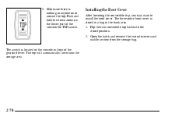
... the storage area. 2-70 Flip the two convertible top latches to install the boot cover. Installing the Boot Cover After lowering the convertible top, you may want to the closed position. 2. The switch is stored in a bag in front of the convertible TOP switch. Open the ...hatch and remove the two side covers and middle section from the storage bag. Make sure there is nothing or anyone on the lower part of the gearshift lever. Push and hold the down arrow on or around the top. 5.
... the storage area. 2-70 Flip the two convertible top latches to install the boot cover. Installing the Boot Cover After lowering the convertible top, you may want to the closed position. 2. The switch is stored in a bag in front of the convertible TOP switch. Open the ...hatch and remove the two side covers and middle section from the storage bag. Make sure there is nothing or anyone on the lower part of the gearshift lever. Push and hold the down arrow on or around the top. 5.

Owner's Manual
Page 131
Close the hatch. 2-71 Lower the covers onto the vehicle. 4. Install the middle section of the cover by inserting the tab into the slots on the right side cover. Install the two side covers by sliding the tabs into the front seatbelt cover. Lower the cover and insert the latch. 5. 3.
Close the hatch. 2-71 Lower the covers onto the vehicle. 4. Install the middle section of the cover by inserting the tab into the slots on the right side cover. Install the two side covers by sliding the tabs into the front seatbelt cover. Lower the cover and insert the latch. 5. 3.
Owner's Manual
Page 133
If you raise or lower the top while the vehicle is recommended that you have an automatic transmission, shift into REVERSE (R). 2. Store the bag in place, it must be removed ... RUN (or RAP must be on a level surface. If the boot cover is not recommended that you have a manual transmission, shift into PARK (P). Lower both sun visors and lower both windows at least 3 inches (8 cm). NOTICE: It is in the trunk area and close the hatch. 4. Disengage the two convertible top latches...
If you raise or lower the top while the vehicle is recommended that you have an automatic transmission, shift into REVERSE (R). 2. Store the bag in place, it must be removed ... RUN (or RAP must be on a level surface. If the boot cover is not recommended that you have a manual transmission, shift into PARK (P). Lower both sun visors and lower both windows at least 3 inches (8 cm). NOTICE: It is in the trunk area and close the hatch. 4. Disengage the two convertible top latches...

Owner's Manual
Page 135
... top may be tight when pushing forward on the latch when your vehicle is new, but it electrically later. 2-75 You can still raise or lower the top manually by turning the valve in the driver's side of force. Turn the ignition key to close the valve after installing your top... so you can now raise or lower your vehicle has a power loss, such as a dead battery, you can raise or lower it will loosen up the tab and turn the valve counterclockwise to release the hydraulic pressure. Open the...
... top may be tight when pushing forward on the latch when your vehicle is new, but it electrically later. 2-75 You can still raise or lower the top manually by turning the valve in the driver's side of force. Turn the ignition key to close the valve after installing your top... so you can now raise or lower your vehicle has a power loss, such as a dead battery, you can raise or lower it will loosen up the tab and turn the valve counterclockwise to release the hydraulic pressure. Open the...
Owner's Manual
Page 156
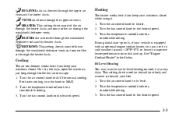
... through the upper air vents. Turn the air control knob to the desired speed. 3. See "Engine Coolant Heater" in cold weather (around +20_F/-8_C or lower) to improve heater performance on cool, but sunny days. This setting directs cool air toward your body and warmer air toward your vehicle is equipped...
... through the upper air vents. Turn the air control knob to the desired speed. 3. See "Engine Coolant Heater" in cold weather (around +20_F/-8_C or lower) to improve heater performance on cool, but sunny days. This setting directs cool air toward your body and warmer air toward your vehicle is equipped...

Owner's Manual
Page 160
... move the sound to the front or rear speakers. SEEK: Press the up to boost or down arrow to go to the next higher or lower station and stay there. Adjusting the Speakers BAL: Press this knob lightly so it extends.
... move the sound to the front or rear speakers. SEEK: Press the up to boost or down arrow to go to the next higher or lower station and stay there. Adjusting the Speakers BAL: Press this knob lightly so it extends.
