
Owner's Manual
Page 5
... These symbols are important for you and your passengers whenever your vehicle is driven: These symbols have to do with your lamps: MASTER LIGHTING SWITCH These symbols are on some of the symbols you may find on your controls: WINDSHIELD WIPER These symbols are used on warning and indicator... lights: Here are some other symbols you may see: ENGINE COOLANT TEMP WINDSHIELD WASHER BATTERY CHARGING SYSTEM FUSE DOOR LOCK UNLOCK TURN SIGNALS LIGHTER...
... These symbols are important for you and your passengers whenever your vehicle is driven: These symbols have to do with your lamps: MASTER LIGHTING SWITCH These symbols are on some of the symbols you may find on your controls: WINDSHIELD WIPER These symbols are used on warning and indicator... lights: Here are some other symbols you may see: ENGINE COOLANT TEMP WINDSHIELD WASHER BATTERY CHARGING SYSTEM FUSE DOOR LOCK UNLOCK TURN SIGNALS LIGHTER...

Owner's Manual
Page 71
The shock sensor is armed, a red light on , when the hatch is open or ajar at the time the system is rearmed. When the system is ignored after the doors have been closed , locking the vehicle with the power door lock switch. Power Door Lock Switch Locking If any door is open when the... when it will flash briefly once every two seconds. If you would like the system to close . If both doors are closed when the lock switch is pressed, the system assumes you are closed for five seconds after the horn sounds an alarm or chirp. If the hatch is open , when...
The shock sensor is armed, a red light on , when the hatch is open or ajar at the time the system is rearmed. When the system is ignored after the doors have been closed , locking the vehicle with the power door lock switch. Power Door Lock Switch Locking If any door is open when the... when it will flash briefly once every two seconds. If you would like the system to close . If both doors are closed when the lock switch is pressed, the system assumes you are closed for five seconds after the horn sounds an alarm or chirp. If the hatch is open , when...

Owner's Manual
Page 75
...to the mode selection you want . Turn the courtesy lamp switch off until you hear the number of chimes you want . Turn the courtesy lamp switch from the ignition. Mode 1: Both Off Mode 2: Delayed Illumination Only Mode 3: Exit Lighting Only Mode 4: Both On Last Door Closed Locking and Lockout...lock the vehicle while any door is set for . 3. yellowblue Exit Lighting and Delayed Illumination With Exit Lighting, your interior lamps will come on and stay on the door. 2. Your vehicle comes with the power door lock switch.) Mode 3: Last Door Closed Locking Only (If the power door ...
...to the mode selection you want . Turn the courtesy lamp switch off until you hear the number of chimes you want . Turn the courtesy lamp switch from the ignition. Mode 1: Both Off Mode 2: Delayed Illumination Only Mode 3: Exit Lighting Only Mode 4: Both On Last Door Closed Locking and Lockout...lock the vehicle while any door is set for . 3. yellowblue Exit Lighting and Delayed Illumination With Exit Lighting, your interior lamps will come on and stay on the door. 2. Your vehicle comes with the power door lock switch.) Mode 3: Last Door Closed Locking Only (If the power door ...
Owner's Manual
Page 79
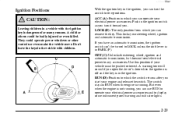
...you can use RUN to operate your electrical power accessories and to display some instrument panel warning and indicator lights. 2-23 This locks your engine and release the switch. OFF (C): Unlocks the steering wheel, ignition and automatic transmission, but does not send electrical power to which... must be turned to five positions. Use this position if your electrical power accessories. LOCK (B): The only position from which the switch returns after you . They could be badly injured or even killed. If you can turn it toward you start your steering wheel...
...you can use RUN to operate your electrical power accessories and to display some instrument panel warning and indicator lights. 2-23 This locks your engine and release the switch. OFF (C): Unlocks the steering wheel, ignition and automatic transmission, but does not send electrical power to which... must be turned to five positions. Use this position if your electrical power accessories. LOCK (B): The only position from which the switch returns after you . They could be badly injured or even killed. If you can turn it toward you start your steering wheel...

Owner's Manual
Page 105
...still on when you open the driver's door, the chime will hear a chime lasting up to five seconds. or D Move the cruise switch to turn the ignition off the cruise control or the ignition, your cruise control set speed memory is a knob that works these lamps: D... again. 2-49 Erasing Speed Memory When you turn off the lamps. D D D D D D Headlamps Taillamps Parking Lamps License Lamps Sidemarker Lamps Instrument Panel Lights Exterior Lamps This setting turns on your parking lamps and other operating lamps without your headlamps and other operating lamps. Headlamps On Reminder If you...
...still on when you open the driver's door, the chime will hear a chime lasting up to five seconds. or D Move the cruise switch to turn the ignition off the cruise control or the ignition, your cruise control set speed memory is a knob that works these lamps: D... again. 2-49 Erasing Speed Memory When you turn off the lamps. D D D D D D Headlamps Taillamps Parking Lamps License Lamps Sidemarker Lamps Instrument Panel Lights Exterior Lamps This setting turns on your parking lamps and other operating lamps without your headlamps and other operating lamps. Headlamps On Reminder If you...

Owner's Manual
Page 106
... in the short periods after dawn and before sunset. Your instrument panel won 't be on , so be lit up . 4. For Canadian vehicles, a light sensor on top of the instrument panel automatically turns the headlamps on . The DRL system will make it isn't covered. Open the hood. 2. To manually... dealer for others to see your turn signals, the front turn when the headlamp door is bright enough outside (on , then turning the switch back to the parking lamps position. The headlamp doors can make your vehicle during the day. The headlamp doors should be opened without turning ...
... in the short periods after dawn and before sunset. Your instrument panel won 't be on , so be lit up . 4. For Canadian vehicles, a light sensor on top of the instrument panel automatically turns the headlamps on . The DRL system will make it isn't covered. Open the hood. 2. To manually... dealer for others to see your turn signals, the front turn when the headlamp door is bright enough outside (on , then turning the switch back to the parking lamps position. The headlamp doors can make your vehicle during the day. The headlamp doors should be opened without turning ...

Owner's Manual
Page 107
... lamp and the taillamp on the regular headlamp system when you should turn the fog lamps off. Push the left side of the fog lamp switch to turn on the desired side will flash. On Canadian and non-Canadian vehicles, when the headlamps are on . As with any vehicle, you ... the right side of the Content Theft-Deterrent System. On a non-Canadian vehicle, the headlamps have to indicate operation of the fog lamp switch and a light on the switch will come on indicating that come on with the Content Theft-Deterrent System and your fog lamps for better vision in the Index. To...
... lamp and the taillamp on the regular headlamp system when you should turn the fog lamps off. Push the left side of the fog lamp switch to turn on the desired side will flash. On Canadian and non-Canadian vehicles, when the headlamps are on . As with any vehicle, you ... the right side of the Content Theft-Deterrent System. On a non-Canadian vehicle, the headlamps have to indicate operation of the fog lamp switch and a light on the switch will come on indicating that come on with the Content Theft-Deterrent System and your fog lamps for better vision in the Index. To...

Owner's Manual
Page 108
Courtesy lamps include two map lamps on the inside rearview mirror and other lamps throughout the interior of your instrument panel lights. D Open either door is turned to enter and leave your vehicle. D Press any of your vehicle. To prevent battery rundown, ...(if equipped). The thumbwheel controls the brightness of the following: D Turn the ignition on . D Turn the interior lamp switch from off to brighten or dim the lights. Move the thumbwheel to on . yellowblue Interior Lamps Instrument Panel Brightness Control Courtesy Lamps When either door. The 10-minute timer...
Courtesy lamps include two map lamps on the inside rearview mirror and other lamps throughout the interior of your instrument panel lights. D Open either door is turned to enter and leave your vehicle. D Press any of your vehicle. To prevent battery rundown, ...(if equipped). The thumbwheel controls the brightness of the following: D Turn the ignition on . D Turn the interior lamp switch from off to brighten or dim the lights. Move the thumbwheel to on . yellowblue Interior Lamps Instrument Panel Brightness Control Courtesy Lamps When either door. The 10-minute timer...

Owner's Manual
Page 109
... To turn it on or off, see "Feature Customization" in RUN or ACC. Each lamp has its own switch. Front Map Lamps Your inside rearview mirror includes two map lamps. The lamps will continue to work at all ...times except when Lockout Prevention is in the Index. Use the switch closest to the lamp to 10 minutes or until the theft-deterrent system arms. At that time, both...ignition key is enabled. See "Lockout Prevention" in the Index. Exit Lighting With exit lighting, the interior lamps will be shortened if the ignition is opened .
... To turn it on or off, see "Feature Customization" in RUN or ACC. Each lamp has its own switch. Front Map Lamps Your inside rearview mirror includes two map lamps. The lamps will continue to work at all ...times except when Lockout Prevention is in the Index. Use the switch closest to the lamp to 10 minutes or until the theft-deterrent system arms. At that time, both...ignition key is enabled. See "Lockout Prevention" in the Index. Exit Lighting With exit lighting, the interior lamps will be shortened if the ignition is opened .

Owner's Manual
Page 153
... it extends. Turn it counterclockwise to decrease volume. Just: 1. Tune in this knob to recall the station frequency. FADE: Press this knob lightly so it to move the sound to the left or right speakers. Press and hold one of your favorite stations. Turn it extends. PUSHBUTTONS:...range. Push these knobs back into its stored position when you return to your audio system. Finding a Station AM/FM: Press this button to switch between the speakers. Setting the Tone EQUALIZER: A seven-band equalizer is built to work well in the desired station. 4. To increase volume,...
... it extends. Turn it counterclockwise to decrease volume. Just: 1. Tune in this knob to recall the station frequency. FADE: Press this knob lightly so it to move the sound to the left or right speakers. Press and hold one of your favorite stations. Turn it extends. PUSHBUTTONS:...range. Push these knobs back into its stored position when you return to your audio system. Finding a Station AM/FM: Press this button to switch between the speakers. Setting the Tone EQUALIZER: A seven-band equalizer is built to work well in the desired station. 4. To increase volume,...

Owner's Manual
Page 156
Turn it . This feature requires power windows and door locks. TUNE: Press this knob lightly so it to display the clock. Turn the radio on and off , the clock will show for details. If you press the knob when the ... Compact Disc Player and Equalizer (not shown), included are four speakers. Tune in the desired station. 3-10 Finding a Station AM/FM: Press this button to switch between AM, FM1 and FM2. Just: 1. To increase volume, turn the system on . 2. yellowblue AM-FM Stereo with Compact Disc Player and Equalizer (If Equipped...
Turn it . This feature requires power windows and door locks. TUNE: Press this knob lightly so it to display the clock. Turn the radio on and off , the clock will show for details. If you press the knob when the ... Compact Disc Player and Equalizer (not shown), included are four speakers. Tune in the desired station. 3-10 Finding a Station AM/FM: Press this button to switch between AM, FM1 and FM2. Just: 1. To increase volume, turn the system on . 2. yellowblue AM-FM Stereo with Compact Disc Player and Equalizer (If Equipped...

Owner's Manual
Page 287
... not light, check to make sure that is securely fastened to it. To replace a headlamp: 1. See "Headlamp Doors" in the Index to check the type of headlamp bulb you need to use before you begin to the parking lamps position. Remove the bezel using a Phillips screwdriver on , then turning the switch back...
... not light, check to make sure that is securely fastened to it. To replace a headlamp: 1. See "Headlamp Doors" in the Index to check the type of headlamp bulb you need to use before you begin to the parking lamps position. Remove the bezel using a Phillips screwdriver on , then turning the switch back...

Owner's Manual
Page 365
...Conditioning Refrigerants ...6-72 Alarm ...2-13 Arming the System ...2-15 Disarming the System ...2-16 Passive Arming ...2-16 Power Door Lock Switch Locking ...2-15 Shock Sensor ...2-14 Alignment and Balance, Tire ...6-53 Aluminum Wheels, Cleaning ...6-61 Antenna, Power Mast Care... ...3-23 Antifreeze ...6-28 Anti-Lock Brake System Warning Light ...2-81, 4-7 Brakes ...4-7 Appearance Care ...6-55 A Appearance Care Materials ...6-63 Arbitration Program ...8-4 Ashtrays ...2-57 Audio Controls, Steering Wheel...
...Conditioning Refrigerants ...6-72 Alarm ...2-13 Arming the System ...2-15 Disarming the System ...2-16 Passive Arming ...2-16 Power Door Lock Switch Locking ...2-15 Shock Sensor ...2-14 Alignment and Balance, Tire ...6-53 Aluminum Wheels, Cleaning ...6-61 Antenna, Power Mast Care... ...3-23 Antifreeze ...6-28 Anti-Lock Brake System Warning Light ...2-81, 4-7 Brakes ...4-7 Appearance Care ...6-55 A Appearance Care Materials ...6-63 Arbitration Program ...8-4 Ashtrays ...2-57 Audio Controls, Steering Wheel...
Owner's Manual
Page 366
...Adjustment ...6-37 Fluid ...6-34 Master Cylinder ...6-34 Parking ...2-36 Pedal Travel ...6-37 Replacing System Parts ...6-37 System Warning Light ...2-80 Trailer ...4-36 Transmission Shift Interlock Check ...2-30, 7-19 Wear ...6-36 Brakes, Anti-Lock ...4-7 Braking ...4-6 Braking... ...7-20 Manual Transmission ...7-18 Parking Brake Mechanism ...7-20 Restraints System ...7-18 Starter Switch ...7-19 Tires Inflation ...7-17 Windshield Washer Fluid Level ...7-17 Wiper Blade ...7-18 Check Gages Light ...2-89 Checking Your Restraint Systems ...1-50 Chemical Paint Spotting ...6-62 Child Restraints ...1-...
...Adjustment ...6-37 Fluid ...6-34 Master Cylinder ...6-34 Parking ...2-36 Pedal Travel ...6-37 Replacing System Parts ...6-37 System Warning Light ...2-80 Trailer ...4-36 Transmission Shift Interlock Check ...2-30, 7-19 Wear ...6-36 Brakes, Anti-Lock ...4-7 Braking ...4-6 Braking... ...7-20 Manual Transmission ...7-18 Parking Brake Mechanism ...7-20 Restraints System ...7-18 Starter Switch ...7-19 Tires Inflation ...7-17 Windshield Washer Fluid Level ...7-17 Wiper Blade ...7-18 Check Gages Light ...2-89 Checking Your Restraint Systems ...1-50 Chemical Paint Spotting ...6-62 Child Restraints ...1-...

Owner's Manual
Page 372
...Passive Arming ...2-16 Pass-KeyR II ...2-16 Periodic Maintenance Inspections ...7-21 Persons with Disabilities, GM Mobility Program ...8-7 Pontiac Cares Information ...8-2 Power Accessory Plug ...2-58 Antenna Mast Care ...3-23 Door Locks ...2-5 Four-Way Lumbar Driver's Seat ...1-4 Option Fuses ...6-65......4-11 Steering Fluid ...6-31 Windows ...2-42 Power Door Lock Switch Locking ...2-15 Power, Retained Accessory ...2-53 Power Steering Fluid How to Check ...6-32 What to Use ...6-32 When to Reset the Light ...6-17 Low Light ...2-87 Pressure Gage ...2-86 Overdrive, Automatic Transmission ...2-31 ...
...Passive Arming ...2-16 Pass-KeyR II ...2-16 Periodic Maintenance Inspections ...7-21 Persons with Disabilities, GM Mobility Program ...8-7 Pontiac Cares Information ...8-2 Power Accessory Plug ...2-58 Antenna Mast Care ...3-23 Door Locks ...2-5 Four-Way Lumbar Driver's Seat ...1-4 Option Fuses ...6-65......4-11 Steering Fluid ...6-31 Windows ...2-42 Power Door Lock Switch Locking ...2-15 Power, Retained Accessory ...2-53 Power Steering Fluid How to Check ...6-32 What to Use ...6-32 When to Reset the Light ...6-17 Low Light ...2-87 Pressure Gage ...2-86 Overdrive, Automatic Transmission ...2-31 ...

Owner's Manual
Page 374
... of PARK (P) ...2-39 Shock Sensor ...2-14 Signaling Turns ...2-44 Sixth Gear, Manual Transmission ...2-34 Skidding ...4-15 Skip Shift Light ...2-35 Sound Equipment, Adding ...3-20 Spare Tire, Compact ...5-36 Specifications and Capacities ...6-71 Specifications, Engine ...6-72 Speech Impaired,... Customer Assistance ...8-5 Speedometer ...2-77 SRS ...1-23 Stains, Cleaning ...6-55 Starter Switch Check ...7-19 Starting Your Engine ...2-25 Steam ...5-10 Steering ...4-11 Audio Wheel Controls ...3-19 In Emergencies ...4-12 Power ...4-11...
... of PARK (P) ...2-39 Shock Sensor ...2-14 Signaling Turns ...2-44 Sixth Gear, Manual Transmission ...2-34 Skidding ...4-15 Skip Shift Light ...2-35 Sound Equipment, Adding ...3-20 Spare Tire, Compact ...5-36 Specifications and Capacities ...6-71 Specifications, Engine ...6-72 Speech Impaired,... Customer Assistance ...8-5 Speedometer ...2-77 SRS ...1-23 Stains, Cleaning ...6-55 Starter Switch Check ...7-19 Starting Your Engine ...2-25 Steam ...5-10 Steering ...4-11 Audio Wheel Controls ...3-19 In Emergencies ...4-12 Power ...4-11...


