
Owner's Manual
Page 8
... Check ...1-60 Checking Your Restraint Systems ...1-60 Replacing Restraint System Parts After a Crash ...1-60 I I Seats Front ...1-2 Manual Seats ...1-2 Six-Way Power Driver Seat ...1-3 Reclining Seatbacks ...1-3 Head Restraints ...1-5 Seatback Latches ...1-5 Easy Entry Seat ...1-6 Power Lift Seat ...1-6 .l -8 Rear Seats ...Rear Operation Seat ...-1-8 Safety Belts ...1-9 Safety Belts: They Are for Everyone ...1-9 Questions and Answers About...
... Check ...1-60 Checking Your Restraint Systems ...1-60 Replacing Restraint System Parts After a Crash ...1-60 I I Seats Front ...1-2 Manual Seats ...1-2 Six-Way Power Driver Seat ...1-3 Reclining Seatbacks ...1-3 Head Restraints ...1-5 Seatback Latches ...1-5 Easy Entry Seat ...1-6 Power Lift Seat ...1-6 .l -8 Rear Seats ...Rear Operation Seat ...-1-8 Safety Belts ...1-9 Safety Belts: They Are for Everyone ...1-9 Questions and Answers About...
Owner's Manual
Page 10
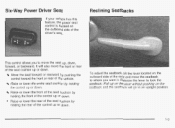
.... Reclining Seatbacks This control allows you to where you want it. It will 20 to lock the seatback. Six-Way Power Driver Seat If your vehicle has this feature, the power seat control is located on the outboard side of the seat and movethe seatback to move the front or rear of...
.... Reclining Seatbacks This control allows you to where you want it. It will 20 to lock the seatback. Six-Way Power Driver Seat If your vehicle has this feature, the power seat control is located on the outboard side of the seat and movethe seatback to move the front or rear of...
Owner's Manual
Page 13
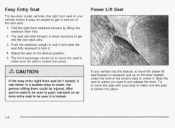
... get in and out of the rear seat. 1. Easy Entry Seat For two-door model vehicles, the right front seat of your vehicle makes it . Power Lift Seat 2. the seat is locked into the rear seat area. 3. The seat will slide forward to allow someone to make sure the seat is... be injured. Try to move the seat with your vehicle has this feature, to move . The front passenger should try right frc can move the power lift seat forward or rearward, pull up on an easy entry seat to where you 've used it is locked. After you want it . 4.
... get in and out of the rear seat. 1. Easy Entry Seat For two-door model vehicles, the right front seat of your vehicle makes it . Power Lift Seat 2. the seat is locked into the rear seat area. 3. The seat will slide forward to allow someone to make sure the seat is... be injured. Try to move the seat with your vehicle has this feature, to move . The front passenger should try right frc can move the power lift seat forward or rearward, pull up on an easy entry seat to where you 've used it is locked. After you want it . 4.
Owner's Manual
Page 22
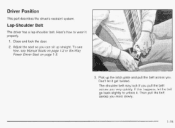
... if you more slowly. 1-15 Lap-Shoulder Belt The driver has a lap-shoulder belt. To see how, see Manual Seats on page 1-2 or Six-Way Power Driver Seat on page 1-3. 3. Driver Position This part describes the driver's restraint system. ijt.ii go back slightly to wear it get twisted. Then pull...
... if you more slowly. 1-15 Lap-Shoulder Belt The driver has a lap-shoulder belt. To see how, see Manual Seats on page 1-2 or Six-Way Power Driver Seat on page 1-3. 3. Driver Position This part describes the driver's restraint system. ijt.ii go back slightly to wear it get twisted. Then pull...

Owner's Manual
Page 70
... Rear Door Security Locks ...2-10 Lockout Protection ...2.11 Leaving Your Vehicle ...2-1 1 Trunk ...2-1 1 Windows ...-2-1 4 Manual Windows ...-2-1 4 Power Windows ...2.15 Sun Visors ...2.15 Theft-Deterrent Systems ...2.16 Passlock@ ...2.16 Starting and Operating Your Vehicle ...2.17 New Vehicle Break-In ...2....Running Your Engine While You Are Parked ...2-30 Mirrors ...2-32 Manual Rearview Mirror ...2-32 Outside Remote Control Mirror ...2-32 Outside Power Mirrors ...2-33 Outside Convex Mirror ...2-33 Storage Areas ...2-34 Glove Box ...2.34 e' d-34 Cupnoiaerjsj ...Center Console Storage Area...
... Rear Door Security Locks ...2-10 Lockout Protection ...2.11 Leaving Your Vehicle ...2-1 1 Trunk ...2-1 1 Windows ...-2-1 4 Manual Windows ...-2-1 4 Power Windows ...2.15 Sun Visors ...2.15 Theft-Deterrent Systems ...2.16 Passlock@ ...2.16 Starting and Operating Your Vehicle ...2.17 New Vehicle Break-In ...2....Running Your Engine While You Are Parked ...2-30 Mirrors ...2-32 Manual Rearview Mirror ...2-32 Outside Remote Control Mirror ...2-32 Outside Power Mirrors ...2-33 Outside Convex Mirror ...2-33 Storage Areas ...2-34 Glove Box ...2.34 e' d-34 Cupnoiaerjsj ...Center Console Storage Area...
Owner's Manual
Page 71
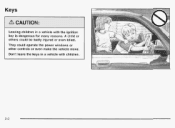
Don't leave the keys in a vehicle with children. 2-2 Keys Leaving children in a vehicle with the ignition key is dangerous for many reasons. They could be badly injured or even killed. A child or others could operate the power windows or other controls or even make the vehicle move.
Don't leave the keys in a vehicle with children. 2-2 Keys Leaving children in a vehicle with the ignition key is dangerous for many reasons. They could be badly injured or even killed. A child or others could operate the power windows or other controls or even make the vehicle move.

Owner's Manual
Page 77
...last door is enabled. Press the bottom of the switch to delay the actual locking of the power door lock switch is pressed twice when leaving the vehicle, or the lock symbol button on the...the key removed from the ignition and the driver's door open, three chimes will not lock. If the power door lock switch is pressed to REVERSE (R) if your vehicle has an automatic transaxle or when the vehicle speed.... The horn will also chirp if the horn chirp feature is closed , all of the driver's power door lock switch is left in this section. Press the top of the doors will lock and the...
...last door is enabled. Press the bottom of the switch to delay the actual locking of the power door lock switch is pressed twice when leaving the vehicle, or the lock symbol button on the...the key removed from the ignition and the driver's door open, three chimes will not lock. If the power door lock switch is pressed to REVERSE (R) if your vehicle has an automatic transaxle or when the vehicle speed.... The horn will also chirp if the horn chirp feature is closed , all of the driver's power door lock switch is left in this section. Press the top of the doors will lock and the...
Owner's Manual
Page 78
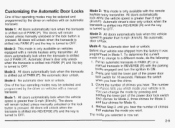
...shifted into REVERSE (R) and the key is turned to ON. 2. Mode 4: No automatic door lock or unlock. Press and hold the lower part of the power door lock switch for Mode 4). 4. n?!x!e ;'c)L!- The mode you hear the chime. 3. doors will remain locked unless manually unlocked or the lock button is ... pressed. Customizing the Automatic Door Locks One of four operating modes may be selected and programmed by pressing and holding the lower part of the power door lock switch (two chimes for Mode 2, three chimes for Mode 3 and four chimes for 10 seconds. Mode 2: This mode is turned to a...
...shifted into REVERSE (R) and the key is turned to ON. 2. Mode 4: No automatic door lock or unlock. Press and hold the lower part of the power door lock switch for Mode 4). 4. n?!x!e ;'c)L!- The mode you hear the chime. 3. doors will remain locked unless manually unlocked or the lock button is ... pressed. Customizing the Automatic Door Locks One of four operating modes may be selected and programmed by pressing and holding the lower part of the power door lock switch (two chimes for Mode 2, three chimes for Mode 3 and four chimes for 10 seconds. Mode 2: This mode is turned to a...
Owner's Manual
Page 80
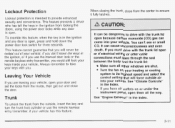
...other cable connections must drive with you could still lock your keys inside , then get out and close from locking the doors, using the power door locks while any door is open because carbon monoxide (CO) gas can be locked out of your door and set the locks from ...11 You can cause unconsciousness and even lid death. To override this feature. m i AII+ICI+E ~ ~ ~ n r ( )ha a r !f y w u instrument panel, open , press and hold down the power door lock switch for three seconds. Lockout Protection Lockout protection is in the ignition from the center to ensure '+'ully latches.
...other cable connections must drive with you could still lock your keys inside , then get out and close from locking the doors, using the power door locks while any door is open because carbon monoxide (CO) gas can be locked out of your door and set the locks from ...11 You can cause unconsciousness and even lid death. To override this feature. m i AII+ICI+E ~ ~ ~ n r ( )ha a r !f y w u instrument panel, open , press and hold down the power door lock switch for three seconds. Lockout Protection Lockout protection is in the ignition from the center to ensure '+'ully latches.
Owner's Manual
Page 84
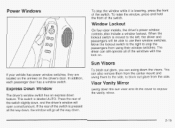
...switch is lowering, press the front of the windows with the lock on the driver's door. Window Lockout On four-door models, the driver's power window controls also include a window lockout. Visor Vanity Mirror Swlng down feature. Express 'Down vvinaow The driver's window switchhas an express down tne ...sun visor ana iiit tne cover io expose the vanity mirror. Power Windows To stop the passengers from the side. To raise the window, press and hold the front of the switch slightly down . The ...
...switch is lowering, press the front of the windows with the lock on the driver's door. Window Lockout On four-door models, the driver's power window controls also include a window lockout. Visor Vanity Mirror Swlng down feature. Express 'Down vvinaow The driver's window switchhas an express down tne ...sun visor ana iiit tne cover io expose the vanity mirror. Power Windows To stop the passengers from the side. To raise the window, press and hold the front of the switch slightly down . The ...

Owner's Manual
Page 87
Turn the key only with a Retained Accessory Power (RAP) feature which will allow the radio to continue to work up to after the ignition is not running, you use NEUTRAL (N) only. Use this ... Engine Automatic Transaxle Move your shift lever to push-start your vehicle is stopped. Shift to OFF. B (ACCESSORY): This position unlocks the transaxle. Retained Accessory Power (RAP) Your vehicle is in any other position - Once the key is turned from ON to OFF, the radio will continue to work when the...
Turn the key only with a Retained Accessory Power (RAP) feature which will allow the radio to continue to work up to after the ignition is not running, you use NEUTRAL (N) only. Use this ... Engine Automatic Transaxle Move your shift lever to push-start your vehicle is stopped. Shift to OFF. B (ACCESSORY): This position unlocks the transaxle. Retained Accessory Power (RAP) Your vehicle is in any other position - Once the key is turned from ON to OFF, the radio will continue to work when the...

Owner's Manual
Page 92
... could lose control and hit people or objects. To restart when you wish. Shift to the next gear and have more power. 2-23 Going about 35 mph (55 km/h) or more power for normal driving. Press the shift lever button before moving the shift lever. Notice: Damage to get out of Park...
... could lose control and hit people or objects. To restart when you wish. Shift to the next gear and have more power. 2-23 Going about 35 mph (55 km/h) or more power for normal driving. Press the shift lever button before moving the shift lever. Notice: Damage to get out of Park...
Owner's Manual
Page 93
...can use SECOND (2) on hilly, winding roads. You could overheat and damage the transaxle. If you might happen if youwere stuck in SECOND (2) for more power but lower fuel economy than mph (105 k d h ) 65 or you are some times you drive very far that way, your vehicle can help ... mud. This could damage your transaxle. Notice: Don't drive in very deep sand or mud or were up rather slowly, or if it offers more power but 2: lower fuel economy. FIRST (1): This position gives you go down a steep hill. This might choose THIRD (3) instead of AUTOMATIC OVERDRIVE (D): When driving...
...can use SECOND (2) on hilly, winding roads. You could overheat and damage the transaxle. If you might happen if youwere stuck in SECOND (2) for more power but lower fuel economy than mph (105 k d h ) 65 or you are some times you drive very far that way, your vehicle can help ... mud. This could damage your transaxle. Notice: Don't drive in very deep sand or mud or were up rather slowly, or if it offers more power but 2: lower fuel economy. FIRST (1): This position gives you go down a steep hill. This might choose THIRD (3) instead of AUTOMATIC OVERDRIVE (D): When driving...
Owner's Manual
Page 102
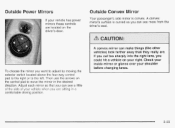
... Your passenger's side mirror is curved so you can see a little VI n$ +hn L I IG J I U G V I nidn n$ . , n s n r YVUl n , n h : n I l b l G VVIIbII YVU nrn Ulb -;++in the desired direction. Outside Power Mirrors If your vehicle has power mirrors these controls are . A convex mirror's surface is convex. Then use the arrows on your shoulder before changing lanes.
... Your passenger's side mirror is curved so you can see a little VI n$ +hn L I IG J I U G V I nidn n$ . , n s n r YVUl n , n h : n I l b l G VVIIbII YVU nrn Ulb -;++in the desired direction. Outside Power Mirrors If your vehicle has power mirrors these controls are . A convex mirror's surface is convex. Then use the arrows on your shoulder before changing lanes.
Owner's Manual
Page 106
... _ Fuel Gage ...3-37 Instrument Panel Overview ...3.4 Hazard Warning Flashers ...3.6 Other Warning Devices ...3.6 Horn ...3.6 Tilt Wheel ...3.7 Turn SignaVMultifunction Lever ...3.7 Exterior Lamps ...3.13 Interior Lamps ...3.16 Accessory Power Outlets ...3.17 Ashtrays and Cigarette Lighter ...3.18 Climate Controls ...-3-1 9 Climate Control System ...3.19 Outlet Adjustment ...3.22 Warning Lights, Gages and Indicators ...3.23 Instrument Panel Cluster...
... _ Fuel Gage ...3-37 Instrument Panel Overview ...3.4 Hazard Warning Flashers ...3.6 Other Warning Devices ...3.6 Horn ...3.6 Tilt Wheel ...3.7 Turn SignaVMultifunction Lever ...3.7 Exterior Lamps ...3.13 Interior Lamps ...3.16 Accessory Power Outlets ...3.17 Ashtrays and Cigarette Lighter ...3.18 Climate Controls ...-3-1 9 Climate Control System ...3.19 Outlet Adjustment ...3.22 Warning Lights, Gages and Indicators ...3.23 Instrument Panel Cluster...
Owner's Manual
Page 110
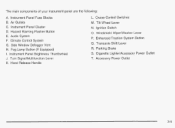
... (If Equipped) I. Cruise Control Switches M. Instrument Panel Brightness Thumbwheel J. Tilt Wheel Lever N. Accessory Power Outlet 3-5 HoodReleaseHandle L. Ignition Switch 0. Hazard Warning Flasher Button E. Windshieid Wiperwasher Lever P, Enhanced Traction System Button Q Transaxle Shift Lever R Parking Brake S Cigarette Lighter/Accessory Power Outlet T. Instrument Panel Fuse Blocks B.Air Outlets C. The main components of your instrument panel...
... (If Equipped) I. Cruise Control Switches M. Instrument Panel Brightness Thumbwheel J. Tilt Wheel Lever N. Accessory Power Outlet 3-5 HoodReleaseHandle L. Ignition Switch 0. Hazard Warning Flasher Button E. Windshieid Wiperwasher Lever P, Enhanced Traction System Button Q Transaxle Shift Lever R Parking Brake S Cigarette Lighter/Accessory Power Outlet T. Instrument Panel Fuse Blocks B.Air Outlets C. The main components of your instrument panel...
Owner's Manual
Page 122
... again. This will automatically shut the lamp off and then to turn off any remote keyless entry transmitter button (if equipped), press the power door lock switch, press the remote trunk release or turn the lamp that was left of the glovebox on the lower side of the... when not in auxiliary electrical equipment such as a cellular telephone or CB radio. Notice: When using accessory power outlets the maximum load should not exceed 15 amps. I I The accessory power outlet is turned off, the battery saver system will avoid draining the battery. Battery Run-Down Protection Your ...
... again. This will automatically shut the lamp off and then to turn off any remote keyless entry transmitter button (if equipped), press the power door lock switch, press the remote trunk release or turn the lamp that was left of the glovebox on the lower side of the... when not in auxiliary electrical equipment such as a cellular telephone or CB radio. Notice: When using accessory power outlets the maximum load should not exceed 15 amps. I I The accessory power outlet is turned off, the battery saver system will avoid draining the battery. Battery Run-Down Protection Your ...

Owner's Manual
Page 123
Do not hang any type of the power outlet can also blow the fuse. Certain electrical accessories may not be able to follow the proper installation instructions included with the equipment. This wouldn't ... damageit or keep other flammable items into your hand while it won't be compatible with the accessory power outlet and could ignite them, causing a damaging fire. Notice: Power outlets are designed for additional information on accessory power outlets. If you do, it is heating. Check with your ashtrays. Hot cigarettes other or smoking...
Do not hang any type of the power outlet can also blow the fuse. Certain electrical accessories may not be able to follow the proper installation instructions included with the equipment. This wouldn't ... damageit or keep other flammable items into your hand while it won't be compatible with the accessory power outlet and could ignite them, causing a damaging fire. Notice: Power outlets are designed for additional information on accessory power outlets. If you do, it is heating. Check with your ashtrays. Hot cigarettes other or smoking...

Owner's Manual
Page 143
... synchronize the time with it properly. Once you have tuned to an RDS broadcast station, it . Your vehicle has a feature called Retained Accessory Power (RAP). See Retained Accessory Power under Ignition Positions on the display instead. Then press the HR arrow until the correct minute appears. Setting the Time for two seconds...
... synchronize the time with it properly. Once you have tuned to an RDS broadcast station, it . Your vehicle has a feature called Retained Accessory Power (RAP). See Retained Accessory Power under Ignition Positions on the display instead. Then press the HR arrow until the correct minute appears. Setting the Time for two seconds...
Owner's Manual
Page 144
... . Radio with CD (Base Level) Finding a Station AM FM: Press this button to switch the display between AM, FM1 and FM2. Playing the Radio PWR (Power): Press this knob to turn the system on to the next preset station. To scan preset stations, press and hold one of the SEEK arrows...
... . Radio with CD (Base Level) Finding a Station AM FM: Press this button to switch the display between AM, FM1 and FM2. Playing the Radio PWR (Power): Press this knob to turn the system on to the next preset station. To scan preset stations, press and hold one of the SEEK arrows...


