

Owner's Manual
Page 140
... it . The lever on the instrument panel cluster will flash in the direction of the steering column includes the following: D Turn and Lane-Change Signals D Headlamp High/Low-Beam Changer D Flash-to flash. These positions allow you complete your turn signal. 2-58 When the turn is finished, the lever will return...
... it . The lever on the instrument panel cluster will flash in the direction of the steering column includes the following: D Turn and Lane-Change Signals D Headlamp High/Low-Beam Changer D Flash-to flash. These positions allow you complete your turn signal. 2-58 When the turn is finished, the lever will return...
Owner's Manual
Page 141
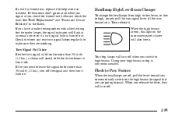
...-Beam Changer To change the headlamps from high to low beam, or low to high, simply pull the turn , check for burned-out bulbs and check the fuse. Then release it ... (1.2 km), turn off the signal and then turn signal lamps regularly to make sure they will turn off . 2-59 Flash-to-Pass Feature When the headlamps are working. See "Bulb Replacement" and "Fuses and Circuit Breakers" in fog is burned out. If you have a trailer towing option with added wiring for...
...-Beam Changer To change the headlamps from high to low beam, or low to high, simply pull the turn , check for burned-out bulbs and check the fuse. Then release it ... (1.2 km), turn off the signal and then turn signal lamps regularly to make sure they will turn off . 2-59 Flash-to-Pass Feature When the headlamps are working. See "Bulb Replacement" and "Fuses and Circuit Breakers" in fog is burned out. If you have a trailer towing option with added wiring for...

Owner's Manual
Page 147
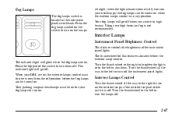
Exterior Lamps (Off): Turning the control to this setting will activate the automatic headlamp control when it is dark enough outside and turn off all of the lamps and lights during the day, except the Daytime Running Lamps (DRL). (... to this setting turns on the left side of the steering column operates the exterior lamps. 2-65 The control on the headlamps, together with the following: D Sidemarker Lamps D Taillamps D Instrument Panel Lights (Headlamps): Turning the control to this setting turns on the parking lamps together with the previously listed lamps and lights.
Exterior Lamps (Off): Turning the control to this setting will activate the automatic headlamp control when it is dark enough outside and turn off all of the lamps and lights during the day, except the Daytime Running Lamps (DRL). (... to this setting turns on the left side of the steering column operates the exterior lamps. 2-65 The control on the headlamps, together with the following: D Sidemarker Lamps D Taillamps D Instrument Panel Lights (Headlamps): Turning the control to this setting turns on the parking lamps together with the previously listed lamps and lights.

Owner's Manual
Page 148
... make it 's dark enough outside , the exterior lamps will stay off , set the parking brake while the ignition is in Canada. The DRL and automatic headlamp control will turn off , and D the parking brake is released. 2-66 Lamps on Reminder If the driver's door is opened and you turn the ignition... need to see the front of the instrument panel makes the DRL work, so be sure it isn't covered. As with the DRL and automatic headlamp control off until you need it. A light sensor on . When the DRL are on, only your front parking and turn signal lamps come on automatically...
... make it 's dark enough outside , the exterior lamps will stay off , set the parking brake while the ignition is in Canada. The DRL and automatic headlamp control will turn off , and D the parking brake is released. 2-66 Lamps on Reminder If the driver's door is opened and you turn the ignition... need to see the front of the instrument panel makes the DRL work, so be sure it isn't covered. As with the DRL and automatic headlamp control off until you need it. A light sensor on . When the DRL are on, only your front parking and turn signal lamps come on automatically...
Owner's Manual
Page 149
... Control This feature controls the brightness of the switch to turn them . Press the top part of the instrument panel lights. Your parking lamps or headlamps must first be turned on when the exterior lamps control is in any position. Turn the thumbwheel all the way to the right to high... the lights or to the left to dim them off . At night, when the light sensor automatically turns on your DRL are on . When your headlamps, the fog lamps can be turned from the off the instrument panel lights.
... Control This feature controls the brightness of the switch to turn them . Press the top part of the instrument panel lights. Your parking lamps or headlamps must first be turned on when the exterior lamps control is in any position. Turn the thumbwheel all the way to the right to high... the lights or to the left to dim them off . At night, when the light sensor automatically turns on your DRL are on . When your headlamps, the fog lamps can be turned from the off the instrument panel lights.
Owner's Manual
Page 278
... eyes to readjust to slow down on your vehicle clean -- inside rearview mirror to see as in a turn or curve. Some drivers suffer from headlamps behind you are wise to wear sunglasses. D Adjust your inside and out. D Slow down a little. It can be examined regularly. Glare at... aware of a roadway when you do in dim light -- the inability to reduce the glare from night blindness -- What you are faced with misaimed headlamps), slow down , especially on the glass. For example, if you 're driving, don't wear sunglasses at night as we get older these differences...
... eyes to readjust to slow down on your vehicle clean -- inside rearview mirror to see as in a turn or curve. Some drivers suffer from headlamps behind you are wise to wear sunglasses. D Adjust your inside and out. D Slow down a little. It can be examined regularly. Glare at... aware of a roadway when you do in dim light -- the inability to reduce the glare from night blindness -- What you are faced with misaimed headlamps), slow down , especially on the glass. For example, if you 're driving, don't wear sunglasses at night as we get older these differences...

Owner's Manual
Page 281
... city streets is the amount of the biggest problems with proper tread depth. D 4-20 If you try to traffic signals. not just your low-beam headlamps -- Allow yourself more visible to have your view restricted by road spray. You'll want to watch out for what the other vehicle occupants could...
... city streets is the amount of the biggest problems with proper tread depth. D 4-20 If you try to traffic signals. not just your low-beam headlamps -- Allow yourself more visible to have your view restricted by road spray. You'll want to watch out for what the other vehicle occupants could...
Owner's Manual
Page 290
..., shut the engine off and close the window almost all the way to restart the vehicle, and possibly for the heat that is in your headlamps. CO could overcome you and kill you must. And check around the base of your vehicle, especially any that you feel really uncomfortable from time...
..., shut the engine off and close the window almost all the way to restart the vehicle, and possibly for the heat that is in your headlamps. CO could overcome you and kill you must. And check around the base of your vehicle, especially any that you feel really uncomfortable from time...
Owner's Manual
Page 378
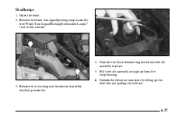
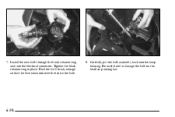
Open the hood. 2. Remove the front turn signal/parking lamp assembly. Unscrew the black retainer ring that holds the bulb assembly in this section. 4. Unhook the electrical connector by lifting up from the lamp housing. 6. Remove the two wing nuts located on top of the headlamp assembly. 6-37 Pull the bulb assembly straight up the blue tabs and pulling the bulb out. 3. Headlamps 1. See "Front Turn Signal/Parking/Sidemarker Lamps" later in place. 5.
Open the hood. 2. Remove the front turn signal/parking lamp assembly. Unscrew the black retainer ring that holds the bulb assembly in this section. 4. Unhook the electrical connector by lifting up from the lamp housing. 6. Remove the two wing nuts located on top of the headlamp assembly. 6-37 Pull the bulb assembly straight up the blue tabs and pulling the bulb out. 3. Headlamps 1. See "Front Turn Signal/Parking/Sidemarker Lamps" later in place. 5.
Owner's Manual
Page 379
Push the bulb firmly enough so that the blue tabs hook over the tab on the headlamp aiming bar. 6-38 Tighten the black retainer ring in place. Be careful not to damage the bulb on the bulb. 8. 7. Carefully put the bulb assembly back into the electrical connector. Install the new bulb through the black retainer ring and into the lamp housing.
Push the bulb firmly enough so that the blue tabs hook over the tab on the headlamp aiming bar. 6-38 Tighten the black retainer ring in place. Be careful not to damage the bulb on the bulb. 8. 7. Carefully put the bulb assembly back into the electrical connector. Install the new bulb through the black retainer ring and into the lamp housing.
Owner's Manual
Page 380
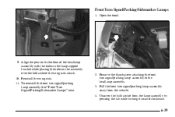
...1. Reinstall the wing nuts. 11. Unscrew the bulb socket from the vehicle. 4. To reinstall the front turn signal/parking lamp assembly to the headlamp assembly. 3. Remove the thumbscrew attaching the front turn signal/parking lamp assembly See "Front Turn Signal/Parking/Sidemarker Lamps" next. 2. Pull the ... lamp assembly by pressing the tab while turning it counterclockwise. 6-39 Open the hood. 9. Align the pins on the bottom of the headlamp assembly with the holes in the lamp support bracket while placing the holes in the assembly over the bolts where the wing nuts attach....
...1. Reinstall the wing nuts. 11. Unscrew the bulb socket from the vehicle. 4. To reinstall the front turn signal/parking lamp assembly to the headlamp assembly. 3. Remove the thumbscrew attaching the front turn signal/parking lamp assembly See "Front Turn Signal/Parking/Sidemarker Lamps" next. 2. Pull the ... lamp assembly by pressing the tab while turning it counterclockwise. 6-39 Open the hood. 9. Align the pins on the bottom of the headlamp assembly with the holes in the lamp support bracket while placing the holes in the assembly over the bolts where the wing nuts attach....
Owner's Manual
Page 382
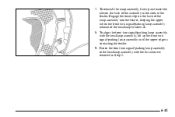
Engage the lower clip on the back of the lamp assembly into the fender, keeping the upper tab on the back of the headlamp bracket tab. 8. To reinstall the lamp assembly, line up the front turn signal/parking lamp assembly inboard of the assembly in the slots in Step 2. 6-...41 To align the front turn signal/parking lamp assembly to the headlamp assembly with the headlamp assembly, lift up and insert the tabs on the front turn signal/parking lamp assembly until the upper edge is contacting the fender. 9. Fasten...
Engage the lower clip on the back of the lamp assembly into the fender, keeping the upper tab on the back of the headlamp bracket tab. 8. To reinstall the lamp assembly, line up the front turn signal/parking lamp assembly inboard of the assembly in the slots in Step 2. 6-...41 To align the front turn signal/parking lamp assembly to the headlamp assembly with the headlamp assembly, lift up and insert the tabs on the front turn signal/parking lamp assembly until the upper edge is contacting the fender. 9. Fasten...

Owner's Manual
Page 393
... spinning the wheels with chains on your vehicle, stop and retighten them as tightly as possible with bearing life, brake cooling, speedometer or odometer calibration, headlamp aim, bumper height, vehicle ground clearance and tire or tire chain clearance to replace a wheel, use a new GM original equipment wheel. 6-52 If the contact...
... spinning the wheels with chains on your vehicle, stop and retighten them as tightly as possible with bearing life, brake cooling, speedometer or odometer calibration, headlamp aim, bumper height, vehicle ground clearance and tire or tire chain clearance to replace a wheel, use a new GM original equipment wheel. 6-52 If the contact...

Owner's Manual
Page 404
Electrical System Add-On Electrical Equipment Headlamp Wiring The headlamp wiring is protected by an internal circuit breaker in some electrical problem, be covered by an internal circuit breaker and a fuse. An electrical overload will ... your vehicle unless you check with your warranty. If the motor overheats due to heavy snow, etc., the wiper will cause the lamps to your headlamp wiring checked right away. When the current load is too heavy, the circuit breaker opens and closes, protecting the circuit until the motor cools.
Electrical System Add-On Electrical Equipment Headlamp Wiring The headlamp wiring is protected by an internal circuit breaker in some electrical problem, be covered by an internal circuit breaker and a fuse. An electrical overload will ... your vehicle unless you check with your warranty. If the motor overheats due to heavy snow, etc., the wiper will cause the lamps to your headlamp wiring checked right away. When the current load is too heavy, the circuit breaker opens and closes, protecting the circuit until the motor cools.
Owner's Manual
Page 406
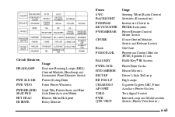
Fuses SWC BACKLIGHT PCM/PASS KEY/CLUSTER PWR MIRROR CRUISE Blank PCM/CRANK Circuit Breakers HEADLAMP Usage Daytime Running Lamps (DRL) Control Module, Headlamp and Instrument Panel Dimmer Switch Power Sliding Door Front Power Windows Six6-Way Power Seats and Rear Side Door Actuator Motor Blower Motor Hi Speed ...
Fuses SWC BACKLIGHT PCM/PASS KEY/CLUSTER PWR MIRROR CRUISE Blank PCM/CRANK Circuit Breakers HEADLAMP Usage Daytime Running Lamps (DRL) Control Module, Headlamp and Instrument Panel Dimmer Switch Power Sliding Door Front Power Windows Six6-Way Power Seats and Rear Side Door Actuator Motor Blower Motor Hi Speed ...

Owner's Manual
Page 407
..., Rear Windows Rear HVAC-A/C Control Rear Window Wiper Motor, Rear Window Wiper/Washer and Multifunction Switch (Rear Window Wiper/Washer Switch) Passenger's Side Low Beam Headlamp Passenger's Side High Beam Headlamp LH HEADLP LOW LH HEADLP HIGH 6-66
..., Rear Windows Rear HVAC-A/C Control Rear Window Wiper Motor, Rear Window Wiper/Washer and Multifunction Switch (Rear Window Wiper/Washer Switch) Passenger's Side Low Beam Headlamp Passenger's Side High Beam Headlamp LH HEADLP LOW LH HEADLP HIGH 6-66

Owner's Manual
Page 408
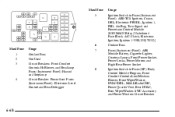
..., Temperature Door Actuator (Front) and Rear Window Defogger Relay BCM PRGRAM BCM Programming RH HEAD Driver's Side Low LP LOW Beam Headlamp RH HEAD Driver's Side High LP HIGH Beam Headlamp PCM/ABS IGN MAIN Relay and PCM, Electronic Brake Control Module Fuses Blank Blank Blank RAP RELAY Underhood Fuse Block This...
..., Temperature Door Actuator (Front) and Rear Window Defogger Relay BCM PRGRAM BCM Programming RH HEAD Driver's Side Low LP LOW Beam Headlamp RH HEAD Driver's Side High LP HIGH Beam Headlamp PCM/ABS IGN MAIN Relay and PCM, Electronic Brake Control Module Fuses Blank Blank Blank RAP RELAY Underhood Fuse Block This...
Owner's Manual
Page 409
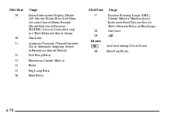
..., Rear Wiper/Washer. SWC Accessory and Power Window Circuit Breaker 6 Maxi Fuse 1 2 3 Usage Coolant Fans Not Used Circuit Breakers: Front Comfort Controls Hi Blower, and Headlamp Fuses (Instrument Panel): Hazard and Stoplamp Circuit Breaker: Power Seat. Fuses (Instrument Panel): Electronic Level Control and Rear Defogger 8 7 4 6-68
..., Rear Wiper/Washer. SWC Accessory and Power Window Circuit Breaker 6 Maxi Fuse 1 2 3 Usage Coolant Fans Not Used Circuit Breakers: Front Comfort Controls Hi Blower, and Headlamp Fuses (Instrument Panel): Hazard and Stoplamp Circuit Breaker: Power Seat. Fuses (Instrument Panel): Electronic Level Control and Rear Defogger 8 7 4 6-68
Owner's Manual
Page 411
... Relay Powertrain Control Module Radio Fog Lamp Relay Horn Relay Mini Fuse 37 Usage Daytime Running Lamps (DRL) Control Module, Headlamps and Instrument Panel Dimmer Switch Theft-Deterrent Relay to Headlamps Not Used AIR Air Conditioning Clutch Diode 38 39 Diodes 40 30 31 Mini Fuse Puller 32 33 34 35 36...
... Relay Powertrain Control Module Radio Fog Lamp Relay Horn Relay Mini Fuse 37 Usage Daytime Running Lamps (DRL) Control Module, Headlamps and Instrument Panel Dimmer Switch Theft-Deterrent Relay to Headlamps Not Used AIR Air Conditioning Clutch Diode 38 39 Diodes 40 30 31 Mini Fuse Puller 32 33 34 35 36...

Owner's Manual
Page 412
... ...11.9 quarts (11.3 L) Engine Oil with Filter ...4.5 quarts (4.25 L) Fuel Capacity Standard/Regular ...20.0 U.S. Capacities and Specifications The following approximate capacities are approximate. Replacement Bulbs Headlamps ...9004-HBI Front Turn Signal/Parking Lamps ...4157 NAK Front Sidemarker Lamps ...194 Stop/Taillamps (Top) ...3057 Signal Lamps (2nd from Top) ...3156 Back-Up...
... ...11.9 quarts (11.3 L) Engine Oil with Filter ...4.5 quarts (4.25 L) Fuel Capacity Standard/Regular ...20.0 U.S. Capacities and Specifications The following approximate capacities are approximate. Replacement Bulbs Headlamps ...9004-HBI Front Turn Signal/Parking Lamps ...4157 NAK Front Sidemarker Lamps ...194 Stop/Taillamps (Top) ...3057 Signal Lamps (2nd from Top) ...3156 Back-Up...

