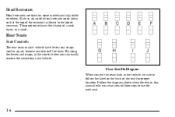
Owner's Manual
Page 18
... the top of the restraint is closest to adjust, remove and reinstall the seats. Follow the diagram above when the text in the vehicle, be sure to use for proper location. Floor Seat Pin Diagram When you put the seats back in this manual tells you can easily remove the seats from...
Owner's Manual
Page 23
... for the legs to attach correctly. The seat must go. Make sure the seat is in so they face rearward because they won't latch that diagram. D The left (40) section of the 40/60 split bench uses the A and B sets of the 50/50 split bench uses the See "Seat Controls...
Owner's Manual
Page 30
... then pulling it forward. The CENTER OR LEFT seat fits in the center location or in so they face rearward because they won't latch that diagram. Replacing the Bucket Seats Don't put the seats in either row, the E and F or I and J sets of floor cups.