
Owner's Manual
Page 7
Vehicle Symbols These are some other symbols you may see: DOOR LOCK UNLOCK TURN SIGNALS e WINDSHIELD DEFROSTER COOLANT TEMP BATTERY CHARGING SYSTEM - For example, these symbols are used on an original battery: CAUTION POSSIBLE INJURY PROTECT EYES BY SHIELDING CAUSTIC ...
Vehicle Symbols These are some other symbols you may see: DOOR LOCK UNLOCK TURN SIGNALS e WINDSHIELD DEFROSTER COOLANT TEMP BATTERY CHARGING SYSTEM - For example, these symbols are used on an original battery: CAUTION POSSIBLE INJURY PROTECT EYES BY SHIELDING CAUSTIC ...

Owner's Manual
Page 94
... key chain transmitter. All doors will unlock automatically when the ignition is closed, all the doors and the liftgate when leaving your vehicle. To turn the Last Door Closed Locking feature off while the shift lever is closed . Sliding Door Delayed Locking If the sliding door is open , the.... Three seconds after the last door is open when you have the dual sliding doors, all the doors will result in three chimes to signal that Last DoorClosed Locking is not locked. When any time, either manually or with the Remote Lock Control system and to lock and unlock ...
... key chain transmitter. All doors will unlock automatically when the ignition is closed, all the doors and the liftgate when leaving your vehicle. To turn the Last Door Closed Locking feature off while the shift lever is closed . Sliding Door Delayed Locking If the sliding door is open , the.... Three seconds after the last door is open when you have the dual sliding doors, all the doors will result in three chimes to signal that Last DoorClosed Locking is not locked. When any time, either manually or with the Remote Lock Control system and to lock and unlock ...
Owner's Manual
Page 140
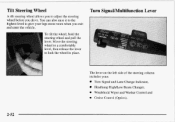
Move the steering wheel toa comfortable level, then release the lever to give your : Turn Signal and Lane Change Indicator, Headlamp High/Low Beam Changer, 0 0 Windshield Wiper and Washer Control and Cruise Control (Option). 2-52 , Turn SignaUMultifunction Lever The lever on the left sidethe steering column of includes your legs more room when you...
Move the steering wheel toa comfortable level, then release the lever to give your : Turn Signal and Lane Change Indicator, Headlamp High/Low Beam Changer, 0 0 Windshield Wiper and Washer Control and Cruise Control (Option). 2-52 , Turn SignaUMultifunction Lever The lever on the left sidethe steering column of includes your legs more room when you...

Owner's Manual
Page 141
...need to make sure they are on, this light on . To signal a turn or lane change . The lever will return automatically. If you to signal a turn signal lamps regularly to leave the signal on for more than normal, a signal bulb may be on the instrument cluster will flash in the Index... out, replace it to flash.Hold it off the signal and then turn is left )positions. Headlamp HigWLow Beam Changer To change . When the turn it . When the high beams are working. 2-53 Turn Signal Reminder Chime If either turn signal is finished, the lever will return by itself when you...
...need to make sure they are on, this light on . To signal a turn or lane change . The lever will return automatically. If you to signal a turn signal lamps regularly to leave the signal on for more than normal, a signal bulb may be on the instrument cluster will flash in the Index... out, replace it to flash.Hold it off the signal and then turn is left )positions. Headlamp HigWLow Beam Changer To change . When the turn it . When the high beams are working. 2-53 Turn Signal Reminder Chime If either turn signal is finished, the lever will return by itself when you...

Owner's Manual
Page 148
... must be on for your fog lamps to go out and the DRL will make your front parWturn signal lamps come on automatically. Your instrument panel won't be on , the headlamp switch is off, and...Then start the vehicle. The indicator light will glow. When it isn't covered. The DRL system will turn on. When the DRL are on, only your vehicle with any time you release the parking brake,... be lit up. A light sensor on top of the switch to turn them off. Fog Lamps r v I J To idle your front park/turn signal lamps will come on in the OFF or LOCK position. I The fogin the Instrument...
... must be on for your fog lamps to go out and the DRL will make your front parWturn signal lamps come on automatically. Your instrument panel won't be on , the headlamp switch is off, and...Then start the vehicle. The indicator light will glow. When it isn't covered. The DRL system will turn on. When the DRL are on, only your vehicle with any time you release the parking brake,... be lit up. A light sensor on top of the switch to turn them off. Fog Lamps r v I J To idle your front park/turn signal lamps will come on in the OFF or LOCK position. I The fogin the Instrument...

Owner's Manual
Page 221
..., however, can adapt to higher volumes of sound. The sound will give you the best sound. Your hearing can cause stations to interfere with FM signals, causing the sound to the radio, a cassettetape or a compact disc. Take precautions by adjusting the volume control on your radio to a safe sound level before...-FM: Press this button to 65 km). Press it again to hear the next selection. When playing a cassette tape or compact disc,press SEEK to turn on the sound. MUTE: Press this button to reduce this noise if you ever getit. AM can pick up arrow to tune to a higher radio...
..., however, can adapt to higher volumes of sound. The sound will give you the best sound. Your hearing can cause stations to interfere with FM signals, causing the sound to the radio, a cassettetape or a compact disc. Take precautions by adjusting the volume control on your radio to a safe sound level before...-FM: Press this button to 65 km). Press it again to hear the next selection. When playing a cassette tape or compact disc,press SEEK to turn on the sound. MUTE: Press this button to reduce this noise if you ever getit. AM can pick up arrow to tune to a higher radio...

Owner's Manual
Page 247
..., sometimes quitesharply. 4-21 Switch on the freeway, adjust your speed to the posted limit or to the freeway. Then use your turn signal, check your mirrors and glance over your turn signal. Once you are safest the of all roads. Expect to move to leave the freeway, move slightly slower at night. If you...
..., sometimes quitesharply. 4-21 Switch on the freeway, adjust your speed to the posted limit or to the freeway. Then use your turn signal, check your mirrors and glance over your turn signal. Once you are safest the of all roads. Expect to move to leave the freeway, move slightly slower at night. If you...

Owner's Manual
Page 263
... You really should not park your instrument panel will also flash, telling other drivers you're about to turn, change .Properly hooked up and extendthe life of engine and transaxle overheating. 3. Apply your signal when they are towing a trailer that they would get hot and no longer work well. Driving On... trailer wheels. When the wheel chocks are still working. The arrows on a hill, here's how to use your instrument panel will flash whenever you signal a turn signal flasher. On a long uphill grade, shift down and reduce your rig could start down , you might have to do it...
... You really should not park your instrument panel will also flash, telling other drivers you're about to turn, change .Properly hooked up and extendthe life of engine and transaxle overheating. 3. Apply your signal when they are towing a trailer that they would get hot and no longer work well. Driving On... trailer wheels. When the wheel chocks are still working. The arrows on a hill, here's how to use your instrument panel will flash whenever you signal a turn signal flasher. On a long uphill grade, shift down and reduce your rig could start down , you might have to do it...

Owner's Manual
Page 266
...police know you have a problem. L To turn signals won't work no matter what position your key is on your flashers. When the hazard warning flashers are on and off the flashers, push the switch down and it will flash on ,your turn off . Your hazard warning flashers letyou warn ...others. Press the button in . Your hazard warning flashers work . 5-2 Hazard Warning Flashers Your hazard warning flashers switch is in, and even if the key isn't in to turn signal lamps will pop back up...
...police know you have a problem. L To turn signals won't work no matter what position your key is on your flashers. When the hazard warning flashers are on and off the flashers, push the switch down and it will flash on ,your turn off . Your hazard warning flashers letyou warn ...others. Press the button in . Your hazard warning flashers work . 5-2 Hazard Warning Flashers Your hazard warning flashers switch is in, and even if the key isn't in to turn signal lamps will pop back up...

Owner's Manual
Page 329
Remove the front parking/turn signal lamp assembly. Halogen Bulbs Halogen bulbs have pressurized gas inside and can burst if you drop or scratch the bulb.You or others could be injured. Bulb Replacement For the type of bulbs, see "Jump Starting" in the Index. Open the hood. Be sure to read and follow the instructions on the bulb package. 6-31 Jump Starting For jump starting instructions, see "Replacement Bulbs" in the Index. 2. See "Front Parking/Turn Signal Lamps" later in this section. Headlamps 1.
Remove the front parking/turn signal lamp assembly. Halogen Bulbs Halogen bulbs have pressurized gas inside and can burst if you drop or scratch the bulb.You or others could be injured. Bulb Replacement For the type of bulbs, see "Jump Starting" in the Index. Open the hood. Be sure to read and follow the instructions on the bulb package. 6-31 Jump Starting For jump starting instructions, see "Replacement Bulbs" in the Index. 2. See "Front Parking/Turn Signal Lamps" later in this section. Headlamps 1.

Owner's Manual
Page 332
... assembly over the bolts where the wing nuts attach. 9. Front Parking/Turn Signal Lamps 1. Remove the thumb screw attaching the parkingkurn signal lamp assembly to the headlamp assembly. 8. Pull the parkinghurn signal lamp assembly away from the headlamp assembly. 3. Replace the parkinghurn signal lamp assembly by lining up the tabs at the back of the...
... assembly over the bolts where the wing nuts attach. 9. Front Parking/Turn Signal Lamps 1. Remove the thumb screw attaching the parkingkurn signal lamp assembly to the headlamp assembly. 8. Pull the parkinghurn signal lamp assembly away from the headlamp assembly. 3. Replace the parkinghurn signal lamp assembly by lining up the tabs at the back of the...

Owner's Manual
Page 333
To align the parking/turn signal lamp lamp housing until an audible clickheard (the tab is assembly until the upperedge is contacting the fender. Engage the lower clip the frontof the 5. parkinghm signallampassemblyinboard of tabs on fender. Fasten the parkinghurn signal lamp assembly the to...assembly with socket holes and screw the bulb sockets back into the8. Replacethebulb by pressing thetab while turning counterclockwise. 7. popping back out). 9. Line up the parking/turn signal lamp assembly with the headlamp assembly, lift up the tabs on the sockets the gaps in ...
To align the parking/turn signal lamp lamp housing until an audible clickheard (the tab is assembly until the upperedge is contacting the fender. Engage the lower clip the frontof the 5. parkinghm signallampassemblyinboard of tabs on fender. Fasten the parkinghurn signal lamp assembly the to...assembly with socket holes and screw the bulb sockets back into the8. Replacethebulb by pressing thetab while turning counterclockwise. 7. popping back out). 9. Line up the parking/turn signal lamp assembly with the headlamp assembly, lift up the tabs on the sockets the gaps in ...

Owner's Manual
Page 334
Line up the tabs on the sockets with the gaps in the socket holes and screw the bulb sockets back into the lamp socket. 3. Front Sidemarker 1. Unscrew the bulb sockets from the body. 6. Remove the thumb screw attaching the parking/turn signal lamp assembly to the headlamp assembly. 4. Pull the parkinghurn signal lamp assembly away from the lamp assembly by pulling the old one out and gently pushing the new one into the lamp housing. 6-36 Open the hood. 2. Replace the bulb by turning counterclockwise. 5.
Line up the tabs on the sockets with the gaps in the socket holes and screw the bulb sockets back into the lamp socket. 3. Front Sidemarker 1. Unscrew the bulb sockets from the body. 6. Remove the thumb screw attaching the parking/turn signal lamp assembly to the headlamp assembly. 4. Pull the parkinghurn signal lamp assembly away from the lamp assembly by pulling the old one out and gently pushing the new one into the lamp housing. 6-36 Open the hood. 2. Replace the bulb by turning counterclockwise. 5.

Owner's Manual
Page 335
... will remain intact during removal. 7. To replace the lamp assembly, line up the parking/turn signal lamp assembly to the headlamp assembly with the slots in Step 1. 4. To align the parking/turn signallamp assembly with the headlamp assembly, lift up and insert the tabs on the back of... the assembly with the thumb screwused in the fender. Fasten the parking/turn signal lamp assembly until the upperedge is contacting the fender. 9. Remove the two screws from the assembly. 6-37 Taillamps 1. Remove the bulb holder...
... will remain intact during removal. 7. To replace the lamp assembly, line up the parking/turn signal lamp assembly to the headlamp assembly with the slots in Step 1. 4. To align the parking/turn signallamp assembly with the headlamp assembly, lift up and insert the tabs on the back of... the assembly with the thumb screwused in the fender. Fasten the parking/turn signal lamp assembly until the upperedge is contacting the fender. 9. Remove the two screws from the assembly. 6-37 Taillamps 1. Remove the bulb holder...

Owner's Manual
Page 356
...(ELC) Air Compressor and ELC Relay ELEC PRNDL ...Instrument Cluster to PRNDL Indicators FRT HVAC LOW/MED BLWR . Windshield Wiper/Washer Motor and Switch HAZARD ...Turn Signal Switch 6-58 Heater-A/C Control FRT PWR SCKT ...Front Electric Accessory Plug Housing FRT WPR/WSHR . .
...(ELC) Air Compressor and ELC Relay ELEC PRNDL ...Instrument Cluster to PRNDL Indicators FRT HVAC LOW/MED BLWR . Windshield Wiper/Washer Motor and Switch HAZARD ...Turn Signal Switch 6-58 Heater-A/C Control FRT PWR SCKT ...Front Electric Accessory Plug Housing FRT WPR/WSHR . .
Owner's Manual
Page 357
... Wiper/Washer Switch) Inflatable Restraint Control Module Stoplamp Switch to Stoplamps Sunroof Control Module Steering Wheel Radio Control Switches Steering Wheel Radio Control Switches (Illumination) Turn Signal Switch RR HVAC ... FUSES HVAC/DRL ...Air Recirculation Motor, DRL Control Module, Heater-A/C Control, Temperature Door Actuator (Front) and Rear Window Defogger Relay IGN 1 ...ELC...
... Wiper/Washer Switch) Inflatable Restraint Control Module Stoplamp Switch to Stoplamps Sunroof Control Module Steering Wheel Radio Control Switches Steering Wheel Radio Control Switches (Illumination) Turn Signal Switch RR HVAC ... FUSES HVAC/DRL ...Air Recirculation Motor, DRL Control Module, Heater-A/C Control, Temperature Door Actuator (Front) and Rear Window Defogger Relay IGN 1 ...ELC...

Owner's Manual
Page 360
..." in your Oldsmobile retailel: - are approximate. Tire Pressures, Sizes ...See Tire-Loading Information label on driver's door. I f the air conditioning system in the Index for more information. Replacement Bulbs Lamps Exterior Headlamps ...9004-HBI Front Parking/Turn Signal Lamps ...3 157NA... or 3 IS7 NAK Front Sidemarker Lamps ...194 Stopmail (Top) ...3057 3 156 Signal (2nd from top) ...Back-up Lamps (3rd from top) ...3 1S6 Tail (Bottom)...
..." in your Oldsmobile retailel: - are approximate. Tire Pressures, Sizes ...See Tire-Loading Information label on driver's door. I f the air conditioning system in the Index for more information. Replacement Bulbs Lamps Exterior Headlamps ...9004-HBI Front Parking/Turn Signal Lamps ...3 157NA... or 3 IS7 NAK Front Sidemarker Lamps ...194 Stopmail (Top) ...3057 3 156 Signal (2nd from top) ...Back-up Lamps (3rd from top) ...3 1S6 Tail (Bottom)...

Owner's Manual
Page 425
... Checking Things Under ...6-7 Prop ...6-8 Release ...6-8 Horn ...2-51 Hydroplaning ...4-19 Ignition Positions ...Illuminated Entry ...2-26 2-62 9-5 Finish Damage ...6-52 FirstGear ...2-34 5-2 Flashers. Fuel ...6-4 FrontDoor ...2-4 Front Parking/Turn Signal Lamp Bulb Replacement ...6-34 2-75 Front Seat Storage Bin ...Front Seat Storage Net ...2-76 Front Sidemarker Lamp Bulb Replacement ...6-36 FrontTowing ...5-10 Fuel ...6-3 Filling Your...
... Checking Things Under ...6-7 Prop ...6-8 Release ...6-8 Horn ...2-51 Hydroplaning ...4-19 Ignition Positions ...Illuminated Entry ...2-26 2-62 9-5 Finish Damage ...6-52 FirstGear ...2-34 5-2 Flashers. Fuel ...6-4 FrontDoor ...2-4 Front Parking/Turn Signal Lamp Bulb Replacement ...6-34 2-75 Front Seat Storage Bin ...Front Seat Storage Net ...2-76 Front Sidemarker Lamp Bulb Replacement ...6-36 FrontTowing ...5-10 Fuel ...6-3 Filling Your...

Owner's Manual
Page 432
Third Row Solid Bench Seat ...1. 13 Adjusting ...1-13 13 Folding the Seatback ...1. Automatic ...Transmitters, Keyless Entry ...2-7 Transportation, Courtesy ...8-6 Trip Odometer ...2-91 TTYUsers ...8-4 Turn Signal and Lane Change Signals ...2-53 Turn Signal Reminder Chime ...2-53 9-12 Removing ...1-14 1-16 Replacing ...Tilt Steering Wheel ...2-52 3-9 Time, Setting the ...6-46 Tire Chains ...4-29 Tire Loading ...Tire-Loading Information Label...
Third Row Solid Bench Seat ...1. 13 Adjusting ...1-13 13 Folding the Seatback ...1. Automatic ...Transmitters, Keyless Entry ...2-7 Transportation, Courtesy ...8-6 Trip Odometer ...2-91 TTYUsers ...8-4 Turn Signal and Lane Change Signals ...2-53 Turn Signal Reminder Chime ...2-53 9-12 Removing ...1-14 1-16 Replacing ...Tilt Steering Wheel ...2-52 3-9 Time, Setting the ...6-46 Tire Chains ...4-29 Tire Loading ...Tire-Loading Information Label...

Owner's Manual
Page 433
... ...2-54 Fluid ...2.54.6.26 Fluid Level Check ...7-37 Rear ...2-55 WindshieldWiper ...2-54 2-55 Rear ...Blade Replacement ...6-38 6-56 Fuses ...4-25 Winter Driving ...Wiring. Turn SignalMultifunction Lever ...2-52 Turn Signals When Towing a Trailer ...4-37 Underbody Flushing Service ...7-40 Underbody Maintenance ...6-53 Underhood Fuse and Relay Center ...6-60 Vehicle Control ...Damage Warnings ...Dimensions ...Identification Number...
... ...2-54 Fluid ...2.54.6.26 Fluid Level Check ...7-37 Rear ...2-55 WindshieldWiper ...2-54 2-55 Rear ...Blade Replacement ...6-38 6-56 Fuses ...4-25 Winter Driving ...Wiring. Turn SignalMultifunction Lever ...2-52 Turn Signals When Towing a Trailer ...4-37 Underbody Flushing Service ...7-40 Underbody Maintenance ...6-53 Underhood Fuse and Relay Center ...6-60 Vehicle Control ...Damage Warnings ...Dimensions ...Identification Number...


