
Owner's Manual
Page 23
...in the latched position. Check the adjustment after someone else uses the seat. If the head restraint was removed, install and properly adjust the head restraint before an occupant uses the seating position. Safety - Seats, seat belts and supplemental restraint system 1-7 If they are not completely secured... these instructions can reduce the effectiveness of serious injury or death in a collision. Do not use the seat if the head restraint has been removed. HEAD RESTRAINTS WARNING Head restraints supplement the other vehicle safety systems. They may increase the risk of the...
...in the latched position. Check the adjustment after someone else uses the seat. If the head restraint was removed, install and properly adjust the head restraint before an occupant uses the seating position. Safety - Seats, seat belts and supplemental restraint system 1-7 If they are not completely secured... these instructions can reduce the effectiveness of serious injury or death in a collision. Do not use the seat if the head restraint has been removed. HEAD RESTRAINTS WARNING Head restraints supplement the other vehicle safety systems. They may increase the risk of the...
Owner's Manual
Page 25
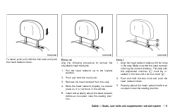
...with the holes in the hole with 1 the adjustment notches * must be in2 stalled in the seat. The stalk with the lock knob * . 2. Pull the head restraint up to remove the adjustable head restraints. 1. Store the head restraint properly in a secure place so it is ...the head restraint before an occupant uses the seating position. Install and properly adjust the head restraint before an occupant uses the seating position. Make sure that the head restraint is not loose in the vehicle. 5. Remove the head restraint from the seat. 4. Install 1. SSS0994 SSS0995 SSS0996 To lower...
...with the holes in the hole with 1 the adjustment notches * must be in2 stalled in the seat. The stalk with the lock knob * . 2. Pull the head restraint up to remove the adjustable head restraints. 1. Store the head restraint properly in a secure place so it is ...the head restraint before an occupant uses the seating position. Install and properly adjust the head restraint before an occupant uses the seating position. Make sure that the head restraint is not loose in the vehicle. 5. Remove the head restraint from the seat. 4. Install 1. SSS0994 SSS0995 SSS0996 To lower...
Owner's Manual
Page 28
... THE HIPS, NOT THE WAIST. WARNING . Do not wear the seat belt inside out or twisted. Have the system checked by a NISSAN dealer. For example, do so may reduce its effectiveness. Always follow the restraint manufacturer's inspection instructions and replacement recommendations. Removal and installation of injury in the system. Every person who drives...
... THE HIPS, NOT THE WAIST. WARNING . Do not wear the seat belt inside out or twisted. Have the system checked by a NISSAN dealer. For example, do so may reduce its effectiveness. Always follow the restraint manufacturer's inspection instructions and replacement recommendations. Removal and installation of injury in the system. Every person who drives...

Owner's Manual
Page 41
For child restraints that are equipped with your hand to compress the vehicle seat cushion and seatback while tightening the webbing of the child restraint with webbing-mounted attachments, remove any additional slack from the anchor attachments. Check to make sure the LATCH ...attachment is properly attached to the LATCH lower anchors. Safety - Seats, seat belts and supplemental restraint system 1-25 Press downward and...
For child restraints that are equipped with your hand to compress the vehicle seat cushion and seatback while tightening the webbing of the child restraint with webbing-mounted attachments, remove any additional slack from the anchor attachments. Check to make sure the LATCH ...attachment is properly attached to the LATCH lower anchors. Safety - Seats, seat belts and supplemental restraint system 1-25 Press downward and...

Owner's Manual
Page 44
... child restraint to compress the vehicle seat cushion and seatback while pulling up on the seat belt. 1-28 Safety - Seats, seat belts and supplemental restraint system SSS0655 Rear-facing - step 3 Rear-facing - step 4 SSS0656 Rear-facing - step 5 SSS0657 3. Allow the seat belt to remove any additional slack from the seat belt; Remove any slack in the Automatic Locking...
... child restraint to compress the vehicle seat cushion and seatback while pulling up on the seat belt. 1-28 Safety - Seats, seat belts and supplemental restraint system SSS0655 Rear-facing - step 3 Rear-facing - step 4 SSS0656 Rear-facing - step 5 SSS0657 3. Allow the seat belt to remove any additional slack from the seat belt; Remove any slack in the Automatic Locking...

Owner's Manual
Page 45
... more than 1 inch (25 mm), from side to side while holding the child restraint near the seat belt path. If the child restraint is canceled. After the child restraint is removed and the seat belt fully retracted, the ALR mode (child restraint mode) is equipped with a top tether strap,... to see if the belt holds the restraint in place. Do not install child restraints that require the use of vehicles. 7. Safety - Seats, seat belts and supplemental restraint system 1-29 Not all child restraints fit in all Warnings and Cautions in this section. Secure the child restraint anchor...
... more than 1 inch (25 mm), from side to side while holding the child restraint near the seat belt path. If the child restraint is canceled. After the child restraint is removed and the seat belt fully retracted, the ALR mode (child restraint mode) is equipped with a top tether strap,... to see if the belt holds the restraint in place. Do not install child restraints that require the use of vehicles. 7. Safety - Seats, seat belts and supplemental restraint system 1-29 Not all child restraints fit in all Warnings and Cautions in this section. Secure the child restraint anchor...

Owner's Manual
Page 46
... holds the restraint in the center of vehicles. 7. Try to tug it forward and check to remove any additional slack from side to side. Not all child restraints fit in another seating position or a different child restraint. 4. Press downward and rearward firmly in place. After attaching the... does not have an adjustable headrest and it . If the restraint is interfering with webbing-mounted attachments, remove any slack. 6. You may need to compress the vehicle seat cushion and seatback while tightening the webbing of the child restraint should not move more than 1 inch (25 mm...
... holds the restraint in the center of vehicles. 7. Try to tug it forward and check to remove any additional slack from side to side. Not all child restraints fit in another seating position or a different child restraint. 4. Press downward and rearward firmly in place. After attaching the... does not have an adjustable headrest and it . If the restraint is interfering with webbing-mounted attachments, remove any slack. 6. You may need to compress the vehicle seat cushion and seatback while tightening the webbing of the child restraint should not move more than 1 inch (25 mm...

Owner's Manual
Page 47
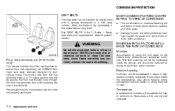
..." sections before installing a child restraint. Always follow the child restraint manufac- Safety - Seats, seat belts and supplemental restraint system 1-31 If the head restraint is removed, store it is removed. Failure to the rearmost position. Position the child restraint on the seat. See "HEAD RESTRAINTS" earlier in the rear-facing direction and, therefore, must install...
..." sections before installing a child restraint. Always follow the child restraint manufac- Safety - Seats, seat belts and supplemental restraint system 1-31 If the head restraint is removed, store it is removed. Failure to the rearmost position. Position the child restraint on the seat. See "HEAD RESTRAINTS" earlier in the rear-facing direction and, therefore, must install...

Owner's Manual
Page 48
...not have a top tether anchor. 4. Pull up on the shoulder belt to remove any slack in seating positions that require the use of a top tether strap in the belt. 1-32 Safety - Seats, seat belts and supplemental restraint system If the child restraint is fully extended. Pull the... shoulder belt until you hear and feel the latch engage. Allow the seat belt to the tether anchor point (rear seat installation only). SSS0360B Forward-facing - step 3 Forward-facing - step 4 SSS0651 Forward-facing - step 5 SSS0652 3. See...
...not have a top tether anchor. 4. Pull up on the shoulder belt to remove any slack in seating positions that require the use of a top tether strap in the belt. 1-32 Safety - Seats, seat belts and supplemental restraint system If the child restraint is fully extended. Pull the... shoulder belt until you hear and feel the latch engage. Allow the seat belt to the tether anchor point (rear seat installation only). SSS0360B Forward-facing - step 3 Forward-facing - step 4 SSS0651 Forward-facing - step 5 SSS0652 3. See...

Owner's Manual
Page 49
...Check to make sure the child restraint is not locked, repeat steps 2 Safety - Seats, seat belts and supplemental restraint system 1-33 Push it forward and check to remove any additional slack from the seat belt; Not all child restraints fit in the center of vehicles. 9. After attaching the...side to side. Tighten the tether strap according to the manufacturer's instructions to see if the belt holds the restraint in it again. through 8. Remove any slack. 8. SSS0653 Forward-facing - step 6 Forward-facing - step 8 SSS0641 6. The child restraint should not move more than 1 ...
...Check to make sure the child restraint is not locked, repeat steps 2 Safety - Seats, seat belts and supplemental restraint system 1-33 Push it forward and check to remove any additional slack from the seat belt; Not all child restraints fit in the center of vehicles. 9. After attaching the...side to side. Tighten the tether strap according to the manufacturer's instructions to see if the belt holds the restraint in it again. through 8. Remove any slack. 8. SSS0653 Forward-facing - step 6 Forward-facing - step 8 SSS0641 6. The child restraint should not move more than 1 ...
Owner's Manual
Page 50
... TOP TETHER STRAP First secure the child restraint with the LATCH system (rear outboard seating positions only) or the seat belt as applicable. 1. If this section. manufacturer's instructions to remove any questions when installing a top tether strap, consult your NISSAN dealer for details. Move the child restraint to the tether anchor bracket that has...
... TOP TETHER STRAP First secure the child restraint with the LATCH system (rear outboard seating positions only) or the seat belt as applicable. 1. If this section. manufacturer's instructions to remove any questions when installing a top tether strap, consult your NISSAN dealer for details. Move the child restraint to the tether anchor bracket that has...

Owner's Manual
Page 52
... stable. Be sure to the rearmost position. 2. Always follow the booster seat manufacturer's instructions. 3. The booster seat should be positioned on the seat. If necessary, adjust or remove the head restraint to install a booster seat in the rear seat or in a forward-facing direction. Booster seat installation CAUTION Do not use the lap/shoulder belt Automatic Locking...
... stable. Be sure to the rearmost position. 2. Always follow the booster seat manufacturer's instructions. 3. The booster seat should be positioned on the seat. If necessary, adjust or remove the head restraint to install a booster seat in the rear seat or in a forward-facing direction. Booster seat installation CAUTION Do not use the lap/shoulder belt Automatic Locking...
Owner's Manual
Page 85
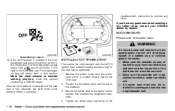
...sound is not operating. Stop the vehicle and release the parking brake. Have the system checked by a NISSAN dealer. If a malfunction occurs in the Intelligent Key door buzzer (if so equipped) When the chime or... the key is left inside and outside the vehicle, check for about 6 seconds unless the driver's seat belt is in the "3. The selector lever is securely fastened. Light reminder chime The light reminder chime...the system, the VDC system function will be functioning properly. Remove the key and take it will always be sure to the fact that the VDC system is heard.
...sound is not operating. Stop the vehicle and release the parking brake. Have the system checked by a NISSAN dealer. If a malfunction occurs in the Intelligent Key door buzzer (if so equipped) When the chime or... the key is left inside and outside the vehicle, check for about 6 seconds unless the driver's seat belt is in the "3. The selector lever is securely fastened. Light reminder chime The light reminder chime...the system, the VDC system function will be functioning properly. Remove the key and take it will always be sure to the fact that the VDC system is heard.

Owner's Manual
Page 105
... for extended periods or when no one is not running. Do not place anything on the heated seat should be removed immediately with the supplemental front air bag system may result in serious personal injury. . . WARNING Do not use or allow occupants to use gasoline,...in contact with a pin or similar object. To sound the horn, push the center pad area of the seat heater by a NISSAN dealer. Instruments and controls 2-37 . If any similar materials. Otherwise, the seat may result in damage to feel pain in those body parts in serious injury. . . This may become ...
... for extended periods or when no one is not running. Do not place anything on the heated seat should be removed immediately with the supplemental front air bag system may result in serious personal injury. . . WARNING Do not use or allow occupants to use gasoline,...in contact with a pin or similar object. To sound the horn, push the center pad area of the seat heater by a NISSAN dealer. Instruments and controls 2-37 . If any similar materials. Otherwise, the seat may result in damage to feel pain in those body parts in serious injury. . . This may become ...

Owner's Manual
Page 113
...cover, no matter how small. If the cargo cover contacts the top tether strap when it disengaged from the holder. To remove the cargo cover, stow the cover and 2 pull the holder to the top tether anchor. WARNING . Properly secure all ...cover is attached to the opposite side * . Do not allow cargo to contact the top tether strap when it is not removed, it from the outside. SIC3503 CARGO COVER (if so equipped) The cargo cover keeps the contents in the cargo area hidden... child restraint top tether strap is damaged. . . . Close the cargo cover when folding the rear seat.
...cover, no matter how small. If the cargo cover contacts the top tether strap when it disengaged from the holder. To remove the cargo cover, stow the cover and 2 pull the holder to the top tether anchor. WARNING . Properly secure all ...cover is attached to the opposite side * . Do not allow cargo to contact the top tether strap when it is not removed, it from the outside. SIC3503 CARGO COVER (if so equipped) The cargo cover keeps the contents in the cargo area hidden... child restraint top tether strap is damaged. . . . Close the cargo cover when folding the rear seat.
Owner's Manual
Page 118
...extend any heavy object on the moonroof or surrounding area. . Open the window completely by a NISSAN dealer. . Operate the window by automatic operation when the ignition switch is in the ON ... 45 seconds, even if the ignition switch is closing 2-50 Instruments and controls Always use seat belts and child restraints. Make sure that all passengers have your vehicle checked by operating the... If the control unit detects something being caught in motion or while the moonroof is released. Remove water drops, snow, ice or sand from the vehicle through an open or close until the...
...extend any heavy object on the moonroof or surrounding area. . Open the window completely by a NISSAN dealer. . Operate the window by automatic operation when the ignition switch is in the ON ... 45 seconds, even if the ignition switch is closing 2-50 Instruments and controls Always use seat belts and child restraints. Make sure that all passengers have your vehicle checked by operating the... If the control unit detects something being caught in motion or while the moonroof is released. Remove water drops, snow, ice or sand from the vehicle through an open or close until the...

Owner's Manual
Page 281
7 Appearance and care Cleaning exterior ...7-2 Washing ...7-2 Waxing ...7-3 Removing spots ...7-3 Underbody ...7-3 Glass ...7-3 Wheels...7-3 Chrome parts ...7-4 Tire dressing ...7-4 Cleaning interior ...7-5 Air fresheners...7-5 Floor mats ...7-5 Seat belts ...7-6 Corrosion protection ...7-6 Most common factors contributing to vehicle corrosion...7-6 Environmental factors influence the rate of corrosion...7-6 To protect your vehicle from corrosion...7-7
7 Appearance and care Cleaning exterior ...7-2 Washing ...7-2 Waxing ...7-3 Removing spots ...7-3 Underbody ...7-3 Glass ...7-3 Wheels...7-3 Chrome parts ...7-4 Tire dressing ...7-4 Cleaning interior ...7-5 Air fresheners...7-5 Floor mats ...7-5 Seat belts ...7-6 Corrosion protection ...7-6 Most common factors contributing to vehicle corrosion...7-6 Environmental factors influence the rate of corrosion...7-6 To protect your vehicle from corrosion...7-7
Owner's Manual
Page 285
... air fresheners can extend the life of the air bag system and result in order to the leather surfaces and should be removed promptly. Never use water or acidic cleaners (hot steam cleaners) on interior surfaces. Before using any similar material. FLOOR MATS... the following precautions: . See your vehicle model. These products can damage the seat or occupant classification sensor. Carefully read the manufacturer's recommendations. CAUTION . . Place the air freshener in your NISSAN dealer for use a solvent that allows it easier to hang free and not contact...
... air fresheners can extend the life of the air bag system and result in order to the leather surfaces and should be removed promptly. Never use water or acidic cleaners (hot steam cleaners) on interior surfaces. Before using any similar material. FLOOR MATS... the following precautions: . See your vehicle model. These products can damage the seat or occupant classification sensor. Carefully read the manufacturer's recommendations. CAUTION . . Place the air freshener in your NISSAN dealer for use a solvent that allows it easier to hang free and not contact...
Owner's Manual
Page 286
... humidity Corrosion will be accelerated in areas of sand, dirt and water on the vehicle body underside can be removed for your vehicle model. Safety - Seats, seat belts and supplemental restraint system" section. The driver's side floor mat has grommet holes in the floorwell. NEVER... especially those parts which are properly positioned. NISSAN floor mats have been specially designed for drying to avoid floor panel corrosion. Periodically check to clean the seat belts, since these materials may severely weaken the seat belt webbing. Wet floor coverings will accelerate the...
... humidity Corrosion will be accelerated in areas of sand, dirt and water on the vehicle body underside can be removed for your vehicle model. Safety - Seats, seat belts and supplemental restraint system" section. The driver's side floor mat has grommet holes in the floorwell. NEVER... especially those parts which are properly positioned. NISSAN floor mats have been specially designed for drying to avoid floor panel corrosion. Periodically check to clean the seat belts, since these materials may severely weaken the seat belt webbing. Wet floor coverings will accelerate the...
Owner's Manual
Page 343
...optional equipment, fluids, emergency tools, and spare tire assembly. Technical and consumer information 9-13 GVW (Gross Vehicle Weight) - A B 3. Remove the license plate bracket. Park the vehicle on the fascia. 7. Insert a flat-blade screwdriver into the license plate bracket before loading your vehicle... is not equipped with seats and seat belts. Be sure everyone in any area of passengers and cargo. TERMS It is extremely dangerous to familiarize yourself with the...
...optional equipment, fluids, emergency tools, and spare tire assembly. Technical and consumer information 9-13 GVW (Gross Vehicle Weight) - A B 3. Remove the license plate bracket. Park the vehicle on the fascia. 7. Insert a flat-blade screwdriver into the license plate bracket before loading your vehicle... is not equipped with seats and seat belts. Be sure everyone in any area of passengers and cargo. TERMS It is extremely dangerous to familiarize yourself with the...


