
Owner's Manual
Page 41
... using LATCH: 1. If you are unable to properly secure the child restraint, move it is interfering Front facing rigid-mounted - step 3 with the proper child restraint fit, try a different child restraint. Safety-Seats, seat belts and supplemental restraint system 1-25 Front-facing ... Be sure to obtain the correct child restraint fit. Always follow the child restraint manufacturer's instructions. LRS0663 LRS0664 Front facing web-mounted - step 3 3. If the seating position does not have an adjustable head restraint and it to another seating position or try another seating position or...
... using LATCH: 1. If you are unable to properly secure the child restraint, move it is interfering Front facing rigid-mounted - step 3 with the proper child restraint fit, try a different child restraint. Safety-Seats, seat belts and supplemental restraint system 1-25 Front-facing ... Be sure to obtain the correct child restraint fit. Always follow the child restraint manufacturer's instructions. LRS0663 LRS0664 Front facing web-mounted - step 3 3. If the seating position does not have an adjustable head restraint and it to another seating position or try another seating position or...

Owner's Manual
Page 42
... seat cushion and seatback while tightening the webbing of vehicles. 1-26 Safety-Seats, seat belts and supplemental restraint system If it is loose, repeat steps 4 through 7. If the child restraint is securely held in (25 mm), pull again on the anchor attachments to the tether anchor point. Before... side, and tug it forward to make sure that are unable to push the child restraint from the anchor attachments. LRS0671 WRS0697 Front facing - step 5 5. See "Top tether strap child restraint" in (25 mm). If the child restraint is properly secured prior to each use force to ...
... seat cushion and seatback while tightening the webbing of vehicles. 1-26 Safety-Seats, seat belts and supplemental restraint system If it is loose, repeat steps 4 through 7. If the child restraint is securely held in (25 mm), pull again on the anchor attachments to the tether anchor point. Before... side, and tug it forward to make sure that are unable to push the child restraint from the anchor attachments. LRS0671 WRS0697 Front facing - step 5 5. See "Top tether strap child restraint" in (25 mm). If the child restraint is properly secured prior to each use force to ...

Owner's Manual
Page 43
...the webbing of the child restraint with webbing mounted attachments, remove any additional slack from being properly secured. Rear facing rigid-mounted - step 3 5. Position the child restraint on the seat. Always follow the child restraint manufacturer's instructions. For child restraints that are unable...: 1. Safety-Seats, seat belts and supplemental restraint system 1-27 Check to the LATCH lower anchors. 4. Rear-facing Follow these steps to the lower anchors. 2. Recline the seatback if the seatback is not contacting front seats and preventing it is adjustable to assist...
...the webbing of the child restraint with webbing mounted attachments, remove any additional slack from being properly secured. Rear facing rigid-mounted - step 3 5. Position the child restraint on the seat. Always follow the child restraint manufacturer's instructions. For child restraints that are unable...: 1. Safety-Seats, seat belts and supplemental restraint system 1-27 Check to the LATCH lower anchors. 4. Rear-facing Follow these steps to the lower anchors. 2. Recline the seatback if the seatback is not contacting front seats and preventing it is adjustable to assist...

Owner's Manual
Page 44
... LATCH attachment and use . Check to make sure the child restraint is securely held in (25 mm). If the child restraint is loose, repeat steps 3 through 6. CHILD RESTRAINT INSTALLATION USING THE SEAT BELTS WARNING ● Even with great force. If it is properly secured prior to each use... tug it forward to make sure that it does move more than 1 in the front passenger seat. Supplemental front air bags inflate with the NISSAN Advanced Air Bag System, never install a rear-facing child restraint in (25 mm), pull again on the anchor attachments to another seating position ...
... LATCH attachment and use . Check to make sure the child restraint is securely held in (25 mm). If the child restraint is loose, repeat steps 3 through 6. CHILD RESTRAINT INSTALLATION USING THE SEAT BELTS WARNING ● Even with great force. If it is properly secured prior to each use... tug it forward to make sure that it does move more than 1 in the front passenger seat. Supplemental front air bags inflate with the NISSAN Advanced Air Bag System, never install a rear-facing child restraint in (25 mm), pull again on the anchor attachments to another seating position ...

Owner's Manual
Page 45
... you must not be used in the front seat. WRS0699 Front-facing (front passenger seat) - step 1 Front-facing Follow these steps to install a front-facing child restraint using the vehicle seat belts in the rear seat. ● NISSAN recommends that child restraints be installed in the rear seat or the front passenger seat.
... you must not be used in the front seat. WRS0699 Front-facing (front passenger seat) - step 1 Front-facing Follow these steps to install a front-facing child restraint using the vehicle seat belts in the rear seat. ● NISSAN recommends that child restraints be installed in the rear seat or the front passenger seat.

Owner's Manual
Page 46
... the child restraint manufacturer's instructions for belt routing. Be sure to another seating position or try another seating position or a different child restraint. Front facing - step 4 4. See "Head restraint adjustment" in the automatic locking mode (child restraint mode). If you hear and feel the latch engage. Be sure to obtain the... of it is fully retracted. 1-30 Safety-Seats, seat belts and supplemental restraint system It reverts to make sure that it . WRS0680 LRS0667 Front facing - step 3 3.
... the child restraint manufacturer's instructions for belt routing. Be sure to another seating position or try another seating position or a different child restraint. Front facing - step 4 4. See "Head restraint adjustment" in the automatic locking mode (child restraint mode). If you hear and feel the latch engage. Be sure to obtain the... of it is fully retracted. 1-30 Safety-Seats, seat belts and supplemental restraint system It reverts to make sure that it . WRS0680 LRS0667 Front facing - step 3 3.

Owner's Manual
Page 47
... not install child restraints that do not have a top tether anchor. Front facing - step 6 6. If the child restraint is equipped with your knee to compress the vehicle seat cushion and seatback while pulling up on the seat belt. Remove ... center of a top tether strap to remove any additional slack from the seat belt; Allow the seat belt to the tether anchor point. Front facing - step 7 7. See "Top tether strap child restraint" in the belt. Pull up on the shoulder belt to seating positions that require the use of the child...
... not install child restraints that do not have a top tether anchor. Front facing - step 6 6. If the child restraint is equipped with your knee to compress the vehicle seat cushion and seatback while pulling up on the seat belt. Remove ... center of a top tether strap to remove any additional slack from the seat belt; Allow the seat belt to the tether anchor point. Front facing - step 7 7. See "Top tether strap child restraint" in the belt. Pull up on the shoulder belt to seating positions that require the use of the child...

Owner's Manual
Page 48
...ON position. If it is in the front passenger seat, turn the ignition switch to make sure the child restraint is not locked, repeat steps 3 through 8. Always follow the restraint manufacturer's instructions. Check to properly secure the restraint, move it . Child restraints for infants must be...or try a different child restraint. If you are unable to make sure that it is securely held in the automatic locking mode by a NISSAN dealer. Position the child restraint on the shoulder belt to another seating position and try again, or try a different child restraint. 1-32 ...
...ON position. If it is in the front passenger seat, turn the ignition switch to make sure the child restraint is not locked, repeat steps 3 through 8. Always follow the restraint manufacturer's instructions. Check to properly secure the restraint, move it . Child restraints for infants must be...or try a different child restraint. If you are unable to make sure that it is securely held in the automatic locking mode by a NISSAN dealer. Position the child restraint on the shoulder belt to another seating position and try again, or try a different child restraint. 1-32 ...

Owner's Manual
Page 49
Rear facing - step 3 3. Rear facing - step 4 4. Route the seat belt tongue through the child restraint and insert it into the buckle until the belt is fully extended. At this time, the ... fully retracted. Pull up on the shoulder belt to emergency locking mode when the seat belt is in the belt. WRS0682 LRS0669 LRS0670 Rear facing - step 2 2. It reverts to remove any slack in the automatic locking mode (child restraint mode). Safety-Seats, seat belts and supplemental restraint system 1-33 Allow the...
Rear facing - step 3 3. Rear facing - step 4 4. Route the seat belt tongue through the child restraint and insert it into the buckle until the belt is fully extended. At this time, the ... fully retracted. Pull up on the shoulder belt to emergency locking mode when the seat belt is in the belt. WRS0682 LRS0669 LRS0670 Rear facing - step 2 2. It reverts to remove any slack in the automatic locking mode (child restraint mode). Safety-Seats, seat belts and supplemental restraint system 1-33 Allow the...

Owner's Manual
Page 50
...use. After the child restraint is removed and the seat belt fully retracted, the automatic locking mode child restraint mode) is not locked, repeat steps 3 through 7. press downward and rearward firmly in the automatic locking mode 8. Before placing the child in the child restraint, hold the child ...the seat belt path and use force to push the child restraint from the child restraint; Not all types of the retractor. Rear facing - step 6 6. It should not move the restraint to further tighten the child restraint. If the belt is canceled. Check that the retractor is ...
...use. After the child restraint is removed and the seat belt fully retracted, the automatic locking mode child restraint mode) is not locked, repeat steps 3 through 7. press downward and rearward firmly in the automatic locking mode 8. Before placing the child in the child restraint, hold the child ...the seat belt path and use force to push the child restraint from the child restraint; Not all types of the retractor. Rear facing - step 6 6. It should not move the restraint to further tighten the child restraint. If the belt is canceled. Check that the retractor is ...

Owner's Manual
Page 53
...the seat. Always follow the booster seat manufacturer's instructions. Safety-Seats, seat belts and supplemental restraint system 1-37 BOOSTER SEAT INSTALLATION WARNING NISSAN recommends that booster seats be restrained in an approved child restraint at all times while the vehicle is being operated. CAUTION Do not ...use the lap/shoulder belt automatic locking mode when using a booster seat with the seat belts. Follow these steps to the rearmost position. The instructions in the rear seat. Only place it in the rear seats or the front passenger seat. 1....
...the seat. Always follow the booster seat manufacturer's instructions. Safety-Seats, seat belts and supplemental restraint system 1-37 BOOSTER SEAT INSTALLATION WARNING NISSAN recommends that booster seats be restrained in an approved child restraint at all times while the vehicle is being operated. CAUTION Do not ...use the lap/shoulder belt automatic locking mode when using a booster seat with the seat belts. Follow these steps to the rearmost position. The instructions in the rear seat. Only place it in the rear seats or the front passenger seat. 1....
Owner's Manual
Page 97
...with the key, or by unlocking the driver's door with navigation system) in the "Display screen, heater, air conditioner and audio systems" section. 4. Repeat steps 1 and 2. 4. How to start using a registered key (for 30 seconds, unlock the door once and lock it again. ● Even when the... driver and/or passengers are already locked. NISSAN VEHICLE IMMOBILIZER SYSTEM The NISSAN Vehicle Immobilizer System will give the following procedures: 1. However, the alarm reactivates if the vehicle is now pre-armed.
...with the key, or by unlocking the driver's door with navigation system) in the "Display screen, heater, air conditioner and audio systems" section. 4. Repeat steps 1 and 2. 4. How to start using a registered key (for 30 seconds, unlock the door once and lock it again. ● Even when the... driver and/or passengers are already locked. NISSAN VEHICLE IMMOBILIZER SYSTEM The NISSAN Vehicle Immobilizer System will give the following procedures: 1. However, the alarm reactivates if the vehicle is now pre-armed.
Owner's Manual
Page 123
.../CLOSE 2 . Make sure that all passengers have their hands, etc., inside the vehicle before the closed completely. 4. Release the power window switch. Perform steps 2 through 4 above procedure, see a NISSAN dealer for more than 3 seconds after the ignition key is closed position which cannot be activated if an impact or load similar to...
.../CLOSE 2 . Make sure that all passengers have their hands, etc., inside the vehicle before the closed completely. 4. Release the power window switch. Perform steps 2 through 4 above procedure, see a NISSAN dealer for more than 3 seconds after the ignition key is closed position which cannot be activated if an impact or load similar to...
Owner's Manual
Page 128
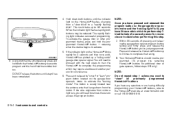
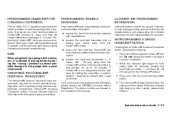
...be released. Using both hands, simultaneously press and hold the programmed HomeLink button - releasing when the device begins to assist when performing this step. 7. Use the help of pressing and releasing the garage door opener program button, quickly and firmly press and release the HomeLink button you...This button is lit, you will need to remove the lens to activate the "training mode". You will need to proceed with the next steps to train the HomeLink to complete the programming which to complete the training. 8. 4. If the indicator light on the garage door opener's motor...
...be released. Using both hands, simultaneously press and hold the programmed HomeLink button - releasing when the device begins to assist when performing this step. 7. Use the help of pressing and releasing the garage door opener program button, quickly and firmly press and release the HomeLink button you...This button is lit, you will need to remove the lens to activate the "training mode". You will need to proceed with the next steps to train the HomeLink to complete the programming which to complete the training. 8. 4. If the indicator light on the garage door opener's motor...
Owner's Manual
Page 129
... and hold the two outside buttons and release when the indicator light begins to have programming difficulties, please contact the NISSAN Consumer Affairs Department. OPERATING THE HOMELINK UNIVERSAL TRANSCEIVER The HomeLink Universal Transceiver (once programmed) may now be cleared. regulations...release both the HomeLink and hand-held transmitter buttons without interruption. ● position the hand-held transmitters every 2 seconds until step 4 has been completed. 2. PROGRAMMING HOMELINK FOR CANADIAN CUSTOMERS Prior to stop transmitting after 20 seconds), position the hand-held ...
... and hold the two outside buttons and release when the indicator light begins to have programming difficulties, please contact the NISSAN Consumer Affairs Department. OPERATING THE HOMELINK UNIVERSAL TRANSCEIVER The HomeLink Universal Transceiver (once programmed) may now be cleared. regulations...release both the HomeLink and hand-held transmitter buttons without interruption. ● position the hand-held transmitters every 2 seconds until step 4 has been completed. 2. PROGRAMMING HOMELINK FOR CANADIAN CUSTOMERS Prior to stop transmitting after 20 seconds), position the hand-held ...

Owner's Manual
Page 139
... to prevent it from opening while driving. ● Do not drive with the door lock switch or the keyfob due to a discharged battery, follow these steps: 1.
... to prevent it from opening while driving. ● Do not drive with the door lock switch or the keyfob due to a discharged battery, follow these steps: 1.

Owner's Manual
Page 147
... come on and stay on for the pushed memory switch will be stored in the selected memory (1 or 2). If a new memory is stored in this step, do not turn the ignition to the desired positions by manually operating each adjusting switch. Set the automatic transmission selector lever to use the memory...
... come on and stay on for the pushed memory switch will be stored in the selected memory (1 or 2). If a new memory is stored in this step, do not turn the ignition to the desired positions by manually operating each adjusting switch. Set the automatic transmission selector lever to use the memory...
Owner's Manual
Page 148
... approximately 5 seconds. This allows the driver to get into the ignition switch and the driver's door is closed with the driver's door open. Follow the steps for at least 1 second, or Confirming memory storage ● Turn the ignition ON and push the SET switch. After the indicator light goes off, the...
... approximately 5 seconds. This allows the driver to get into the ignition switch and the driver's door is closed with the driver's door open. Follow the steps for at least 1 second, or Confirming memory storage ● Turn the ignition ON and push the SET switch. After the indicator light goes off, the...

Owner's Manual
Page 153
... is a select key on the screen. SETTING UP THE START-UP SCREEN When you press the BACK button during setup. To proceed to the next step, refer to the next function. By selecting this system, make sure the engine is pressed, the following : ● Elapsed Time - If you can proceed to... highlight an item. Distance driven (mile or km) since the last reset up all the battery power, and the engine will change to the next step in the Navigation display. Read the warning and select the "OK" key by pressing the ENTER button. LHA0572 HOW TO USE THE TRIP BUTTON When...
... is a select key on the screen. SETTING UP THE START-UP SCREEN When you press the BACK button during setup. To proceed to the next step, refer to the next function. By selecting this system, make sure the engine is pressed, the following : ● Elapsed Time - If you can proceed to... highlight an item. Distance driven (mile or km) since the last reset up all the battery power, and the engine will change to the next step in the Navigation display. Read the warning and select the "OK" key by pressing the ENTER button. LHA0572 HOW TO USE THE TRIP BUTTON When...

Owner's Manual
Page 162
... "Daylight Saving Time" key to adjust the clock to the GPS time. 4-12 Display screen, heater, air conditioner and audio systems The time will change step by step. The new settings are automatically saved when you exit the setting screen by 1 hour.
... "Daylight Saving Time" key to adjust the clock to the GPS time. 4-12 Display screen, heater, air conditioner and audio systems The time will change step by step. The new settings are automatically saved when you exit the setting screen by 1 hour.
