
Owner's Manual
Page 24
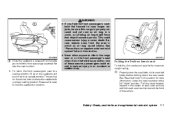
... will go. Do not place cargo higher than the seatbacks. LRS0608 FLEXIBLE SEATING WARNING ● Never allow people to ride in the latched position. Then lift up on the recline lever, located on the rear seats. ● Head restraints should be securely stored to prevent them properly if they have been... not allow anyone to ride in the cargo area or on the upper corner of your vehicle is not equipped with seats and seat belts. Lift up on the latch located on the rear seats when they are completely secured in any area of the seatback to the rear-most position...
... will go. Do not place cargo higher than the seatbacks. LRS0608 FLEXIBLE SEATING WARNING ● Never allow people to ride in the latched position. Then lift up on the recline lever, located on the rear seats. ● Head restraints should be securely stored to prevent them properly if they have been... not allow anyone to ride in the cargo area or on the upper corner of your vehicle is not equipped with seats and seat belts. Lift up on the latch located on the rear seats when they are completely secured in any area of the seatback to the rear-most position...
Owner's Manual
Page 25
... a person. Secure objects away from the area in the seat belt hooks before folding down position. To return the front passenger's seat to a seating position lift up on the front passenger's seat when it is released it up to a proper seating position. Lower the head restraints to carry longer objects, be...
... a person. Secure objects away from the area in the seat belt hooks before folding down position. To return the front passenger's seat to a seating position lift up on the front passenger's seat when it is released it up to a proper seating position. Lower the head restraints to carry longer objects, be...
Owner's Manual
Page 27
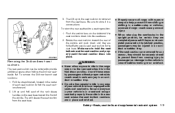
... secure each seat cushion to fold the seat cushions forward. 2. Pull the straps forward, located in case of sudden braking or an accident. Then lift up and fold each seat cushion to the seat base. Be sure to the vehicle in the center of each of the seat cushions down...from causing injury to passengers or damage to store it from sliding or shifting. In a sudden stop . ● Do not allow anyone to a seating position: 1. Lift up on the bottom of the red release handles on the rear seat when it from the seat base. WARNING ● Never allow people to...
... secure each seat cushion to fold the seat cushions forward. 2. Pull the straps forward, located in case of sudden braking or an accident. Then lift up and fold each seat cushion to the seat base. Be sure to the vehicle in the center of each of the seat cushions down...from causing injury to passengers or damage to store it from sliding or shifting. In a sudden stop . ● Do not allow anyone to a seating position: 1. Lift up on the bottom of the red release handles on the rear seat when it from the seat base. WARNING ● Never allow people to...

Owner's Manual
Page 109
... of straps. In a sudden stop or collision, unsecured cargo could come loose and cause personal injury. Instruments and controls 2-35 ● Never allow people to lift the luggage board. LIC0865 CARGO AREA STORAGE To access the floor storage area, push down 1 to raise the handle, then pull up while accessing the...
... of straps. In a sudden stop or collision, unsecured cargo could come loose and cause personal injury. Instruments and controls 2-35 ● Never allow people to lift the luggage board. LIC0865 CARGO AREA STORAGE To access the floor storage area, push down 1 to raise the handle, then pull up while accessing the...

Owner's Manual
Page 113
... remove: 1. Remove the crossbar. 4. WARNING Properly secure all cargo with ropes or straps to help prevent it from the roof rack. If you cannot comfortably lift the items onto the roof rack from the ground, use a ladder or stool. ● Do not place items on the crossbar B . 3. Doing so could cause...
... remove: 1. Remove the crossbar. 4. WARNING Properly secure all cargo with ropes or straps to help prevent it from the roof rack. If you cannot comfortably lift the items onto the roof rack from the ground, use a ladder or stool. ● Do not place items on the crossbar B . 3. Doing so could cause...

Owner's Manual
Page 114
Lift the gear basket to reinstall. 5. NOTE: Cargo in the gear basket must fit with a Torxdriver by turning counterclockwise A . 3. LIC0869 LIC0870 To open the gear basket ...
Lift the gear basket to reinstall. 5. NOTE: Cargo in the gear basket must fit with a Torxdriver by turning counterclockwise A . 3. LIC0869 LIC0870 To open the gear basket ...

Owner's Manual
Page 116
it down to the second detent and release it again to cancel the window lock function. 2-42 Instruments and controls To stop the window, lift the switch up 2 . To close only the corresponding passenger window. To open the window, push the switch and hold it need not be held. Push ...
it down to the second detent and release it again to cancel the window lock function. 2-42 Instruments and controls To stop the window, lift the switch up 2 . To close only the corresponding passenger window. To open the window, push the switch and hold it need not be held. Push ...

Owner's Manual
Page 199
...shaped opening of the wheel nut wrench to the jack body and the following instructions. 1. for lifting only your vehicle to the illustration for the correct placement and jack-up points. Always refer to lift the vehicle. If it with safety stands. ● Use only the jack provided with your ...WARNING ● Never get under the rear of the vehicle. ● Use the correct jack-up points for your vehicle on the wheel and then lift the spare tire. ● Do not allow passengers to lower the spare tire. 6. Once the spare tire is completely lowered, reach under the vehicle...
...shaped opening of the wheel nut wrench to the jack body and the following instructions. 1. for lifting only your vehicle to the illustration for the correct placement and jack-up points. Always refer to lift the vehicle. If it with safety stands. ● Use only the jack provided with your ...WARNING ● Never get under the rear of the vehicle. ● Use the correct jack-up points for your vehicle on the wheel and then lift the spare tire. ● Do not allow passengers to lower the spare tire. 6. Once the spare tire is completely lowered, reach under the vehicle...

Owner's Manual
Page 200
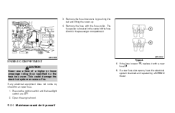
LCE0119 LCE0087 2. Place the jack directly under the jack-up point as shown. 4. The front tire jack-up point. The jack should be used on the side of the jack contacts the vehicle at the jack-up points are indicated by stamped arrows on firm and level ground. 3. Install the assembled jack rod into the jack as illustrated so the top of the frame. To lift the vehicle, securely hold the jack lever and rod. Carefully raise the vehicle until the tire clears the ground. 6-6 In case of emergency
LCE0119 LCE0087 2. Place the jack directly under the jack-up point as shown. 4. The front tire jack-up point. The jack should be used on the side of the jack contacts the vehicle at the jack-up points are indicated by stamped arrows on firm and level ground. 3. Install the assembled jack rod into the jack as illustrated so the top of the frame. To lift the vehicle, securely hold the jack lever and rod. Carefully raise the vehicle until the tire clears the ground. 6-6 In case of emergency

Owner's Manual
Page 203
... so equipped). Switch off and wait 3 to 4 seconds before trying again. 7. CAUTION Do not keep the starter motor engaged for example, strut mounting bolt, engine lift bracket, etc.) - not to the battery. ● Make sure the jumper cables do not touch moving parts in the engine compartment and that the cable...
... so equipped). Switch off and wait 3 to 4 seconds before trying again. 7. CAUTION Do not keep the starter motor engaged for example, strut mounting bolt, engine lift bracket, etc.) - not to the battery. ● Make sure the jumper cables do not touch moving parts in the engine compartment and that the cable...

Owner's Manual
Page 205
Incorrect towing equipment could damage your vehicle after it has been lifted by a tow truck. Visually check drive belts for towing. .... 6. When towing your vehicle. Towing instructions are available from the engine, stand clear to your vehicle, NISSAN recommends having a service operator tow your vehicle, all State (Provincial in , engine belts or the engine ...: WARNING If steam or water is running . Also check if the cooling fan is coming from a NISSAN dealer. WARNING ● Never ride in a vehicle that the transmission, axles, steering system and powertrain are...
Incorrect towing equipment could damage your vehicle after it has been lifted by a tow truck. Visually check drive belts for towing. .... 6. When towing your vehicle. Towing instructions are available from the engine, stand clear to your vehicle, NISSAN recommends having a service operator tow your vehicle, all State (Provincial in , engine belts or the engine ...: WARNING If steam or water is running . Also check if the cooling fan is coming from a NISSAN dealer. WARNING ● Never ride in a vehicle that the transmission, axles, steering system and powertrain are...

Owner's Manual
Page 228
...below the MIN line or the brake warning light comes on . If fluid must be added frequently, the system should be checked by a NISSAN dealer. WINDOW WASHER FLUID RESERVOIR Fill the window washer fluid reservoir periodically. Follow the manufacturer's instructions for better cleaning. If fluid must be ...level is below the MIN line, add Genuine NISSAN Super Heavy Duty Brake Fluid or equivalent DOT 3 fluid up to the washer for the mixture ratio. 8-12 Maintenance and do-it-yourself To fill the window washer fluid reservoir, lift the cap off the reservoir tank and pour the...
...below the MIN line or the brake warning light comes on . If fluid must be added frequently, the system should be checked by a NISSAN dealer. WINDOW WASHER FLUID RESERVOIR Fill the window washer fluid reservoir periodically. Follow the manufacturer's instructions for better cleaning. If fluid must be ...level is below the MIN line, add Genuine NISSAN Super Heavy Duty Brake Fluid or equivalent DOT 3 fluid up to the washer for the mixture ratio. 8-12 Maintenance and do-it-yourself To fill the window washer fluid reservoir, lift the cap off the reservoir tank and pour the...

Owner's Manual
Page 235
... the blades and using the windshield washer or if a wiper blade chatters when running, wax or other material may be on the blade or windshield. Lift the wiper arm away from wind pressure. WDI0408 REPLACING Replace the wiper blades if they are worn. 1. otherwise it may be damaged when the hood...
... the blades and using the windshield washer or if a wiper blade chatters when running, wax or other material may be on the blade or windshield. Lift the wiper arm away from wind pressure. WDI0408 REPLACING Replace the wiper blades if they are worn. 1. otherwise it may be damaged when the hood...

Owner's Manual
Page 237
Maintenance and do-it-yourself 8-21 WDI0292 Rear window wiper blade 1 2 3 Lift the wiper arm away from the rear window. Push the wiper blade in and pivot until the blade becomes free. Insert a new blade onto the wiper arm and snap into place.
Maintenance and do-it-yourself 8-21 WDI0292 Rear window wiper blade 1 2 3 Lift the wiper arm away from the rear window. Push the wiper blade in and pivot until the blade becomes free. Insert a new blade onto the wiper arm and snap into place.
Owner's Manual
Page 240
Remove the fuse box cover by a NISSAN dealer. 8-24 Maintenance and do-it with the fuse puller. Remove the fuse with a new fuse B . 6. The fuse puller is open fuse. 1. WDI0199 WDI0452 ENGINE ... in the passenger compartment. Open the engine hood. If a new fuse also opens, have the electrical system checked and repaired by pushing the tab and lifting the cover up. 4. Type A 5. If the fuse is located in the center of a higher or lower amperage rating than specified on , check for an open...
Remove the fuse box cover by a NISSAN dealer. 8-24 Maintenance and do-it with the fuse puller. Remove the fuse with a new fuse B . 6. The fuse puller is open fuse. 1. WDI0199 WDI0452 ENGINE ... in the passenger compartment. Open the engine hood. If a new fuse also opens, have the electrical system checked and repaired by pushing the tab and lifting the cover up. 4. Type A 5. If the fuse is located in the center of a higher or lower amperage rating than specified on , check for an open...

