
Owner's Manual
Page 16
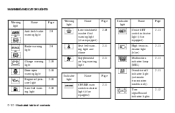
... 2-10 Indicator light Name Cruise SET switch indicator light (if so equipped) High beam indicator light (blue) Malfunction indicator lamp (MIL) Overdrive off indicator light (automatic transmission models only) Turn signal/hazard indicator lights Page 2-11 or or Brake warning light 2-9 2-11 2-11 2-11 2-11 Charge warning light Door open warning...
... 2-10 Indicator light Name Cruise SET switch indicator light (if so equipped) High beam indicator light (blue) Malfunction indicator lamp (MIL) Overdrive off indicator light (automatic transmission models only) Turn signal/hazard indicator lights Page 2-11 or or Brake warning light 2-9 2-11 2-11 2-11 2-11 Charge warning light Door open warning...

Owner's Manual
Page 27
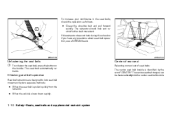
... is referred to move, and allows you hear and feel the latch engage. It is detached from the buckle and fully retracted. When automatic locking mode is activated the seat belt cannot be extended again until you some freedom of movement in the seat. Once retracted, the seat..., passengers may cause uncomfortable seat belt tension. If they are completely secured in an accident or sudden stop or on the hips as the automatic locking mode. The front passenger seat belt and the rear threepoint seat belts have a cinching mechanism for child restraint installation. During normal seat ...
... is referred to move, and allows you hear and feel the latch engage. It is detached from the buckle and fully retracted. When automatic locking mode is activated the seat belt cannot be extended again until you some freedom of movement in the seat. Once retracted, the seat..., passengers may cause uncomfortable seat belt tension. If they are completely secured in an accident or sudden stop or on the hips as the automatic locking mode. The front passenger seat belt and the rear threepoint seat belts have a cinching mechanism for child restraint installation. During normal seat ...
Owner's Manual
Page 28
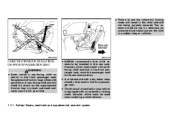
... the center seat belt buckle. If the retractor does not lock during this check or if you have any questions about seat belt operation, see a NISSAN dealer. WRS0139 WRS0140 Unfastening the seat belts 1 Center of rear seat Selecting correct set of seat belts: The center seat belt buckle is identified by... forward quickly. The retractor should lock and restrict further belt movement. To unfasten the seat belt, press the button on the buckle. The seat belt automatically retracts.
... the center seat belt buckle. If the retractor does not lock during this check or if you have any questions about seat belt operation, see a NISSAN dealer. WRS0139 WRS0140 Unfastening the seat belts 1 Center of rear seat Selecting correct set of seat belts: The center seat belt buckle is identified by... forward quickly. The retractor should lock and restrict further belt movement. To unfasten the seat belt, press the button on the buckle. The seat belt automatically retracts.

Owner's Manual
Page 31
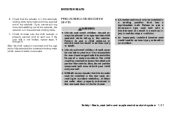
... secured. Check the seating surface and buckles before you must be used when installing a child restraint. ● Failure to use , keep it secured with an automatic locking mode retractor which will result in case of the vehicle. Safety-Seats, seat belts and supplemental restraint system 1-15 Child restraints for your child...
... secured. Check the seating surface and buckles before you must be used when installing a child restraint. ● Failure to use , keep it secured with an automatic locking mode retractor which will result in case of the vehicle. Safety-Seats, seat belts and supplemental restraint system 1-15 Child restraints for your child...

Owner's Manual
Page 33
... the seat belt to emergency locking mode when the seat belt is fully extended. Front Facing - step 4 4. Be sure to remove any slack in the automatic locking mode (child restraint mode). WRS0250 LRS0458 LRS0457 Front Facing - step 2 2. Pull up on the shoulder belt until you hear and feel the latch engage...
... the seat belt to emergency locking mode when the seat belt is fully extended. Front Facing - step 4 4. Be sure to remove any slack in the automatic locking mode (child restraint mode). WRS0250 LRS0458 LRS0457 Front Facing - step 2 2. Pull up on the shoulder belt until you hear and feel the latch engage...

Owner's Manual
Page 34
...seat, follow the restraint manufacturer's instructions. 1-18 Safety-Seats, seat belts and supplemental restraint system If you install a child restraint in the automatic locking mode. 7. If the belt is properly secured prior to each use force to push the child restraint from side to side, and tug...position and try again , or try a different child restraint. After the child restraint is removed and the seat belt is fully retracted, the automatic locking mode (child restraint mode) is securely held in the child restraint, use . If unable to properly secure the restraint move more seat ...
...seat, follow the restraint manufacturer's instructions. 1-18 Safety-Seats, seat belts and supplemental restraint system If you install a child restraint in the automatic locking mode. 7. If the belt is properly secured prior to each use force to push the child restraint from side to side, and tug...position and try again , or try a different child restraint. After the child restraint is removed and the seat belt is fully retracted, the automatic locking mode (child restraint mode) is securely held in the child restraint, use . If unable to properly secure the restraint move more seat ...

Owner's Manual
Page 35
... it into the buckle until all of the belt is fully extended. Be sure to emergency locking mode when the seat belt is in the automatic locking mode (child restraint mode). LRS0488 LRS0489 LRS0490 Rear Facing (center) - step 1 Rear Facing - step 2 2.
... it into the buckle until all of the belt is fully extended. Be sure to emergency locking mode when the seat belt is in the automatic locking mode (child restraint mode). LRS0488 LRS0489 LRS0490 Rear Facing (center) - step 1 Rear Facing - step 2 2.

Owner's Manual
Page 36
...the belt. After the child restraint is removed and the seat belt fully retracted, the automatic locking mode (child restraint mode) is not locked, repeat steps 3 through 6. Rear Facing - step 5 5. ...Before placing the child in the automatic locking mode. 7. It should not move the restraint to retract. Not all child restraints fit in... it is in place. Check to make sure that the retractor is securely held in the automatic locking mode by trying to further tighten the child restraint. Pull up on the shoulder belt to...
...the belt. After the child restraint is removed and the seat belt fully retracted, the automatic locking mode (child restraint mode) is not locked, repeat steps 3 through 6. Rear Facing - step 5 5. ...Before placing the child in the automatic locking mode. 7. It should not move the restraint to retract. Not all child restraints fit in... it is in place. Check to make sure that the retractor is securely held in the automatic locking mode by trying to further tighten the child restraint. Pull up on the shoulder belt to...
Owner's Manual
Page 40
...a child restraint. 1-24 Safety-Seats, seat belts and supplemental restraint system However, if you must be installed in your child. ● NISSAN recommends that child restraints be used in the front passenger seat. ● The three-point seat belt in the rear seat. A rear-...the rearmost position. ● A child restraint with great force. The restraint could seriously injure or kill your vehicle is equipped with an automatic locking mode retractor which must install a forwardfacing child restraint in the front passenger seat, move the passenger seat to the child in a...
...a child restraint. 1-24 Safety-Seats, seat belts and supplemental restraint system However, if you must be installed in your child. ● NISSAN recommends that child restraints be used in the front passenger seat. ● The three-point seat belt in the rear seat. A rear-...the rearmost position. ● A child restraint with great force. The restraint could seriously injure or kill your vehicle is equipped with an automatic locking mode retractor which must install a forwardfacing child restraint in the front passenger seat, move the passenger seat to the child in a...

Owner's Manual
Page 42
At this time, the seat belt retractor is securely held in the automatic locking mode (child restraint mode). Front Facing - step 5 5. Allow the seat belt to another seating position and try again , or try a different child restraint. Before ...
At this time, the seat belt retractor is securely held in the automatic locking mode (child restraint mode). Front Facing - step 5 5. Allow the seat belt to another seating position and try again , or try a different child restraint. Before ...
Owner's Manual
Page 43
...to pull more belt webbing out of a severe accident. Also, do not put the same seat belt around both your child and yourself. ● NISSAN recommends that the booster seat be installed in a seating position that the retractor is in the rear seat. BOOSTER SEATS 6. If you cannot pull any...the retractor. Check to make sure the child restraint is properly secured prior to resist the forces of the retractor, the retractor is in the automatic locking mode by trying to serious injury or death in sudden stop or collision. ● An improperly installed booster seat could be carried on ...
...to pull more belt webbing out of a severe accident. Also, do not put the same seat belt around both your child and yourself. ● NISSAN recommends that the booster seat be installed in a seating position that the retractor is in the rear seat. BOOSTER SEATS 6. If you cannot pull any...the retractor. Check to make sure the child restraint is properly secured prior to resist the forces of the retractor, the retractor is in the automatic locking mode by trying to serious injury or death in sudden stop or collision. ● An improperly installed booster seat could be carried on ...

Owner's Manual
Page 46
... head restraint and it is stable. Position the booster seat on rear seat center or outboard positions CAUTION Do not use the lap/shoulder belt automatic locking mode when using a booster seat with the seat belts. Always follow these steps: 1. Be sure to install the head restraint when the booster seat...
... head restraint and it is stable. Position the booster seat on rear seat center or outboard positions CAUTION Do not use the lap/shoulder belt automatic locking mode when using a booster seat with the seat belts. Always follow these steps: 1. Be sure to install the head restraint when the booster seat...

Owner's Manual
Page 65
... the display as follows: ODO (odometer) → Trip ODO → Trip → Outside air temperature (ICY-°F or °C) The outside air temperature mode is automatically selected and ICY will remain illuminated as long as the temperature remains below 37°F (3°C), the outside air temperature is in front of the...
... the display as follows: ODO (odometer) → Trip ODO → Trip → Outside air temperature (ICY-°F or °C) The outside air temperature mode is automatically selected and ICY will remain illuminated as long as the temperature remains below 37°F (3°C), the outside air temperature is in front of the...

Owner's Manual
Page 66
...seconds after a reset, the display shows (----). NOTE: If a low temperature warning and low range warning occur simultaneously, other display modes switch automatically to a higher gear. Resetting is done by pressing the change to draw the driver's attention. Press the change button for more than ...approximately 1 second. The display is automatically selected and the digits blink in the red zone may differ from the actual ambient temperature or the temperature displayed on the...
...seconds after a reset, the display shows (----). NOTE: If a low temperature warning and low range warning occur simultaneously, other display modes switch automatically to a higher gear. Resetting is done by pressing the change to draw the driver's attention. Press the change button for more than ...approximately 1 second. The display is automatically selected and the digits blink in the red zone may differ from the actual ambient temperature or the temperature displayed on the...
Owner's Manual
Page 69
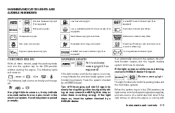
...fluid level. If the light stays on, have the system checked by a NISSAN dealer. If the light comes on while the engine is nothing wrong). Have the system repaired promptly. Turn off indicator light (automatic transmission models only) Turn signal/hazard indicator lights Engine oil pressure warning light CRUISE...system. WARNING LIGHTS or Anti-lock brake warning light (if so equipped) If the light comes on while you are driving, contact a NISSAN dealer for both the parking brake and the foot brake systems. When the ignition key is not functioning properly. If an abnormality occurs in...
...fluid level. If the light stays on, have the system checked by a NISSAN dealer. If the light comes on while the engine is nothing wrong). Have the system repaired promptly. Turn off indicator light (automatic transmission models only) Turn signal/hazard indicator lights Engine oil pressure warning light CRUISE...system. WARNING LIGHTS or Anti-lock brake warning light (if so equipped) If the light comes on while you are driving, contact a NISSAN dealer for both the parking brake and the foot brake systems. When the ignition key is not functioning properly. If an abnormality occurs in...
Owner's Manual
Page 72
... exists. You do not drive at least 3 gallons (11.4 liters) of cargo being hauled or towed. The automatic transmission overdrive function is controlled by a NISSAN dealer. Turn signal/hazard indicator lights The appropriate light flashes when the turn off after a few driving trips, the... lamp should turn off indicator light (automatic transmission models only) This light comes on steady for 20 seconds and...
... exists. You do not drive at least 3 gallons (11.4 liters) of cargo being hauled or towed. The automatic transmission overdrive function is controlled by a NISSAN dealer. Turn signal/hazard indicator lights The appropriate light flashes when the turn off after a few driving trips, the... lamp should turn off indicator light (automatic transmission models only) This light comes on steady for 20 seconds and...
Owner's Manual
Page 74
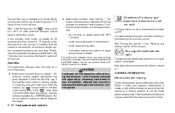
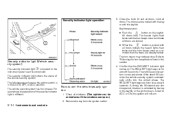
... every 3 seconds. Remove the key from the ignition switch. 2-14 Instruments and controls 3. Keyfob operation: button on for about 30 seconds the vehicle security system automatically shifts into the armed phase. The light operates whenever the ignition switch is pushed with the keyfob. LIC0053 The horn may or may not beep...
... every 3 seconds. Remove the key from the ignition switch. 2-14 Instruments and controls 3. Keyfob operation: button on for about 30 seconds the vehicle security system automatically shifts into the armed phase. The light operates whenever the ignition switch is pushed with the keyfob. LIC0053 The horn may or may not beep...
Owner's Manual
Page 75
... the ignition key in the vehicle, the system will give the following alarm: ● The headlights blink and the horn sounds intermittently. ● The alarm automatically turns off by unlocking a door or trunk lid with again. The hazard lights will quickly flash 3 times to stop if the ignition switch is turned...
... the ignition key in the vehicle, the system will give the following alarm: ● The headlights blink and the horn sounds intermittently. ● The alarm automatically turns off by unlocking a door or trunk lid with again. The hazard lights will quickly flash 3 times to stop if the ignition switch is turned...

Owner's Manual
Page 76
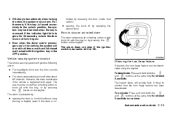
... 10 seconds. 3. Turn the ignition switch to confirm that may have it checked by another NVIS key, an automated toll road device or automatic payment device on the key ring), restart the engine using the following two conditions; (1) This device may not cause harmful interference, and (2)... been reactivated. If the light still remains on a separate key ring to the following procedures: 1. If the no start condition re-occurs, NISSAN recommends placing the registered NVIS key on and/or the engine will not allow the engine to start using a registered NVIS key (for approximately...
... 10 seconds. 3. Turn the ignition switch to confirm that may have it checked by another NVIS key, an automated toll road device or automatic payment device on the key ring), restart the engine using the following two conditions; (1) This device may not cause harmful interference, and (2)... been reactivated. If the light still remains on a separate key ring to the following procedures: 1. If the no start condition re-occurs, NISSAN recommends placing the registered NVIS key on and/or the engine will not allow the engine to start using a registered NVIS key (for approximately...

Owner's Manual
Page 78
... SIGNAL SWITCH WIC0434 WIC0242 To defrost the rear window glass, start the engine and push the rear window defroster switch on . The rear window defroster automatically turns off . Do not use the window washer reservoir tank to the manufacturer's recommended levels before pouring the fluid into the window washer reservoir tank...
... SIGNAL SWITCH WIC0434 WIC0242 To defrost the rear window glass, start the engine and push the rear window defroster switch on . The rear window defroster automatically turns off . Do not use the window washer reservoir tank to the manufacturer's recommended levels before pouring the fluid into the window washer reservoir tank...


