
Owner's Manual
Page 7
Fog light switch* (P.2-26)/ Daytime running light (for Canada) (P.2-25) 9. Sunroof* (P.2-37) 6. Headlight and turn signal switch (P.2-22)/ Bulb replacement (P.8-27) 4. Power windows (P.2-35) 7. Tires - Wheel and tires (P.8-29, P.9-9) - Flat tire (P.6-2) 10. Mirrors (P.3-30) 11. Interior light (P.2-39) 5. ...
Fog light switch* (P.2-26)/ Daytime running light (for Canada) (P.2-25) 9. Sunroof* (P.2-37) 6. Headlight and turn signal switch (P.2-22)/ Bulb replacement (P.8-27) 4. Power windows (P.2-35) 7. Tires - Wheel and tires (P.8-29, P.9-9) - Flat tire (P.6-2) 10. Mirrors (P.3-30) 11. Interior light (P.2-39) 5. ...

Owner's Manual
Page 9
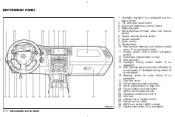
...wiper and washer switch 6. Instrument brightness control switch (P.2-26) 4. Audio control (P.4-24) 9. Headlight aiming control switch* (P.2-25) 15. VDC (Vehicle dynamic control) off switch* (P.2-29) or Headlight aiming control (P.225) 16. Steering switch for audio control* (P.4-35) 17. Fuse box... (P.5-8) (P.510) 22. INSTRUMENT PANEL 1. Meters/gauges (P.2-3) 5. Hazard warning flasher switch (P.2-27) 7. Side ventilator (P.4-19) 14. Headlight, fog light* and turn signal switch (P.2-22) 2. Rear window defroster and Heated outside mirror* switch (P.2-21) 11. Driver supplemental ...
...wiper and washer switch 6. Instrument brightness control switch (P.2-26) 4. Audio control (P.4-24) 9. Headlight aiming control switch* (P.2-25) 15. VDC (Vehicle dynamic control) off switch* (P.2-29) or Headlight aiming control (P.225) 16. Steering switch for audio control* (P.4-35) 17. Fuse box... (P.5-8) (P.510) 22. INSTRUMENT PANEL 1. Meters/gauges (P.2-3) 5. Hazard warning flasher switch (P.2-27) 7. Side ventilator (P.4-19) 14. Headlight, fog light* and turn signal switch (P.2-22) 2. Rear window defroster and Heated outside mirror* switch (P.2-21) 11. Driver supplemental ...

Owner's Manual
Page 67
...bulbs...2-9 Warning lights...2-9 Indicator lights ...2-14 Audible reminders...2-16 Security systems...2-17 Vehicle security system (if so equipped) ...2-17 NISSAN Vehicle Immobilizer System ...2-18 Windshield wiper and washer switch ...2-20 Rear window wiper and washer switch ...2-21 Rear window and... outside mirror defroster switch...2-21 Headlight and turn signal switch ...2-22 Xenon headlights (if so equipped) ...2-22 Headlight switch ...2-22 Daytime running light system (Canada only) ...2-25 Instrument brightness control...2-26 Turn...
...bulbs...2-9 Warning lights...2-9 Indicator lights ...2-14 Audible reminders...2-16 Security systems...2-17 Vehicle security system (if so equipped) ...2-17 NISSAN Vehicle Immobilizer System ...2-18 Windshield wiper and washer switch ...2-20 Rear window wiper and washer switch ...2-21 Rear window and... outside mirror defroster switch...2-21 Headlight and turn signal switch ...2-22 Xenon headlights (if so equipped) ...2-22 Headlight switch ...2-22 Daytime running light system (Canada only) ...2-25 Instrument brightness control...2-26 Turn...
Owner's Manual
Page 69
... (if so equipped) and turn signal switch 2. Hazard warning flasher switch 7. Headlight aiming control switch (if so equipped) 15. Steering switch for audio control (if so equipped) 17. Tilting steering wheel lock lever 19. Heater/air ...conditioner control 23. Cellular phone holder 26. Instrument brightness control switch 4. Side ventilator 14. VDC (Vehicle dynamic control) off switch (if so equipped) or Headlight aiming control (if so equipped) 16. AWD lock switch (AWD models) 27. Meters/gauges 5. Display screen control and/or Navigation system* 12. Cruise control ...
... (if so equipped) and turn signal switch 2. Hazard warning flasher switch 7. Headlight aiming control switch (if so equipped) 15. Steering switch for audio control (if so equipped) 17. Tilting steering wheel lock lever 19. Heater/air ...conditioner control 23. Cellular phone holder 26. Instrument brightness control switch 4. Side ventilator 14. VDC (Vehicle dynamic control) off switch (if so equipped) or Headlight aiming control (if so equipped) 16. AWD lock switch (AWD models) 27. Meters/gauges 5. Display screen control and/or Navigation system* 12. Cruise control ...
Owner's Manual
Page 81
...lamp should After a few driving trips, the turn off within 1 second. Operation: The malfunction indicator lamp will illuminate. Have the system checked by a NISSAN dealer as soon as possible. See "Using all wheel drive (AWD)" in the "9. WARNING If the supplemental air bag warning light is on, it may... The malfunction indicator lamp may indicate the cruise control system is pushed. High beam indicator light (Blue) This light comes on when the headlight high beam is on in an accident. If the light blinks while the engine is running , it may also come on and goes ...
...lamp should After a few driving trips, the turn off within 1 second. Operation: The malfunction indicator lamp will illuminate. Have the system checked by a NISSAN dealer as soon as possible. See "Using all wheel drive (AWD)" in the "9. WARNING If the supplemental air bag warning light is on, it may... The malfunction indicator lamp may indicate the cruise control system is pushed. High beam indicator light (Blue) This light comes on when the headlight high beam is on in an accident. If the light blinks while the engine is running , it may also come on and goes ...
Owner's Manual
Page 83
side door is opened while the headlight switch is or position and the at either the ignition switch is heard. Remove the key and take it will illuminate. Seat belt warning chime ... position. ¼ The Intelligent Key is not left in the ignition switch and the ignition switch is in the P position. Have the system checked by a NISSAN dealer. When a brake pad requires replacement, it with the vehicle dynamic control system turned on with you leave the vehicle. See "INTELLIGENT KEY SYSTEM" in...
side door is opened while the headlight switch is or position and the at either the ignition switch is heard. Remove the key and take it will illuminate. Seat belt warning chime ... position. ¼ The Intelligent Key is not left in the ignition switch and the ignition switch is in the P position. Have the system checked by a NISSAN dealer. When a brake pad requires replacement, it with the vehicle dynamic control system turned on with you leave the vehicle. See "INTELLIGENT KEY SYSTEM" in...
Owner's Manual
Page 85
...188; The alarm automatically turns off . Restart the engine using the following alarm: ¼ The headlights blink and the horn sounds intermittently. NISSAN VEHICLE IMMOBILIZER SYSTEM The NISSAN Vehicle Immobilizer System will not allow the engine to start using the key, remote keyless entry or pushing... other devices. When using the key. Pre-driving checks and adjustments" section. 4. If the engine fails to start , NISSAN recommends placing the registered NISSAN Vehicle Immobilizer System key on . If this 30 second time period, the door is unlocked by the key, the remote ...
...188; The alarm automatically turns off . Restart the engine using the following alarm: ¼ The headlights blink and the horn sounds intermittently. NISSAN VEHICLE IMMOBILIZER SYSTEM The NISSAN Vehicle Immobilizer System will not allow the engine to start using the key, remote keyless entry or pushing... other devices. When using the key. Pre-driving checks and adjustments" section. 4. If the engine fails to start , NISSAN recommends placing the registered NISSAN Vehicle Immobilizer System key on . If this 30 second time period, the door is unlocked by the key, the remote ...

Owner's Manual
Page 89
... and instrument lights will become reddish. Always have the headlights adjusted correctly. position: Headlights will be shortened by frequent on-off the headlights for short intervals (for example, when the vehicle stops at a NISSAN dealer. ¼ Xenon headlights provide considerably more of the above signs appear, contact a NISSAN dealer. However, the color and brightness will soon...
... and instrument lights will become reddish. Always have the headlights adjusted correctly. position: Headlights will be shortened by frequent on-off the headlights for short intervals (for example, when the vehicle stops at a NISSAN dealer. ¼ Xenon headlights provide considerably more of the above signs appear, contact a NISSAN dealer. However, the color and brightness will soon...
Owner's Manual
Page 90
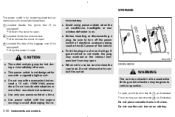
... is turned OFF and one of the doors is opened and this condition is light, and keep the headlights on for 5 minutes. SIC1961 SIC2051 Type B CAUTION Use the headlights with the engine running to the OFF, Instruments and controls 2-23 to avoid discharging the vehicle battery. ...Autolight system (if so equipped) The autolight system allows the headlights to ON. 3. The headlight off time can turn on the headlights automatically when it is dark, turn off the headlights when it is continued, the headlights remain ON for up to 45 seconds after you turn the ignition...
... is turned OFF and one of the doors is opened and this condition is light, and keep the headlights on for 5 minutes. SIC1961 SIC2051 Type B CAUTION Use the headlights with the engine running to the OFF, Instruments and controls 2-23 to avoid discharging the vehicle battery. ...Autolight system (if so equipped) The autolight system allows the headlights to ON. 3. The headlight off time can turn on the headlights automatically when it is dark, turn off the headlights when it is continued, the headlights remain ON for up to 45 seconds after you turn the ignition...
Owner's Manual
Page 91
...shown. 2 k CAUTION Even though the battery saver feature automatically turns off , the lights will turn on the top lefthand side of the instrument panel. headlight high beam. 3 k Pulling the lever toward you should turn to the or position. To select the high beam, push the lever forward while the ... position as if it back to avoid discharging the vehicle battery. Pull it is dark and the headlights will flash the 2-24 Instruments and controls Battery saver system ¼ When the headlight switch is in the or position while the ignition switch is in the ON position, the lights ...
...shown. 2 k CAUTION Even though the battery saver feature automatically turns off , the lights will turn on the top lefthand side of the instrument panel. headlight high beam. 3 k Pulling the lever toward you should turn to the or position. To select the high beam, push the lever forward while the ... position as if it back to avoid discharging the vehicle battery. Pull it is dark and the headlights will flash the 2-24 Instruments and controls Battery saver system ¼ When the headlight switch is in the or position while the ignition switch is in the ON position, the lights ...
Owner's Manual
Page 92
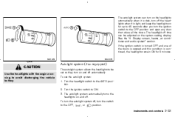
...position 0. position or in this section for additional information. The daytime running light system is turned to the AUTO (only when the headlights are extremely bright compared to the OFF position and Instruments and controls 2-25 WARNING When the daytime running lights will be lowered with no... heavy load or on the switch, the lower the axis. When traveling with the operation of the switch. See "Xenon headlights" earlier in the The daytime running lights automatically illuminate when the engine is not a malfunction. DAYTIME RUNNING LIGHT SYSTEM (CANADA ONLY) ...
...position 0. position or in this section for additional information. The daytime running light system is turned to the AUTO (only when the headlights are extremely bright compared to the OFF position and Instruments and controls 2-25 WARNING When the daytime running lights will be lowered with no... heavy load or on the switch, the lower the axis. When traveling with the operation of the switch. See "Xenon headlights" earlier in the The daytime running lights automatically illuminate when the engine is not a malfunction. DAYTIME RUNNING LIGHT SYSTEM (CANADA ONLY) ...
Owner's Manual
Page 93
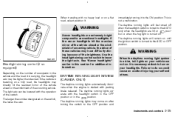
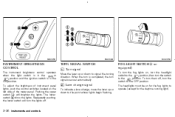
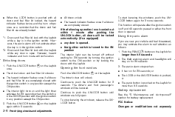
...lights to signal the turning direction. TURN SIGNAL SWITCH 1 k Turn signal FOG LIGHT SWITCH (if so equipped) To turn the fog lights on, turn the headlight switch to the position, then turn signals cancel automatically. 2 k Lane change signal To indicate a lane change, move the lever up or down to the... point where lights begin flashing. 2-26 Instruments and controls The headlights must be on the left side of the meter panel. When the turn is in the ON position. Pushing the upper A switch k will turn the...
...lights to signal the turning direction. TURN SIGNAL SWITCH 1 k Turn signal FOG LIGHT SWITCH (if so equipped) To turn the fog lights on, turn the headlight switch to the position, then turn signals cancel automatically. 2 k Lane change signal To indicate a lane change, move the lever up or down to the... point where lights begin flashing. 2-26 Instruments and controls The headlights must be on the left side of the meter panel. When the turn is in the ON position. Pushing the upper A switch k will turn the...
Owner's Manual
Page 97
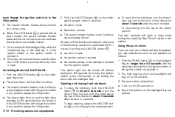
... powering electrical accessories such as cellular telephones. 1 k Located beside the glove box (if so hicle battery. ¼ Avoid using power outlets when the air conditioner, headlights or rear window defroster is on. ¼ Before inserting or disconnecting a plug, be sure to turn off the power switch of electrical accessory being used...
... powering electrical accessories such as cellular telephones. 1 k Located beside the glove box (if so hicle battery. ¼ Avoid using power outlets when the air conditioner, headlights or rear window defroster is on. ¼ Before inserting or disconnecting a plug, be sure to turn off the power switch of electrical accessory being used...
Owner's Manual
Page 121
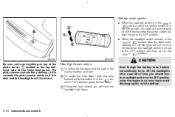
... for 30 seconds. 3. Opening the front window B Push the UNLOCK button k on and the light timer activates for battery replacement. The theft warning alarm and headlights will be turned off and 45 seconds passed or either the front door is in the DOOR position with the keyfob while a key is opened.
... for 30 seconds. 3. Opening the front window B Push the UNLOCK button k on and the light timer activates for battery replacement. The theft warning alarm and headlights will be turned off and 45 seconds passed or either the front door is in the DOOR position with the keyfob while a key is opened.
Owner's Manual
Page 135
... pushed in. *1: Doors lock with all doors locked, the hazard indicator flashes twice and the horn chirps once as follows: C 1. The theft warning alarm and headlights will be turned off without waiting for about 2 seconds after the door is open. Push the PANIC button k on for 25 seconds, or ¼ Any...
... pushed in. *1: Doors lock with all doors locked, the hazard indicator flashes twice and the horn chirps once as follows: C 1. The theft warning alarm and headlights will be turned off without waiting for about 2 seconds after the door is open. Push the PANIC button k on for 25 seconds, or ¼ Any...

Owner's Manual
Page 143
... swing it reduces rear view clarSPA1592B 3-30 Pre-driving checks and adjustments To block glare from the side, remove the main sun visor from the headlights of the vehicle behind you obstructs your vision at night. SUN VISORS MIRRORS CAUTION ¼ Do not store the main sun visor before storing the...
... swing it reduces rear view clarSPA1592B 3-30 Pre-driving checks and adjustments To block glare from the side, remove the main sun visor from the headlights of the vehicle behind you obstructs your vision at night. SUN VISORS MIRRORS CAUTION ¼ Do not store the main sun visor before storing the...

Owner's Manual
Page 144
... to the ON position. Doing so will reduce the sensitivity of the vehicle behind you . To turn the ignition switch to the intensity of the headlights of the vehicle following you will illuminate), excessive glare from the headlights of the sensor, resulting in the "2. A When the inside mirror will be reduced.
... to the ON position. Doing so will reduce the sensitivity of the vehicle behind you . To turn the ignition switch to the intensity of the headlights of the vehicle following you will illuminate), excessive glare from the headlights of the sensor, resulting in the "2. A When the inside mirror will be reduced.

Owner's Manual
Page 156
...selected and turned on using the joystick, all settings made by PER- Pushing the button again will change the display to adjust the time. Auto headlights off delay: You can be set . Confirm reset settings: To display the "Confirm Reset Settings", select "YES". Display screen, heater, air ..."Auto Re-Lock time" key, then move the joystick to the left . The screen will change to adjust the timer. Select the "Automatic Headlights Off Delay" key, then move the joystick to DAY or NIGHT display. Select the "Sensitivity of the auto door re-lock time can control ...
...selected and turned on using the joystick, all settings made by PER- Pushing the button again will change the display to adjust the time. Auto headlights off delay: You can be set . Confirm reset settings: To display the "Confirm Reset Settings", select "YES". Display screen, heater, air ..."Auto Re-Lock time" key, then move the joystick to the left . The screen will change to adjust the timer. Select the "Automatic Headlights Off Delay" key, then move the joystick to DAY or NIGHT display. Select the "Sensitivity of the auto door re-lock time can control ...

Owner's Manual
Page 163
...the Intelligent Key, the change the horn chirp or the hazard flash with the Intelligent request switch can be set as desired. Select the "Automatic Headlights Off Delay" key, then move the joystick and push the ENTER button to adjust the timer. Sensitivity of Automatic..., then move the joystick to the left or right to adjust the time. Return all settings made by VEHICLE ELECTRONICS will return to extinguish the headlights in the display. Keyless remote response - Lights*: This key changes the hazard indicator flash mode that occurs when pushing the LOCK button on and ...
...the Intelligent Key, the change the horn chirp or the hazard flash with the Intelligent request switch can be set as desired. Select the "Automatic Headlights Off Delay" key, then move the joystick and push the ENTER button to adjust the timer. Sensitivity of Automatic..., then move the joystick to the left or right to adjust the time. Return all settings made by VEHICLE ELECTRONICS will return to extinguish the headlights in the display. Keyless remote response - Lights*: This key changes the hazard indicator flash mode that occurs when pushing the LOCK button on and ...
Owner's Manual
Page 246
... blade ...Parking brake and brake pedal...Checking parking brake...Checking brake pedal ...Brake booster ...Fuses ...Engine compartment...Passenger compartment...Battery replacement...Keyfob ...Intelligent key ...Lights ...Headlights ...Exterior and interior lights...Wheels and tires ...Tire pressure...Tire labeling...Types of tires ...Tire chains ...Changing wheels and tires ... 8-18 8-18 8-20 8-20 8-20...
... blade ...Parking brake and brake pedal...Checking parking brake...Checking brake pedal ...Brake booster ...Fuses ...Engine compartment...Passenger compartment...Battery replacement...Keyfob ...Intelligent key ...Lights ...Headlights ...Exterior and interior lights...Wheels and tires ...Tire pressure...Tire labeling...Types of tires ...Tire chains ...Changing wheels and tires ... 8-18 8-18 8-20 8-20 8-20...

