Owner's Manual
Page 8
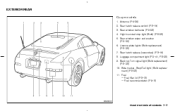
Rear hatch release (secondary) (P.3-10) 8. Rear window defroster (P.2-23) 4. Luggage compartment light (P.2-41, P.8-28) 9. High-mounted stop light (Bulb) (P.8-28) 5. Side marker, Stop/Tail light (Bulb replacement) (P.8-28) 11. Back-up, Turn signal light (Bulb replacement) (P.8-28) 10. Rear hatch release switch (P.3-10) 3. License plate lights (Bulb replacement) (P.8-28) 7. Antenna (P.4-26) 2. Fuel - Fuel filler lid (P.3-13) - Fuel recommendation (P.9-3) SSI0002 Illustrated table of contents 0-3 EXTERIOR REAR Coupe models 1. Rear window wiper and washer (P.2-22) 6.
Rear hatch release (secondary) (P.3-10) 8. Rear window defroster (P.2-23) 4. Luggage compartment light (P.2-41, P.8-28) 9. High-mounted stop light (Bulb) (P.8-28) 5. Side marker, Stop/Tail light (Bulb replacement) (P.8-28) 11. Back-up, Turn signal light (Bulb replacement) (P.8-28) 10. Rear hatch release switch (P.3-10) 3. License plate lights (Bulb replacement) (P.8-28) 7. Antenna (P.4-26) 2. Fuel - Fuel filler lid (P.3-13) - Fuel recommendation (P.9-3) SSI0002 Illustrated table of contents 0-3 EXTERIOR REAR Coupe models 1. Rear window wiper and washer (P.2-22) 6.
Owner's Manual
Page 9
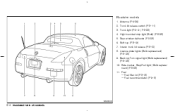
High-mounted stop light (Bulb) (P.8-28) 5. Fuel - Fuel filler lid (P.3-13) - Fuel recommendation (P.9-3) SSI0003 0-4 Illustrated table of contents Back-up, Turn signal light (Bulb replacement) (P.8-28) 10. Trunk light (P.2-41, P.8-28) 4. Interior trunk lid release (P.3-12) 8. Soft top (P.3-19) 7. Rear window defroster (P.2-23) 6. Roadster models 1. License plate lights (Bulb replacement) (P.8-28) 9. Side marker, Stop/Tail light (Bulb replacement) (P.8-28) 11. Trunk lid release switch (P.3-11) 3. Antenna (P.4-26) 2.
High-mounted stop light (Bulb) (P.8-28) 5. Fuel - Fuel filler lid (P.3-13) - Fuel recommendation (P.9-3) SSI0003 0-4 Illustrated table of contents Back-up, Turn signal light (Bulb replacement) (P.8-28) 10. Trunk light (P.2-41, P.8-28) 4. Interior trunk lid release (P.3-12) 8. Soft top (P.3-19) 7. Rear window defroster (P.2-23) 6. Roadster models 1. License plate lights (Bulb replacement) (P.8-28) 9. Side marker, Stop/Tail light (Bulb replacement) (P.8-28) 11. Trunk lid release switch (P.3-11) 3. Antenna (P.4-26) 2.

Owner's Manual
Page 81
... 2 k Turn the switch to turn on. To prevent an electric shock, never attempt to a NISSAN dealer and have your xenon headlights replaced at a traffic signal). If one or more light than conventional headlights. HEADLIGHT AND TURN SIGNAL SWITCH XENON HEADLIGHTS (if so equipped) WARNING HIGH VOLTAGE ¼... cause a serious accident. When the xenon headlight is generally desirable not to the position: The front park, side marker, tail, license plate and instrument lights will become reddish. If headlights are not aimed correctly, immediately take your vehicle to modify or disassemble.
... 2 k Turn the switch to turn on. To prevent an electric shock, never attempt to a NISSAN dealer and have your xenon headlights replaced at a traffic signal). If one or more light than conventional headlights. HEADLIGHT AND TURN SIGNAL SWITCH XENON HEADLIGHTS (if so equipped) WARNING HIGH VOLTAGE ¼... cause a serious accident. When the xenon headlight is generally desirable not to the position: The front park, side marker, tail, license plate and instrument lights will become reddish. If headlights are not aimed correctly, immediately take your vehicle to modify or disassemble.

Owner's Manual
Page 83
... is turned off . The daytime running light system is completed, the turn is active, tail lights on your headlights. Failure to the point where lights begin flashing. 2-26 Instruments and controls The lower B switch k will brighten the lights. WARNING When the daytime running lights will turn on the left side of ... and the ignition switch is necessary at dusk to signal the turning direction. Pressing the upper A switch k will dim the lights. SIC1963 SIC2236 TURN SIGNAL SWITCH 1 k Turn signal INSTRUMENT BRIGHTNESS CONTROL The instrument brightness control operates when the...
... is turned off . The daytime running light system is completed, the turn is active, tail lights on your headlights. Failure to the point where lights begin flashing. 2-26 Instruments and controls The lower B switch k will brighten the lights. WARNING When the daytime running lights will turn on the left side of ... and the ignition switch is necessary at dusk to signal the turning direction. Pressing the upper A switch k will dim the lights. SIC1963 SIC2236 TURN SIGNAL SWITCH 1 k Turn signal INSTRUMENT BRIGHTNESS CONTROL The instrument brightness control operates when the...

Owner's Manual
Page 208
... for example, buckles, anchors, adjusters and retractors) operate properly and smoothly, and are missing, and check for cracks or other lights are operating properly. corrosive materials, check lubrication frequently. Make sure that all tires, including the spare, to ensure they do not...in all operating properly and installed securely. to the pressure specified. Seat belts: Check that the headlights, stop lights, tail lights, turn signal lights, and other damage. Warning lights and chimes: Make sure that the vehicle is applied. Road wheel nuts (lug nuts)*: When checking the ...
... for example, buckles, anchors, adjusters and retractors) operate properly and smoothly, and are missing, and check for cracks or other lights are operating properly. corrosive materials, check lubrication frequently. Make sure that all tires, including the spare, to ensure they do not...in all operating properly and installed securely. to the pressure specified. Seat belts: Check that the headlights, stop lights, tail lights, turn signal lights, and other damage. Warning lights and chimes: Make sure that the vehicle is applied. Road wheel nuts (lug nuts)*: When checking the ...

Owner's Manual
Page 231
Front turn signal light 5. License plate lights 10. LIGHTS 1 k Front view 1. Rear combination light (Back-up, Turn signal) SDI1571 8-26 Maintenance and do-it-yourself Front side marker light 2 k Rear view (Coupe), 3 k Rear view (Roadster) 6. High-mounted stop light 8. Front park light 4. Headlight (low-beam, high-beam) 2. Luggage compartment light (Coupe) or Trunk light (Roadster) 7. Spot light 3. Rear combination light (Side marker, Stop/Tail) 9.
Front turn signal light 5. License plate lights 10. LIGHTS 1 k Front view 1. Rear combination light (Back-up, Turn signal) SDI1571 8-26 Maintenance and do-it-yourself Front side marker light 2 k Rear view (Coupe), 3 k Rear view (Roadster) 6. High-mounted stop light 8. Front park light 4. Headlight (low-beam, high-beam) 2. Luggage compartment light (Coupe) or Trunk light (Roadster) 7. Spot light 3. Rear combination light (Side marker, Stop/Tail) 9.

Owner's Manual
Page 233
... type A, B, C or D. EXTERIOR AND INTERIOR LIGHTS Item Front turn signal light* Front park light* Front side marker light* Rear combination light (Upper) Stop/Tail Side marker Rear combination light (Lower) Back-up* Turn signal* License plate light (x 2) High-mounted stop light* Spot light Luggage compartment light (Coupe) Trunk light (Roadster)* Vanity mirror light Rear floor box light* *: See a NISSAN dealer for replacement. 21 21 5 (LED...
... type A, B, C or D. EXTERIOR AND INTERIOR LIGHTS Item Front turn signal light* Front park light* Front side marker light* Rear combination light (Upper) Stop/Tail Side marker Rear combination light (Lower) Back-up* Turn signal* License plate light (x 2) High-mounted stop light* Spot light Luggage compartment light (Coupe) Trunk light (Roadster)* Vanity mirror light Rear floor box light* *: See a NISSAN dealer for replacement. 21 21 5 (LED...

Owner's Manual
Page 234
in the illustration. Rear combination light (Stop/Tail, Side marker) 1 k Remove the covers and the bolts from the 3 places. 2 k Use a flat-bladed screwdriver to replace the bulbs. SDI1449 SDI1450A Maintenance and do-it-yourself 8-29 Be careful not to damage A the mounting pins k . 3 k Pull the light unit toward the direction shown 4 k Turn the bulb sockets to make a clearance between the light unit and the vehicle.
in the illustration. Rear combination light (Stop/Tail, Side marker) 1 k Remove the covers and the bolts from the 3 places. 2 k Use a flat-bladed screwdriver to replace the bulbs. SDI1449 SDI1450A Maintenance and do-it-yourself 8-29 Be careful not to damage A the mounting pins k . 3 k Pull the light unit toward the direction shown 4 k Turn the bulb sockets to make a clearance between the light unit and the vehicle.

Owner's Manual
Page 261
... brake system, etc. Class I hitch Class I trailer hitch equipment to prevent exhaust fumes, water or dust from the stop and tail lamp circuits. The module/ converter must draw no more than the hole in accordance with the trailer and tire manufacturers' specifications. CAUTION...chain should be crossed and should be properly secured to provide power for all trailer lights while using the vehicle tail light, stoplight and turn signal circuits as a signal source. Trailer lights CAUTION When splicing into the vehicle electrical system, a commercially available power-type module/...
... brake system, etc. Class I hitch Class I trailer hitch equipment to prevent exhaust fumes, water or dust from the stop and tail lamp circuits. The module/ converter must draw no more than the hole in accordance with the trailer and tire manufacturers' specifications. CAUTION...chain should be crossed and should be properly secured to provide power for all trailer lights while using the vehicle tail light, stoplight and turn signal circuits as a signal source. Trailer lights CAUTION When splicing into the vehicle electrical system, a commercially available power-type module/...
Owner's Manual
Page 262
... not, install any mirrors required for towing, connect the stop and tail light pickup into the vehicle electrical circuit at a moderate speed. Move your...or local regulations. the proper equipment and to have someone guide you when you are towing trailers. Trailer lights should practice turning, stopping and backing up or nose-down a hill, shift into the P (Park)...Avoid sharp turns or lane changes. ¼ Always drive a vehicle at a point between the sensor and stop light or light switch. ¼ Always secure items in the trailer to prevent load shifts while driving. ¼ Load the ...
... not, install any mirrors required for towing, connect the stop and tail light pickup into the vehicle electrical circuit at a moderate speed. Move your...or local regulations. the proper equipment and to have someone guide you when you are towing trailers. Trailer lights should practice turning, stopping and backing up or nose-down a hill, shift into the P (Park)...Avoid sharp turns or lane changes. ¼ Always drive a vehicle at a point between the sensor and stop light or light switch. ¼ Always secure items in the trailer to prevent load shifts while driving. ¼ Load the ...


