Owner's Manual
Page 86
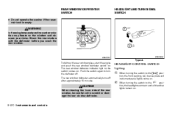
... SWITCH Lighting 1 When turning the switch to scratch or damage the rear window defroster. 2-20 Instruments and controls WIC0327 WIC0242 To defrost the rear window glass, start the engine and push the rear window defroster switch on . HEADLIGHT AND TURN SIGNAL SWITCH WARNING In freezing temperatures the washer solution may freeze...
... SWITCH Lighting 1 When turning the switch to scratch or damage the rear window defroster. 2-20 Instruments and controls WIC0327 WIC0242 To defrost the rear window glass, start the engine and push the rear window defroster switch on . HEADLIGHT AND TURN SIGNAL SWITCH WARNING In freezing temperatures the washer solution may freeze...
Owner's Manual
Page 199
7 Appearance and care Cleaning exterior ...7-2 Washing ...7-2 Waxing ...7-2 Removing spots ...7-2 Underbody ...7-3 Glass ...7-3 Aluminum alloy wheels ...7-3 Chrome parts ...7-3 Cleaning interior...7-3 Floor mats ...7-4 Seat belts ...7-4 Corrosion protection ...7-5 Most common factors contributing to vehicle corrosion ...7-5 Environmental factors influence the rate of corrosion ...7-5 To protect your vehicle from corrosion ...7-5
7 Appearance and care Cleaning exterior ...7-2 Washing ...7-2 Waxing ...7-2 Removing spots ...7-2 Underbody ...7-3 Glass ...7-3 Aluminum alloy wheels ...7-3 Chrome parts ...7-3 Cleaning interior...7-3 Floor mats ...7-4 Seat belts ...7-4 Corrosion protection ...7-5 Most common factors contributing to vehicle corrosion ...7-5 Environmental factors influence the rate of corrosion ...7-5 To protect your vehicle from corrosion ...7-5
Owner's Manual
Page 201
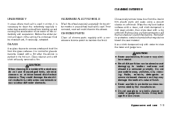
...; Small dirt particles can be abrasive and damaging to leather surfaces and should be checked and, if necessary, retreated. It is normal for glass to maintain the finish. Do not use saddle soap, polishes, oils, cleaning fluids, solvents, detergents or ammonia-based cleaners as they may... damage the leather's natural finish. ● Never use fabric protectors unless recommended by the manufacturer. ● Do not use glass or plastic cleaner on the underbody and suspension. Appearance and care 7-3 Before using a vacuum cleaner or soft brush. Use a cloth dampened only with...
...; Small dirt particles can be abrasive and damaging to leather surfaces and should be checked and, if necessary, retreated. It is normal for glass to maintain the finish. Do not use saddle soap, polishes, oils, cleaning fluids, solvents, detergents or ammonia-based cleaners as they may... damage the leather's natural finish. ● Never use fabric protectors unless recommended by the manufacturer. ● Do not use glass or plastic cleaner on the underbody and suspension. Appearance and care 7-3 Before using a vacuum cleaner or soft brush. Use a cloth dampened only with...

Owner's Manual
Page 230
... form when rinsing with a cloth soaked in a washer solution or a mild detergent. If your windshield is opened. ● Make sure the wiper blades contact the glass; REPLACING Replace the wiper blades if they are worn. 1 2 3 Lift the wiper arm away from wind pressure. Clean the outside of the windshield with clear...
... form when rinsing with a cloth soaked in a washer solution or a mild detergent. If your windshield is opened. ● Make sure the wiper blades contact the glass; REPLACING Replace the wiper blades if they are worn. 1 2 3 Lift the wiper arm away from wind pressure. Clean the outside of the windshield with clear...
Owner's Manual
Page 237
...button, then the button two or three times to operate the equipment. HB5/9007* *: Always check with the Parts Department at a NISSAN dealer for the latest parts information. ● Do not leave the bulb out of the headlight reflector for any interference received, including interference... that may break if the glass envelope is scratched or the bulb is subject to approximately 33 ft (10 m) from inside the halogen bulb. however, if it -yourself ...
...button, then the button two or three times to operate the equipment. HB5/9007* *: Always check with the Parts Department at a NISSAN dealer for the latest parts information. ● Do not leave the bulb out of the headlight reflector for any interference received, including interference... that may break if the glass envelope is scratched or the bulb is subject to approximately 33 ft (10 m) from inside the halogen bulb. however, if it -yourself ...

Owner's Manual
Page 238
...hood. Carefully remove the headlight bulb. Connect the negative (-) battery cable. 5. Open the hood. 2. The bulb may break if the glass envelope is scratched or the bulb is free form the headlight reflector and then remove it -yourself Turn the bulb retaining ring counterclockwise until ... dropped. 8-34 Maintenance and do-it A . 5. Replacing the fog light bulb CAUTION ● High pressure halogen gas is necessary, contact a NISSAN dealer. 4. Do not shake or rotate the bulb when removing it snaps and stops. 4. When aiming adjustment is sealed inside the halogen bulb. ...
...hood. Carefully remove the headlight bulb. Connect the negative (-) battery cable. 5. Open the hood. 2. The bulb may break if the glass envelope is scratched or the bulb is free form the headlight reflector and then remove it -yourself Turn the bulb retaining ring counterclockwise until ... dropped. 8-34 Maintenance and do-it A . 5. Replacing the fog light bulb CAUTION ● High pressure halogen gas is necessary, contact a NISSAN dealer. 4. Do not shake or rotate the bulb when removing it snaps and stops. 4. When aiming adjustment is sealed inside the halogen bulb. ...

Owner's Manual
Page 239
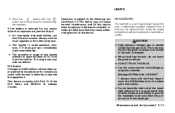
Maintenance and do not touch the glass envelope. 1. Disconnect the negative (-) battery cable. Disconnect bulb connector. 3. Do not touch the glass envelope. 5. WDI0307 2. Rotate the bulb cover counterclockwise and remove. 4. Remove by pulling it . Do not shake or rotate the bulb when removing it straight out of removal. Install in the reverse order of the fog light assembly. ● When handling the bulb, do -it-yourself 8-35
Maintenance and do not touch the glass envelope. 1. Disconnect the negative (-) battery cable. Disconnect bulb connector. 3. Do not touch the glass envelope. 5. WDI0307 2. Rotate the bulb cover counterclockwise and remove. 4. Remove by pulling it . Do not shake or rotate the bulb when removing it straight out of removal. Install in the reverse order of the fog light assembly. ● When handling the bulb, do -it-yourself 8-35
