
Owner's Manual
Page 56
... (if so equipped) ...2-12 Windshield wiper and washer switch ...2-15 Switch operation ...2-16 Rear window defogger switch (Crew Cab models only) ...2-16 Headlight and turn signal switch ...2-17 Headlight switch ...2-17 Turn signal switch...2-18 Front fog light switch (if so equipped)...2-18 Hazard warning flasher switch ...2-19 Horn...2-19 Power point...
... (if so equipped) ...2-12 Windshield wiper and washer switch ...2-15 Switch operation ...2-16 Rear window defogger switch (Crew Cab models only) ...2-16 Headlight and turn signal switch ...2-17 Headlight switch ...2-17 Turn signal switch...2-18 Front fog light switch (if so equipped)...2-18 Hazard warning flasher switch ...2-19 Horn...2-19 Power point...

Owner's Manual
Page 67
...or missing, or if the vehicle runs out of cargo Instruments and controls 2-11 High beam indicator light This blue light comes on when the headlight high beams are on steady − An emission control system malfunction has been detected. Check to the dealer. ● Malfunction indicator lamp ... is not functioning properly. If the turn off after a few driving trips, the should turn off after a few driving trips, have your NISSAN dealer. ● Failure to drive the vehicle. Have the system checked by the cruise control system. While the cruise main switch indicator light ...
...or missing, or if the vehicle runs out of cargo Instruments and controls 2-11 High beam indicator light This blue light comes on when the headlight high beams are on steady − An emission control system malfunction has been detected. Check to the dealer. ● Malfunction indicator lamp ... is not functioning properly. If the turn off after a few driving trips, the should turn off after a few driving trips, have your NISSAN dealer. ● Failure to drive the vehicle. Have the system checked by the cruise control system. While the cruise main switch indicator light ...
Owner's Manual
Page 68
Have the vehicle inspected by an authorized NISSAN dealer. You do not need to the dealer. CHIMES Brake pad wear...Take the ignition key when you leave the vehicle. IC0005 Overdrive off when you leave the vehicle. Turn the headlight switch off indicator light (automatic transmission only) This light comes on unless the ignition key is pushed to the...of the vehicle are disturbed. Key reminder chime The chime sounds when the driver's door is opened with the headlight switch on when the overdrive switch is in the ON position. The malfunction indicator lamp may stop blinking and ...
Have the vehicle inspected by an authorized NISSAN dealer. You do not need to the dealer. CHIMES Brake pad wear...Take the ignition key when you leave the vehicle. IC0005 Overdrive off when you leave the vehicle. Turn the headlight switch off indicator light (automatic transmission only) This light comes on unless the ignition key is pushed to the...of the vehicle are disturbed. Key reminder chime The chime sounds when the driver's door is opened with the headlight switch on when the overdrive switch is in the ON position. The malfunction indicator lamp may stop blinking and ...

Owner's Manual
Page 70
... excessively to the unlock position, the system may not activate. The vehicle security system is NOT activated if one of the following alarm: ● The headlights blink and the horn sounds intermittently. However, the alarm reactivates if the vehicle is turned to stop if the ignition switch is not in the...
... excessively to the unlock position, the system may not activate. The vehicle security system is NOT activated if one of the following alarm: ● The headlights blink and the horn sounds intermittently. However, the alarm reactivates if the vehicle is turned to stop if the ignition switch is not in the...
Owner's Manual
Page 73
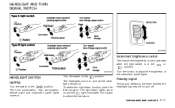
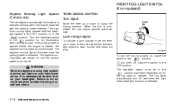
To select the high beam function, push the lever forward. Passing signal Pulling and releasing the lever flashes the headlight high beams on . The high beam lights come on and all the other lights remain on and the light illuminates. Instruments and controls... position: Turn the control to select the low beam. Pull it back to adjust the brightness of the instrument panel lights. The headlights come on . HEADLIGHT AND TURN SIGNAL SWITCH AIC1023 Instrument brightness control The instrument brightness control operates or when the light switch is in the position. AIC1116...
To select the high beam function, push the lever forward. Passing signal Pulling and releasing the lever flashes the headlight high beams on . The high beam lights come on and all the other lights remain on and the light illuminates. Instruments and controls... position: Turn the control to select the low beam. Pull it back to adjust the brightness of the instrument panel lights. The headlights come on . HEADLIGHT AND TURN SIGNAL SWITCH AIC1023 Instrument brightness control The instrument brightness control operates or when the light switch is in the position. AIC1116...
Owner's Manual
Page 74
...a reduced intensity when the engine is started , the daytime running lights do so could cause an accident injuring yourself and others. Turn the headlight switch to the position for the fog lights to flash, but the lever does not latch. TURN SIGNAL SWITCH Turn signal Move the lever ...in the position. To turn the front fog lights on until the ignition switch is turned off whenever the high beam headlight function is active, tail lights on your headlights. The daytime running light system is selected. 2-18 Instruments and controls Failure to the OFF position. AIC0618 To turn ...
...a reduced intensity when the engine is started , the daytime running lights do so could cause an accident injuring yourself and others. Turn the headlight switch to the position for the fog lights to flash, but the lever does not latch. TURN SIGNAL SWITCH Turn signal Move the lever ...in the position. To turn the front fog lights on until the ignition switch is turned off whenever the high beam headlight function is active, tail lights on your headlights. The daytime running light system is selected. 2-18 Instruments and controls Failure to the OFF position. AIC0618 To turn ...
Owner's Manual
Page 76
...point with the engine running. (If the engine is stopped, this could result in a discharged battery.) ● Avoid using when the air conditioner, headlights or rear window defogger is on. Do not use with a cigarette lighter unit. ● Before inserting or disconnecting a plug, be purchased from an authorized... NISSAN dealer. It is turned OFF. ● Push the plug in all the way. If good contact is not made, the plug may overheat or...
...point with the engine running. (If the engine is stopped, this could result in a discharged battery.) ● Avoid using when the air conditioner, headlights or rear window defogger is on. Do not use with a cigarette lighter unit. ● Before inserting or disconnecting a plug, be purchased from an authorized... NISSAN dealer. It is turned OFF. ● Push the plug in all the way. If good contact is not made, the plug may overheat or...

Owner's Manual
Page 91
... If you are near your vehicle and feel threatened, you may activate the panic alarm to call attention as follows: 1. The theft warning alarm and headlights will lock automatically within five seconds. Push the UNLOCK button on the multi- The interior light illuminates for longer than 0.5 seconds. 2. Only the driver's side...
... If you are near your vehicle and feel threatened, you may activate the panic alarm to call attention as follows: 1. The theft warning alarm and headlights will lock automatically within five seconds. Push the UNLOCK button on the multi- The interior light illuminates for longer than 0.5 seconds. 2. Only the driver's side...

Owner's Manual
Page 99
OUTSIDE MIRRORS The outside mirror can be moved in any direction for a better rear view. WARNING Use the night position only when necessary because it reduces rear view clarity. Pre-driving checks and adjustments 3-13 SUN VISORS MIRRORS AIC0710 AIC0703 APD1090 VANITY MIRROR (if so equipped) A vanity mirror is located on the rear side of vehicles behind the vehicle. INSIDE MIRROR The night position reduces glare from the headlights of the passenger sunvisor.
OUTSIDE MIRRORS The outside mirror can be moved in any direction for a better rear view. WARNING Use the night position only when necessary because it reduces rear view clarity. Pre-driving checks and adjustments 3-13 SUN VISORS MIRRORS AIC0710 AIC0703 APD1090 VANITY MIRROR (if so equipped) A vanity mirror is located on the rear side of vehicles behind the vehicle. INSIDE MIRROR The night position reduces glare from the headlights of the passenger sunvisor.
Owner's Manual
Page 196
... pedal ...8-24 Brake booster ...8-25 Clutch pedal ...8-26 Checking clutch pedal ...8-26 Fuses...8-27 Passenger compartment ...8-27 Multi-remote controller battery replacement ...8-28 Lights ...8-29 Headlights...8-29 Fog lights (if so equipped)...8-32 Exterior and interior lights ...8-33 Wheels and tires ...8-36 Tire pressure ...8-36
... pedal ...8-24 Brake booster ...8-25 Clutch pedal ...8-26 Checking clutch pedal ...8-26 Fuses...8-27 Passenger compartment ...8-27 Multi-remote controller battery replacement ...8-28 Lights ...8-29 Headlights...8-29 Fog lights (if so equipped)...8-32 Exterior and interior lights ...8-33 Wheels and tires ...8-36 Tire pressure ...8-36

Owner's Manual
Page 223
This could damage the electrical system or cause a fire. Do-it with the fuse puller. 4. FUSES ADI1128 PASSENGER COMPARTMENT CAUTION Never use a fuse of a higher amperage rating than specified on the fuse box cover. Be sure the ignition key and the headlight switch are OFF. 2. Remove the fuse box cover. 3. Remove the fuse with a new fuse. 5. If the electrical equipment does not operate, check for an open , replace it -yourself 8-27 If a new fuse opens again, have the electrical system checked and repaired by an authorized NISSAN dealer. If the fuse is open fuse. 1.
This could damage the electrical system or cause a fire. Do-it with the fuse puller. 4. FUSES ADI1128 PASSENGER COMPARTMENT CAUTION Never use a fuse of a higher amperage rating than specified on the fuse box cover. Be sure the ignition key and the headlight switch are OFF. 2. Remove the fuse box cover. 3. Remove the fuse with a new fuse. 5. If the electrical equipment does not operate, check for an open , replace it -yourself 8-27 If a new fuse opens again, have the electrical system checked and repaired by an authorized NISSAN dealer. If the fuse is open fuse. 1.

Owner's Manual
Page 225
...● Use the same number and wattage as originally installed: Wattage 65/55 Bulb No. This device complies with the Parts Department at an authorized NISSAN dealer for compliance could void the user's authority to the following two conditions: (1) This device may not cause harmful interference, and (2) this device ... The bulb may cause undesired operation of Industry Canada. CAUTION ● High pressure halogen gas is a semi-sealed beam type which uses a replaceable headlight (halogen) bulb. HEADLIGHTS The headlight is sealed inside the engine compartment without removing the...
...● Use the same number and wattage as originally installed: Wattage 65/55 Bulb No. This device complies with the Parts Department at an authorized NISSAN dealer for compliance could void the user's authority to the following two conditions: (1) This device may not cause harmful interference, and (2) this device ... The bulb may cause undesired operation of Industry Canada. CAUTION ● High pressure halogen gas is a semi-sealed beam type which uses a replaceable headlight (halogen) bulb. HEADLIGHTS The headlight is sealed inside the engine compartment without removing the...

Owner's Manual
Page 226
...low beam on. 2. When aiming adjustment is necessary, contact an authorized NISSAN dealer. ● Do not leave the bulb out of the headlight reflector for full levels of time as bulb center (on level ground. Replacing the headlight bulb 1. Disconnect the negative ( ) battery cable. 3 Disconnect the ...the driver or an equivalent weight placed in the reverse order of removal. ● Be sure the lip of the bulb socket contacts the headlight body. ● Adjust beam pattern until it . 5. Open the hood. 2. Turn the bulb retaining ring counterclockwise until cutoff line is ...
...low beam on. 2. When aiming adjustment is necessary, contact an authorized NISSAN dealer. ● Do not leave the bulb out of the headlight reflector for full levels of time as bulb center (on level ground. Replacing the headlight bulb 1. Disconnect the negative ( ) battery cable. 3 Disconnect the ...the driver or an equivalent weight placed in the reverse order of removal. ● Be sure the lip of the bulb socket contacts the headlight body. ● Adjust beam pattern until it . 5. Open the hood. 2. Turn the bulb retaining ring counterclockwise until cutoff line is ...

Owner's Manual
Page 228
If the vehicle front body has been repaired and/or the headlight assembly has been replaced, check aiming. LDI0050 FOG LIGHTS (if so equipped) Replacing the fog light bulb CAUTION ● High pressure halogen gas is dropped. ● When handling the bulb, do not touch the glass envelope. LDI0028 8-32 Do-it-yourself Adjust headlamps accordingly. The bulb may break if the glass envelope is scratched or the bulb is sealed inside the halogen bulb. Use the aiming chart shown in the illustration. ● Basic illuminating area should be within the range shown.
If the vehicle front body has been repaired and/or the headlight assembly has been replaced, check aiming. LDI0050 FOG LIGHTS (if so equipped) Replacing the fog light bulb CAUTION ● High pressure halogen gas is dropped. ● When handling the bulb, do not touch the glass envelope. LDI0028 8-32 Do-it-yourself Adjust headlamps accordingly. The bulb may break if the glass envelope is scratched or the bulb is sealed inside the halogen bulb. Use the aiming chart shown in the illustration. ● Basic illuminating area should be within the range shown.
Owner's Manual
Page 229
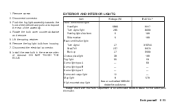
... counterclockwise and remove. 5. Do-it-yourself 8-33 Disconnect the electrical connector. 8. EXTERIOR AND INTERIOR LIGHTS Item Front combination light: Headlight Turn signal light Parking light side front Side marker Rear combination light: Turn signal Stop/Tail Back-up License plate light Fog light...H3 83 578 55/65 28.5 5 5 9007 3456k 168 168 Wattage (W) Bulb No.* *: Always check with the Parts Department at an authorized NISSAN dealer for the latest parts information. Disconnect connector. 3. Install the new bulb in the reverse order of the assembly. 4. Lift the spring retainer....
... counterclockwise and remove. 5. Do-it-yourself 8-33 Disconnect the electrical connector. 8. EXTERIOR AND INTERIOR LIGHTS Item Front combination light: Headlight Turn signal light Parking light side front Side marker Rear combination light: Turn signal Stop/Tail Back-up License plate light Fog light...H3 83 578 55/65 28.5 5 5 9007 3456k 168 168 Wattage (W) Bulb No.* *: Always check with the Parts Department at an authorized NISSAN dealer for the latest parts information. Disconnect connector. 3. Install the new bulb in the reverse order of the assembly. 4. Lift the spring retainer....

Owner's Manual
Page 235
... that all four wheels. Some of these effects may lead to -tire clearance, tire chain clearance, speedometer calibration, headlight aim and bumper height. Contact an authorized NISSAN dealer. Therefore, they should be replaced with tires of the same size, brand, construction and tread pattern. Wheels ... wear. Recommended types and sizes are changed for wheel off the vehicle. Failure to repair the spare tire, contact an authorized NISSAN dealer. If it has been repaired. Spin balancing the front wheels on the vehicle could have the same offset dimension. Four-...
... that all four wheels. Some of these effects may lead to -tire clearance, tire chain clearance, speedometer calibration, headlight aim and bumper height. Contact an authorized NISSAN dealer. Therefore, they should be replaced with tires of the same size, brand, construction and tread pattern. Wheels ... wear. Recommended types and sizes are changed for wheel off the vehicle. Failure to repair the spare tire, contact an authorized NISSAN dealer. If it has been repaired. Spin balancing the front wheels on the vehicle could have the same offset dimension. Four-...

Owner's Manual
Page 241
... detect uneven or abnormal tire wear, there may be needed. Tighten if necessary. Make sure that the headlights, stop lights, tail lights, turn signal lights, and other corrosive materials, check lubrication frequently. Also check headlight aim. Check the belt webbing for smooth operation and make sure no wheel nuts are all latches...
... detect uneven or abnormal tire wear, there may be needed. Tighten if necessary. Make sure that the headlights, stop lights, tail lights, turn signal lights, and other corrosive materials, check lubrication frequently. Also check headlight aim. Check the belt webbing for smooth operation and make sure no wheel nuts are all latches...
Owner's Manual
Page 284
... rating...10-5 Fuel recommendation ...10-4 Fuses ...8-27 G Gauge Engine coolant temperature gauge ...Fuel gauge...Odometer...Speedometer ...Tachometer...General maintenance ...H Hazard warning flasher switch ...2-19 Headlight aiming adjustment ...8-30 Headlight and turn signal switch ...2-17 2-5 2-6 2-3 2-3 2-5 9-2 11-2 fuel...5-20 Emission control information label...10-14 Emission control system warranty...10-28 Engine Before starting...
... rating...10-5 Fuel recommendation ...10-4 Fuses ...8-27 G Gauge Engine coolant temperature gauge ...Fuel gauge...Odometer...Speedometer ...Tachometer...General maintenance ...H Hazard warning flasher switch ...2-19 Headlight aiming adjustment ...8-30 Headlight and turn signal switch ...2-17 2-5 2-6 2-3 2-3 2-5 9-2 11-2 fuel...5-20 Emission control information label...10-14 Emission control system warranty...10-28 Engine Before starting...
Owner's Manual
Page 285
......1-20 Brake light (See stop light) ...8-33 Bulb check/instrument panel ...2-7 Bulb replacement...8-33 Headlight aiming adjustment ...8-30 Headlight and turn signal switch ...2-17 Headlights...8-29 Light bulbs ...8-29 Passenger supplemental air bag ON/OFF switch and light ...1-17 Spotlights (... mirror control ...3-14 Outside mirrors ...3-13 Overdrive switch...5-13, 5-14 Overheat If your vehicle overheats ...6-10 9-2 9-3 8-2 9-2 9-5 11-3 Headlights ...8-29 Hood release ...3-8 Horn ...2-19 Hubs Auto-lock free-running hubs ...5-21 I Indicator lights and chimes (See warning/ indicator lights and...
......1-20 Brake light (See stop light) ...8-33 Bulb check/instrument panel ...2-7 Bulb replacement...8-33 Headlight aiming adjustment ...8-30 Headlight and turn signal switch ...2-17 Headlights...8-29 Light bulbs ...8-29 Passenger supplemental air bag ON/OFF switch and light ...1-17 Spotlights (... mirror control ...3-14 Outside mirrors ...3-13 Overdrive switch...5-13, 5-14 Overheat If your vehicle overheats ...6-10 9-2 9-3 8-2 9-2 9-5 11-3 Headlights ...8-29 Hood release ...3-8 Horn ...2-19 Hubs Auto-lock free-running hubs ...5-21 I Indicator lights and chimes (See warning/ indicator lights and...
Owner's Manual
Page 287
camper loading...10-17 Turn signal switch (See headlight and turn signal switch ...2-17 Overdrive switch...5-13, 5-14 Passenger supplemental air bag ON/OFF switch and light...1-17 Rear window defogger switch ...2-16 Windshield ... ...2-25 Power windows...2-23 Rear sliding window ...2-25 Windshield wiper and washer switch ...2-15 Wiper Windshield wiper and washer switch ...2-15 Wiper blades...8-23 11-5 Headlight and turn signal switch) ...2-17 U Uniform tire quality grading ...10-27 V Vanity mirror ...3-13 Vehicle dimensions and weights ...10-11 Vehicle identification number (VIN) (chassis...
camper loading...10-17 Turn signal switch (See headlight and turn signal switch ...2-17 Overdrive switch...5-13, 5-14 Passenger supplemental air bag ON/OFF switch and light...1-17 Rear window defogger switch ...2-16 Windshield ... ...2-25 Power windows...2-23 Rear sliding window ...2-25 Windshield wiper and washer switch ...2-15 Wiper Windshield wiper and washer switch ...2-15 Wiper blades...8-23 11-5 Headlight and turn signal switch) ...2-17 U Uniform tire quality grading ...10-27 V Vanity mirror ...3-13 Vehicle dimensions and weights ...10-11 Vehicle identification number (VIN) (chassis...


