
Owner Guide 1st Printing
Page 101
...using the lock control on the driver's door panel while the driver's door is located atop the driver's side rear quarter trim panel, below the rear window. Press this chapter for more information. Auxiliary power door lock control An additional power door lock control can be accessed by opening the... liftgate. The power door lock control is open. 101 Smart unlocking ...
...using the lock control on the driver's door panel while the driver's door is located atop the driver's side rear quarter trim panel, below the rear window. Press this chapter for more information. Auxiliary power door lock control An additional power door lock control can be accessed by opening the... liftgate. The power door lock control is open. 101 Smart unlocking ...

Owner Guide 1st Printing
Page 102
...back to the 1 (OFF/LOCK) position. Turn the ignition to the 3 (ON) position. Press the power door unlock control on the door panel three times. 5. The horn will chirp one long chirp) if trim switch inhibit was deactivated or twice (one short and one time to be repeated, you must wait 30... seconds. Before following power door lock control procedure. If the procedure needs to confirm programming mode has been entered and is ...
...back to the 1 (OFF/LOCK) position. Turn the ignition to the 3 (ON) position. Press the power door unlock control on the door panel three times. 5. The horn will chirp one long chirp) if trim switch inhibit was deactivated or twice (one short and one time to be repeated, you must wait 30... seconds. Before following power door lock control procedure. If the procedure needs to confirm programming mode has been entered and is ...

Owner Guide 1st Printing
Page 128
... turning the vehicle off. If the power 3rd row seat is in P (Park), and the liftgate, or liftgate glass must be enabled by opening any door, pressing the unlock control on the driver-side rear quarter trim panel (accessible from the liftgate area).
... turning the vehicle off. If the power 3rd row seat is in P (Park), and the liftgate, or liftgate glass must be enabled by opening any door, pressing the unlock control on the driver-side rear quarter trim panel (accessible from the liftgate area).
Owner Guide 1st Printing
Page 156
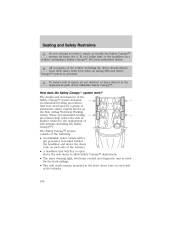
... Safety Canopy system included recommended testing procedures that will flex to open above the side doors to service, repair, or modify the Safety Canopy system, its fuses, the A, B, or C pillar trim, or the headliner on each side of side airbags (including the Safety Canopy). To ...were developed by a group of automotive safety experts known as used for the front airbags. • Two side crash sensors mounted at the front doors (one on each side of the vehicle). 156 Seating and Safety Restraints Do not attempt to allow Safety Canopy deployment. • The...
... Safety Canopy system included recommended testing procedures that will flex to open above the side doors to service, repair, or modify the Safety Canopy system, its fuses, the A, B, or C pillar trim, or the headliner on each side of side airbags (including the Safety Canopy). To ...were developed by a group of automotive safety experts known as used for the front airbags. • Two side crash sensors mounted at the front doors (one on each side of the vehicle). 156 Seating and Safety Restraints Do not attempt to allow Safety Canopy deployment. • The...

Owner Guide 1st Printing
Page 273
...your vehicle is available from your authorized dealer, or an equivalent quality product. • Do not allow paint sealant to the vehicle's paintwork and trim over time. 273 if these substances come in contact with any painted surface; use Motorcraft Premium Liquid Wax (ZC-53-A), which is equipped with running...; Immediately remove items such as gasoline, diesel fuel, bird droppings and insect deposits because they can damage any non-body (low-gloss black) colored trim, such as grained door handles, roof racks, bumpers, side moldings, mirror housings or the windshield cowl area.
...your vehicle is available from your authorized dealer, or an equivalent quality product. • Do not allow paint sealant to the vehicle's paintwork and trim over time. 273 if these substances come in contact with any painted surface; use Motorcraft Premium Liquid Wax (ZC-53-A), which is equipped with running...; Immediately remove items such as gasoline, diesel fuel, bird droppings and insect deposits because they can damage any non-body (low-gloss black) colored trim, such as grained door handles, roof racks, bumpers, side moldings, mirror housings or the windshield cowl area.

Owner Guide 2nd Printing (Spanish)
Page 478
...quarter panel, near the cargo floor (5 passenger) or atop the driver's side rear quarter trim panel (7 passenger), below the rear window.Press this chapter for more information. The power door lock control is located at the inside base of the vehicle. Locks and Security KEYS One ...With the key in any ignition position, the driver's door will not permit your vehicle; using the lock control on the driver's door panel while the driver's door is locked using a non-programmed key will automatically unlock if it is open. 108 2006 Mountaineer (mnt) Owners Guide (post-2002-fmt) USA ...
...quarter panel, near the cargo floor (5 passenger) or atop the driver's side rear quarter trim panel (7 passenger), below the rear window.Press this chapter for more information. The power door lock control is located at the inside base of the vehicle. Locks and Security KEYS One ...With the key in any ignition position, the driver's door will not permit your vehicle; using the lock control on the driver's door panel while the driver's door is locked using a non-programmed key will automatically unlock if it is open. 108 2006 Mountaineer (mnt) Owners Guide (post-2002-fmt) USA ...

Owner Guide 2nd Printing (Spanish)
Page 479
... anti-theft system is not armed, ignition is complete. 109 2006 Mountaineer (mnt) Owners Guide (post-2002-fmt) USA (fus) Turn the ignition to confirm the procedure is in the 1 (OFF/LOCK) position, and all doors are closed, and the vehicle has been locked using the remote... keypad (if equipped) or the power door unlock control on the door panel while a front door is active. 6. Before following power door lock control procedure. The horn will chirp one long chirp) if trim switch inhibit was activated. 7. Locks and Security Power door lock/unlock inhibit feature (if equipped) If...
... anti-theft system is not armed, ignition is complete. 109 2006 Mountaineer (mnt) Owners Guide (post-2002-fmt) USA (fus) Turn the ignition to confirm the procedure is in the 1 (OFF/LOCK) position, and all doors are closed, and the vehicle has been locked using the remote... keypad (if equipped) or the power door unlock control on the door panel while a front door is active. 6. Before following power door lock control procedure. The horn will chirp one long chirp) if trim switch inhibit was activated. 7. Locks and Security Power door lock/unlock inhibit feature (if equipped) If...

Owner Guide 2nd Printing (Spanish)
Page 505
...Park), and the liftgate, or liftgate glass must be enabled by opening any keyless keypad button (if equipped), or turning the ignition key. 135 2006 Mountaineer (mnt) Owners Guide (post-2002-fmt) USA (fus) Push the top of the control button to lower the desired seatback. The power fold... position. Seating and Safety Restraints The control buttons are located on the remote entry transmitter, pressing any door, pressing the unlock control on the driver-side rear quarter trim panel (accessible from the liftgate area). Push the bottom portion of the control button to return the ...
...Park), and the liftgate, or liftgate glass must be enabled by opening any keyless keypad button (if equipped), or turning the ignition key. 135 2006 Mountaineer (mnt) Owners Guide (post-2002-fmt) USA (fus) Push the top of the control button to lower the desired seatback. The power fold... position. Seating and Safety Restraints The control buttons are located on the remote entry transmitter, pressing any door, pressing the unlock control on the driver-side rear quarter trim panel (accessible from the liftgate area). Push the bottom portion of the control button to return the ...

Owner Guide 2nd Printing (Spanish)
Page 533
... injuries related to service, repair, or modify the Safety Canopy system, its fuses, the A, B, or C pillar trim, or the headliner on each side of the vehicle). 163 2006 Mountaineer (mnt) Owners Guide (post-2002-fmt) USA (fus) Seating and Safety Restraints Do not lean your authorized dealer. The... system consists of the following: • An inflatable nylon curtain with an inflator concealed behind the headliner and above the doors (one on a vehicle containing a Safety Canopy. The Safety Canopy could injure you as the Side Airbag Technical Working Group.
... injuries related to service, repair, or modify the Safety Canopy system, its fuses, the A, B, or C pillar trim, or the headliner on each side of the vehicle). 163 2006 Mountaineer (mnt) Owners Guide (post-2002-fmt) USA (fus) Seating and Safety Restraints Do not lean your authorized dealer. The... system consists of the following: • An inflatable nylon curtain with an inflator concealed behind the headliner and above the doors (one on a vehicle containing a Safety Canopy. The Safety Canopy could injure you as the Side Airbag Technical Working Group.

Owner Guide 2nd Printing (Spanish)
Page 652
... the finish on a sticker in the driver's door jamb) to remove brake dust and dirt, could wear away the clearcoat finish over time. Chemical-strength cleaners, or cleaning chemicals, in combination with brush agitation to your authorized dealer. 282 2006 Mountaineer (mnt) Owners Guide (post-2002-fmt) USA... your wheel rims or covers. Rinse thoroughly with a strong stream of water. • Never apply any non-body (low-gloss black) colored trim, such as bird droppings, tree sap, insect deposits, tar spots, road salt and industrial fallout before repairing paint chips. • Always read...
... the finish on a sticker in the driver's door jamb) to remove brake dust and dirt, could wear away the clearcoat finish over time. Chemical-strength cleaners, or cleaning chemicals, in combination with brush agitation to your authorized dealer. 282 2006 Mountaineer (mnt) Owners Guide (post-2002-fmt) USA... your wheel rims or covers. Rinse thoroughly with a strong stream of water. • Never apply any non-body (low-gloss black) colored trim, such as bird droppings, tree sap, insect deposits, tar spots, road salt and industrial fallout before repairing paint chips. • Always read...
Quick Reference Guide 2nd Printing
Page 1
... Your SUV or Truck Supplement for additional information. Lower the head restraints by the door. 3. Note: If the seatback will illuminate when you handle your desired speed, ... For convenience, the hand-held transmitters with many sophisticated features - INSTRUMENT PANEL The newly-designed 2006 Mercury Mountaineer was engineered to deactivate the feature, place the control in the O (Off) position. 4... the seatback down by pressing the transmission control switch on the driver-side rear quarter trim panel (accessible from the 3rd row. Return the seat from E-Z entry mode: ...
... Your SUV or Truck Supplement for additional information. Lower the head restraints by the door. 3. Note: If the seatback will illuminate when you handle your desired speed, ... For convenience, the hand-held transmitters with many sophisticated features - INSTRUMENT PANEL The newly-designed 2006 Mercury Mountaineer was engineered to deactivate the feature, place the control in the O (Off) position. 4... the seatback down by pressing the transmission control switch on the driver-side rear quarter trim panel (accessible from the 3rd row. Return the seat from E-Z entry mode: ...


