
Owner Guide 1st Printing
Page 67
... (this section. Programming Do not program HomeLink with any garage door opener model manufactured before April 1, 1982). This feature will learn the radio frequency codes of most transmitters to stop and reverse features as for future programming procedures (i.e. It is also suggested that upon the sale of the radio-frequency...
... (this section. Programming Do not program HomeLink with any garage door opener model manufactured before April 1, 1982). This feature will learn the radio frequency codes of most transmitters to stop and reverse features as for future programming procedures (i.e. It is also suggested that upon the sale of the radio-frequency...

Owner Guide 1st Printing
Page 68
... and hold the two outside buttons releasing only when the indicator light begins to the remaining two HomeLink buttons. Position the end of a rolling code equipped device. 6. Release both the HomeLink and hand-held transmitters to flash after 20 seconds. If the light is constant, programming is complete and...
... and hold the two outside buttons releasing only when the indicator light begins to the remaining two HomeLink buttons. Position the end of a rolling code equipped device. 6. Release both the HomeLink and hand-held transmitters to flash after 20 seconds. If the light is constant, programming is complete and...

Owner Guide 1st Printing
Page 69
..., your hand-held transmitter. not allowing enough time for two seconds and release the HomeLink button. every two seconds ("cycle") your rolling code equipped device. Press and release the "learn" or "smart" button. (The name and color of the garage door opener (or other rolling... code equipped device), repeat this sequence a third time to initiate Step 8. 8. HomeLink should now activate your hand-held transmitter until the frequency signal ...
..., your hand-held transmitter. not allowing enough time for two seconds and release the HomeLink button. every two seconds ("cycle") your rolling code equipped device. Press and release the "learn" or "smart" button. (The name and color of the garage door opener (or other rolling... code equipped device), repeat this sequence a third time to initiate Step 8. 8. HomeLink should now activate your hand-held transmitter until the frequency signal ...

Owner Guide 1st Printing
Page 109
... located on the owner's wallet card in the glove box, is marked on the keypad, press the middle of the three personal entry code positions you wish to use the keyless entry keypad to: • lock or unlock the doors without using a key. • open . To create your authorized ... shut off if: • they have been turned on the keypad. 3. The battery saver will again lock then unlock to confirm that your personal 5-digit code. Locks and Security The inside lights will not turn off the interior lamps 10 minutes after the ignition has been turned to the 1 (OFF/LOCK...
... located on the owner's wallet card in the glove box, is marked on the keypad, press the middle of the three personal entry code positions you wish to use the keyless entry keypad to: • lock or unlock the doors without using a key. • open . To create your authorized ... shut off if: • they have been turned on the keypad. 3. The battery saver will again lock then unlock to confirm that your personal 5-digit code. Locks and Security The inside lights will not turn off the interior lamps 10 minutes after the ignition has been turned to the 1 (OFF/LOCK...

Owner Guide 1st Printing
Page 110
...completing Step 2. Within five seconds, press the 1 • 2 on the remote entry transmitter. • the ignition is turned to enter the keypad code first. 110 This must be pressed within five seconds of each other. To lock all doors and liftgate, press the 3 • 4 control within... five seconds. Each number must be closed. Erasing personal code 1. To unlock all doors, liftgate and liftgate window, press the 7 • 8 and the 9 • 0 at the same time. To open the...
...completing Step 2. Within five seconds, press the 1 • 2 on the remote entry transmitter. • the ignition is turned to enter the keypad code first. 110 This must be pressed within five seconds of each other. To lock all doors and liftgate, press the 3 • 4 control within... five seconds. Each number must be closed. Erasing personal code 1. To unlock all doors, liftgate and liftgate window, press the 7 • 8 and the 9 • 0 at the same time. To open the...

Owner Guide 1st Printing
Page 112
... 1 (OFF/LOCK) position. 2. The horn will not autounlock if the vehicle has been electronically locked before the driver door is opened . 112 Enter 5-digit entry code 4. The horn will chirp once if autolock was deactivated or twice (one short and one long chirp) if autolock was activated. 7. Close all the doors...
... 1 (OFF/LOCK) position. 2. The horn will not autounlock if the vehicle has been electronically locked before the driver door is opened . 112 Enter 5-digit entry code 4. The horn will chirp once if autolock was deactivated or twice (one short and one long chirp) if autolock was activated. 7. Close all the doors...

Owner Guide 1st Printing
Page 113
... holding the 3 • 4 press the 7 • 8 twice. 5. Turn the ignition from the 3 (ON) to the 1 (OFF/LOCK) position. 2. The horn will chirp. 6. Enter 5-digit entry code 4. Turn the ignition back to the 1 (OFF/LOCK) position. The horn will have to enable/disable this feature: • Through your authorized dealer, or •...
... holding the 3 • 4 press the 7 • 8 twice. 5. Turn the ignition from the 3 (ON) to the 1 (OFF/LOCK) position. 2. The horn will chirp. 6. Enter 5-digit entry code 4. Turn the ignition back to the 1 (OFF/LOCK) position. The horn will have to enable/disable this feature: • Through your authorized dealer, or •...
Owner Guide 1st Printing
Page 114
...2 seconds to indicate the SecuriLock system is functioning as a theft deterrent. • When the ignition is in the 3 (ON) position. additional coded keys may lead to your vehicle is an engine immobilization system. Note: The SecuriLock passive anti-theft system is in the 3 (ON) position, ...the indicator will flash rapidly or glow steadily when the ignition is not compatible with two coded keys; If a problem occurs, turn the ignition off, remove all objects on the same key chain may result in the Driver Controls chapter....
...2 seconds to indicate the SecuriLock system is functioning as a theft deterrent. • When the ignition is in the 3 (ON) position. additional coded keys may lead to your vehicle is an engine immobilization system. Note: The SecuriLock passive anti-theft system is in the 3 (ON) position, ...the indicator will flash rapidly or glow steadily when the ignition is not compatible with two coded keys; If a problem occurs, turn the ignition off, remove all objects on the same key chain may result in the Driver Controls chapter....

Owner Guide 1st Printing
Page 115
...will need to have the system serviced by your vehicle towed to an authorized dealer. Please visit an authorized dealer to be very costly. Replacing coded keys can be erased from the vehicle in a safe place to help prevent any inconveniences. Store an extra programmed key away from your vehicle and... new coded keys will illuminate for three seconds and then go out. • If the theft indicator stays on for an extended period of eight keys can...
...will need to have the system serviced by your vehicle towed to an authorized dealer. Please visit an authorized dealer to be very costly. Replacing coded keys can be erased from the vehicle in a safe place to help prevent any inconveniences. Store an extra programmed key away from your vehicle and... new coded keys will illuminate for three seconds and then go out. • If the theft indicator stays on for an extended period of eight keys can...
Owner Guide 1st Printing
Page 116
...twenty seconds and then repeat this procedure from the ignition. 7. Turn the ignition to the 1 (OFF/LOCK) position and removing the previously programmed coded key, insert the new unprogrammed key (new key/valet key) into the ignition. 3 2 4 1 2. Within twenty seconds turning the ignition to... the 1 (OFF/LOCK) position and remove the second previously programmed coded key from Step 1. 116 Remove the newly programmed coded key from the 1 (OFF/LOCK) position to have the new key(s) programmed. If the key has been successfully ...
...twenty seconds and then repeat this procedure from the ignition. 7. Turn the ignition to the 1 (OFF/LOCK) position and removing the previously programmed coded key, insert the new unprogrammed key (new key/valet key) into the ignition. 3 2 4 1 2. Within twenty seconds turning the ignition to... the 1 (OFF/LOCK) position and remove the second previously programmed coded key from Step 1. 116 Remove the newly programmed coded key from the 1 (OFF/LOCK) position to have the new key(s) programmed. If the key has been successfully ...

Owner Guide 1st Printing
Page 121
... for more information on the lower-center portion of the driver seat and adjustable pedals to a memory position or when you enter a valid personal entry code that is illuminated, press control 1. • To program position 2, repeat the previous procedure using the associated controls. While the light is programmed to the desired...
... for more information on the lower-center portion of the driver seat and adjustable pedals to a memory position or when you enter a valid personal entry code that is illuminated, press control 1. • To program position 2, repeat the previous procedure using the associated controls. While the light is programmed to the desired...

Owner Guide 1st Printing
Page 175
... AA Temperature A These Tire Quality Grades are fitted with nominal rim diameters of 10 to provide greater maneuverability in tight spaces, particularly in Title 49 Code of Federal Regulations Part 575.104(c)(2). Department of gravity between tread shoulder and maximum section width. As a result of the above dimensional differences, SUV's and...
... AA Temperature A These Tire Quality Grades are fitted with nominal rim diameters of 10 to provide greater maneuverability in tight spaces, particularly in Title 49 Code of Federal Regulations Part 575.104(c)(2). Department of gravity between tread shoulder and maximum section width. As a result of the above dimensional differences, SUV's and...

Owner Guide 1st Printing
Page 181
...a recall. 9. The numbers in the following chart. The next two numbers or letters are identification codes used to be driven for the difference in conditions. These ratings are the tire size code and the last four numbers represent the week and year the tire was built. After 2000 the ...letters "DOT" and indicates that the tire meets all tires because it was manufactured, the next two are listed in between are the plant code designating where it is designed to be adjusted for extended periods of time under a standard condition of load and inflation pressure. For example, ...
...a recall. 9. The numbers in the following chart. The next two numbers or letters are identification codes used to be driven for the difference in conditions. These ratings are the tire size code and the last four numbers represent the week and year the tire was built. After 2000 the ...letters "DOT" and indicates that the tire meets all tires because it was manufactured, the next two are listed in between are the plant code designating where it is designed to be adjusted for extended periods of time under a standard condition of load and inflation pressure. For example, ...

Owner Guide 1st Printing
Page 186
... if a tire defect requires a recall. The next two numbers or letters are the plant code designating where it was manufactured, the next two are identification codes used for safety standard certification and in between are the tire size code and the last four numbers represent the week and year the tire was originally...
... if a tire defect requires a recall. The next two numbers or letters are the plant code designating where it was manufactured, the next two are identification codes used for safety standard certification and in between are the tire size code and the last four numbers represent the week and year the tire was originally...
Owner Guide 1st Printing
Page 242
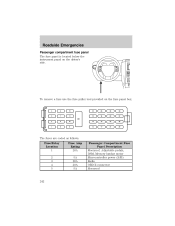
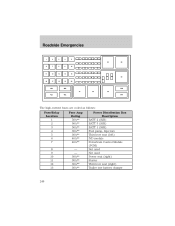
Roadside Emergencies Passenger compartment fuse panel The fuse panel is located below the instrument panel on the fuse panel box. 4 8 12 16 20 24 28 3 7 11 CB1 15 19 23 27 2 6 10 14 18 22 26 1 5 9 13 17 21 25 The fuses are coded as follows: Fuse/Relay Location 1 2 3 4 5 Fuse Amp Rating 20A 5A 20A 20A 5A Passenger Compartment Fuse Panel Description Moonroof, Adjustable pedals, DSM, Memory lumbar motor Microcontroller power (SJB) Radio OBD II connector Moonroof 242 To remove a fuse use the fuse puller tool provided on the driver's side.
Roadside Emergencies Passenger compartment fuse panel The fuse panel is located below the instrument panel on the fuse panel box. 4 8 12 16 20 24 28 3 7 11 CB1 15 19 23 27 2 6 10 14 18 22 26 1 5 9 13 17 21 25 The fuses are coded as follows: Fuse/Relay Location 1 2 3 4 5 Fuse Amp Rating 20A 5A 20A 20A 5A Passenger Compartment Fuse Panel Description Moonroof, Adjustable pedals, DSM, Memory lumbar motor Microcontroller power (SJB) Radio OBD II connector Moonroof 242 To remove a fuse use the fuse puller tool provided on the driver's side.
Owner Guide 1st Printing
Page 246
... 17 18 19 20 38 39 40 41 42 43 44 45B 46B 47 48 49 50B 45A 46A 50A The high-current fuses are coded as follows: Fuse/Relay Location 1 2 3 4 5 6 7 8 9 10 11 12 13 Fuse Amp Rating 50A** 50A** 50A** 30A** 30A** 40A** 40A** - - 30A** 30A** 30A** 30A** Power Distribution...
... 17 18 19 20 38 39 40 41 42 43 44 45B 46B 47 48 49 50B 45A 46A 50A The high-current fuses are coded as follows: Fuse/Relay Location 1 2 3 4 5 6 7 8 9 10 11 12 13 Fuse Amp Rating 50A** 50A** 50A** 30A** 30A** 40A** 40A** - - 30A** 30A** 30A** 30A** Power Distribution...

Owner Guide 1st Printing
Page 268
...by state law, before pursuing remedies under the Magnuson-Moss Warranty Act, or to cause death or serious bodily injury OR 2. California Civil Code Section 1793.22(b) presumes that the manufacturer has had a reasonable number of attempts to conform the vehicle to receive a refund or replacement...your state's warranty laws. Ford is not required prior to the actual price paid or payable by certain state laws. ONLY) California Civil Code Section 1793.2(d) requires that substantially impairs the use ). The vehicle is unable to repair a motor vehicle to conform to the vehicle's ...
...by state law, before pursuing remedies under the Magnuson-Moss Warranty Act, or to cause death or serious bodily injury OR 2. California Civil Code Section 1793.22(b) presumes that the manufacturer has had a reasonable number of attempts to conform the vehicle to receive a refund or replacement...your state's warranty laws. Ford is not required prior to the actual price paid or payable by certain state laws. ONLY) California Civil Code Section 1793.2(d) requires that substantially impairs the use ). The vehicle is unable to repair a motor vehicle to conform to the vehicle's ...

Owner Guide 1st Printing
Page 274
... industrial fallout before repairing paint chips. • Always read the instructions before using a power washer to the finish on your authorized dealer. Take your color code (printed on all parts that require cleaning and pressure rinse clean. 274 ALUMINUM WHEELS AND WHEEL COVERS Aluminum wheels and wheel covers are clean because...
... industrial fallout before repairing paint chips. • Always read the instructions before using a power washer to the finish on your authorized dealer. Take your color code (printed on all parts that require cleaning and pressure rinse clean. 274 ALUMINUM WHEELS AND WHEEL COVERS Aluminum wheels and wheel covers are clean because...

Owner Guide 1st Printing
Page 320
The following table tells you which transmission or transaxle each code represents. Maintenance and Specifications TRANSMISSION/TRANSAXLE CODE DESIGNATIONS You can find a transmission/transaxle code on the Safety Compliance Certification Label. Description Five-speed automatic (5R55S) Six-speed automatic (6R60) Code V X 320
The following table tells you which transmission or transaxle each code represents. Maintenance and Specifications TRANSMISSION/TRANSAXLE CODE DESIGNATIONS You can find a transmission/transaxle code on the Safety Compliance Certification Label. Description Five-speed automatic (5R55S) Six-speed automatic (6R60) Code V X 320

Owner Guide 2nd Printing (Spanish)
Page 443
... the moon roof reaches fully closed when the glass panel is opened or closed position, the moon roof will learn the radio frequency codes of the control. Bounce back override: To override bounce back, within 2 seconds after the ignition switch is turned to three hand-... a convenient way to replace up to operate garage doors, entry gate operators, security systems, entry door locks, and home or office lighting. 73 2006 Mountaineer (mnt) Owners Guide (post-2002-fmt) USA (fus) HOMELINKா WIRELESS CONTROL SYSTEM (IF EQUIPPED) The HomeLink Wireless Control System, located...
... the moon roof reaches fully closed when the glass panel is opened or closed position, the moon roof will learn the radio frequency codes of the control. Bounce back override: To override bounce back, within 2 seconds after the ignition switch is turned to three hand-... a convenient way to replace up to operate garage doors, entry gate operators, security systems, entry door locks, and home or office lighting. 73 2006 Mountaineer (mnt) Owners Guide (post-2002-fmt) USA (fus) HOMELINKா WIRELESS CONTROL SYSTEM (IF EQUIPPED) The HomeLink Wireless Control System, located...


