
Driving Your SUV or Truck 1st Printing
Page 14
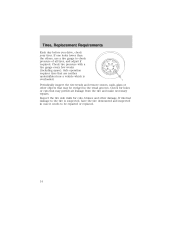
Safe operation requires tires that may permit air leakage from the tire and make necessary repairs. Periodically inspect the tire treads and remove stones, nails, glass or other damage. Check tire pressure with a tire gauge every few weeks (including spare). If internal damage to the tire is overloaded. Tires, Replacement Requirements ...
Safe operation requires tires that may permit air leakage from the tire and make necessary repairs. Periodically inspect the tire treads and remove stones, nails, glass or other damage. Check tire pressure with a tire gauge every few weeks (including spare). If internal damage to the tire is overloaded. Tires, Replacement Requirements ...
Owner Guide 1st Printing (Spanish)
Page 330
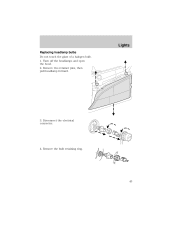
Remove the bulb retaining ring. 43 Disconnect the electrical connector. 4. Turn off the headlamps and open the hood. 2. Remove two retainer pins, then pull headlamp forward. 3. Lights Replacing headlamp bulbs Do not touch the glass of a halogen bulb. 1.
Remove the bulb retaining ring. 43 Disconnect the electrical connector. 4. Turn off the headlamps and open the hood. 2. Remove two retainer pins, then pull headlamp forward. 3. Lights Replacing headlamp bulbs Do not touch the glass of a halogen bulb. 1.

Owner Guide 1st Printing (Spanish)
Page 331
Reverse steps to break the next time the headlamps are operated. Carefully pull old bulb out of the lamp assembly Handle a halogen headlamp bulb carefully and keep out of children's reach. The oil from your hand could cause the bulb to reinstall bulb(s). Replacing front parking/turn signal bulbs 1. Remove the two headlamp retainer pins, then pull headlamp forward. 44 Grasp the bulb only by its plastic base and do not touch the glass. Lights 5. Turn off the headlamps and open the hood. 2.
Reverse steps to break the next time the headlamps are operated. Carefully pull old bulb out of the lamp assembly Handle a halogen headlamp bulb carefully and keep out of children's reach. The oil from your hand could cause the bulb to reinstall bulb(s). Replacing front parking/turn signal bulbs 1. Remove the two headlamp retainer pins, then pull headlamp forward. 44 Grasp the bulb only by its plastic base and do not touch the glass. Lights 5. Turn off the headlamps and open the hood. 2.

Owner Guide 1st Printing (Spanish)
Page 332
Reverse steps to break the next time the headlamps are operated. Grasp the bulb only by its plastic base and do not touch the glass. Carefully pull old bulb out of the lamp assembly Handle a halogen headlamp bulb carefully and keep out of children's reach. The oil from the lamp assembly. 4. Lights 3. Remove the bulb socket from your hand could cause the bulb to reinstall bulb(s). 45
Reverse steps to break the next time the headlamps are operated. Grasp the bulb only by its plastic base and do not touch the glass. Carefully pull old bulb out of the lamp assembly Handle a halogen headlamp bulb carefully and keep out of children's reach. The oil from the lamp assembly. 4. Lights 3. Remove the bulb socket from your hand could cause the bulb to reinstall bulb(s). 45
Owner Guide 1st Printing (Spanish)
Page 342
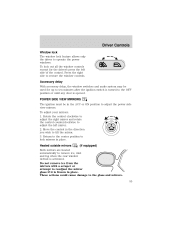
... mirrors. 55 To adjust your mirrors: 1. Rotate the control clockwise to adjust the right mirror and rotate the control counterclockwise to readjust the mirror glass if it is opened. Do not remove ice from the mirrors with a scraper or attempt to adjust the left side of the control. These actions ...
... mirrors. 55 To adjust your mirrors: 1. Rotate the control clockwise to adjust the right mirror and rotate the control counterclockwise to readjust the mirror glass if it is opened. Do not remove ice from the mirrors with a scraper or attempt to adjust the left side of the control. These actions ...

Owner Guide 1st Printing (Spanish)
Page 348
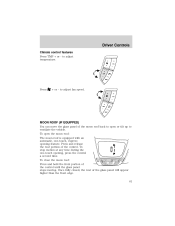
MOON ROOF (IF EQUIPPED) You can move the glass panel of the glass panel will appear higher than the front edge. 61 Once fully closed, the rear of the moon roof back to open the moon roof: The .... To open or tilt up to ventilate the vehicle. Press + or - to adjust temperature. Press and release the rear portion of the control until the glass panel stops moving. to adjust fan speed. Driver Controls Climate control features Press TMP + or - To stop motion at any time during the one -touch...
MOON ROOF (IF EQUIPPED) You can move the glass panel of the glass panel will appear higher than the front edge. 61 Once fully closed, the rear of the moon roof back to open the moon roof: The .... To open or tilt up to ventilate the vehicle. Press + or - to adjust temperature. Press and release the rear portion of the control until the glass panel stops moving. to adjust fan speed. Driver Controls Climate control features Press TMP + or - To stop motion at any time during the one -touch...
Owner Guide 1st Printing (Spanish)
Page 349
... the vehicle parked in other vehicles as well as required by U.S. To close the shade, pull it toward the front of the control until the glass panel stops moving. federal safety standards. To close the moon roof from the vent position, press and hold the front portion of the vehicle, the... that lacks safety stop and reverse, does not meet current U.S. Driver Controls To vent: To tilt the moon roof into the vent position (when the glass panel is closed when the...
... the vehicle parked in other vehicles as well as required by U.S. To close the shade, pull it toward the front of the control until the glass panel stops moving. federal safety standards. To close the moon roof from the vent position, press and hold the front portion of the vehicle, the... that lacks safety stop and reverse, does not meet current U.S. Driver Controls To vent: To tilt the moon roof into the vent position (when the glass panel is closed when the...

Owner Guide 1st Printing (Spanish)
Page 366
... locks or press the door lock switch on the right side under the license plate lamp shield. • To open at the same time. Liftgate glass and liftgate should be opened from outside the vehicle. Failure to observe this warning may occur to your vehicle. REAR LIFTGATE The liftgate area is...
... locks or press the door lock switch on the right side under the license plate lamp shield. • To open at the same time. Liftgate glass and liftgate should be opened from outside the vehicle. Failure to observe this warning may occur to your vehicle. REAR LIFTGATE The liftgate area is...

Owner Guide 1st Printing (Spanish)
Page 371
... party responsible for both doors. • Move lock control up to engage the childproof lock. • Move control down to operate the equipment. The liftgate glass feature operates as long as the vehicle's speed is subject to lock or unlock all vehicle doors and liftgate and open the liftgate window without...
... party responsible for both doors. • Move lock control up to engage the childproof lock. • Move control down to operate the equipment. The liftgate glass feature operates as long as the vehicle's speed is subject to lock or unlock all vehicle doors and liftgate and open the liftgate window without...

Owner Guide 1st Printing (Spanish)
Page 372
... alarm. The remote entry system activates the illuminated entry feature. This feature turns on using the dimmer control or • any door, the liftgate, liftgate glass or hood (on vehicles equipped with your vehicle, ensure ALL remote entry transmitters are closed properly, the lamps will chirp and the lamps flash once...
... alarm. The remote entry system activates the illuminated entry feature. This feature turns on using the dimmer control or • any door, the liftgate, liftgate glass or hood (on vehicles equipped with your vehicle, ensure ALL remote entry transmitters are closed properly, the lamps will chirp and the lamps flash once...

Owner Guide 1st Printing (Spanish)
Page 490
... PARTS Use only approved products to clean any parts. • Wiper blades can be cleaned with a non-abrasive cleaner such as Motorcraft Ultra Clear Spray Glass Cleaner (ZC-23), available from undesirable windshield reflection. INSTRUMENT PANEL AND CLUSTER LENS Clean the instrument panel with a damp cloth, then dry with isopropyl (rubbing...
... PARTS Use only approved products to clean any parts. • Wiper blades can be cleaned with a non-abrasive cleaner such as Motorcraft Ultra Clear Spray Glass Cleaner (ZC-23), available from undesirable windshield reflection. INSTRUMENT PANEL AND CLUSTER LENS Clean the instrument panel with a damp cloth, then dry with isopropyl (rubbing...

Owner Guide 1st Printing (Spanish)
Page 491
...EQUIPPED) Your leather seating surfaces have a clear, protective coating over the leather. • To clean, use household cleaning products or glass cleaners, which can stain and discolor the fabric and affect the flame retardant abilities of the clear, protective coating. UNDERBODY Flush the complete...from your vehicle frequently. Dry the area with a soft cloth. • To help maintain its resiliency and color, use household or glass cleaners as these may damage the finish. These products may weaken the belt webbing. Cleaning INTERIOR TRIM • Clean the interior trim...
...EQUIPPED) Your leather seating surfaces have a clear, protective coating over the leather. • To clean, use household cleaning products or glass cleaners, which can stain and discolor the fabric and affect the flame retardant abilities of the clear, protective coating. UNDERBODY Flush the complete...from your vehicle frequently. Dry the area with a soft cloth. • To help maintain its resiliency and color, use household or glass cleaners as these may damage the finish. These products may weaken the belt webbing. Cleaning INTERIOR TRIM • Clean the interior trim...
Owner Guide 1st Printing (Spanish)
Page 492
For best results, use the following products or products of your vehicle. Cleaning FORD, LINCOLN AND MERCURY CAR CARE PRODUCTS Your Ford, Lincoln or Mercury dealer has many quality products available to fulfill your automotive needs; Each product is made from high quality materials ...-A) Motorcraft Dash and Vinyl Cleaner (ZC-38-A) Motorcraft Car Care Kit (ZC-26) Ford Premium Car Wash Concentrate (F2SZ-19523-WC) Motorcraft Carlite Glass Cleaner (Canada only) (CXC-100) Motorcraft Spot and Stain Remover (ZC-14) Motorcraft Detail Wash (ZC-3-A) Motorcraft Tire Detailer (ZC-28) Motorcraft...
For best results, use the following products or products of your vehicle. Cleaning FORD, LINCOLN AND MERCURY CAR CARE PRODUCTS Your Ford, Lincoln or Mercury dealer has many quality products available to fulfill your automotive needs; Each product is made from high quality materials ...-A) Motorcraft Dash and Vinyl Cleaner (ZC-38-A) Motorcraft Car Care Kit (ZC-26) Ford Premium Car Wash Concentrate (F2SZ-19523-WC) Motorcraft Carlite Glass Cleaner (Canada only) (CXC-100) Motorcraft Spot and Stain Remover (ZC-14) Motorcraft Detail Wash (ZC-3-A) Motorcraft Tire Detailer (ZC-28) Motorcraft...

Owner Guide 3rd Printing
Page 43
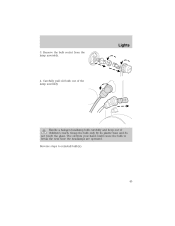
Remove two retainer pins, then pull headlamp forward. 3. Turn off the headlamps and open the hood. 2. Disconnect the electrical connector. 4. Remove the bulb retaining ring. 43 Lights Replacing headlamp bulbs Do not touch the glass of a halogen bulb. 1.
Remove two retainer pins, then pull headlamp forward. 3. Turn off the headlamps and open the hood. 2. Disconnect the electrical connector. 4. Remove the bulb retaining ring. 43 Lights Replacing headlamp bulbs Do not touch the glass of a halogen bulb. 1.

Owner Guide 3rd Printing
Page 44
Lights 5. Reverse steps to break the next time the headlamps are operated. Remove the two headlamp retainer pins, then pull headlamp forward. 44 Replacing front parking/turn signal bulbs 1. The oil from your hand could cause the bulb to reinstall bulb(s). Turn off the headlamps and open the hood. 2. Grasp the bulb only by its plastic base and do not touch the glass. Carefully pull old bulb out of the lamp assembly Handle a halogen headlamp bulb carefully and keep out of children's reach.
Lights 5. Reverse steps to break the next time the headlamps are operated. Remove the two headlamp retainer pins, then pull headlamp forward. 44 Replacing front parking/turn signal bulbs 1. The oil from your hand could cause the bulb to reinstall bulb(s). Turn off the headlamps and open the hood. 2. Grasp the bulb only by its plastic base and do not touch the glass. Carefully pull old bulb out of the lamp assembly Handle a halogen headlamp bulb carefully and keep out of children's reach.
Owner Guide 3rd Printing
Page 45
The oil from the lamp assembly. 4. Carefully pull old bulb out of the lamp assembly Handle a halogen headlamp bulb carefully and keep out of children's reach. Lights 3. Grasp the bulb only by its plastic base and do not touch the glass. Reverse steps to break the next time the headlamps are operated. Remove the bulb socket from your hand could cause the bulb to reinstall bulb(s). 45
The oil from the lamp assembly. 4. Carefully pull old bulb out of the lamp assembly Handle a halogen headlamp bulb carefully and keep out of children's reach. Lights 3. Grasp the bulb only by its plastic base and do not touch the glass. Reverse steps to break the next time the headlamps are operated. Remove the bulb socket from your hand could cause the bulb to reinstall bulb(s). 45

Owner Guide 3rd Printing
Page 55
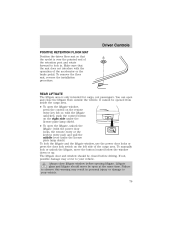
... the control in place. Accessory delay With accessory delay, the window switches and audio system may be in place. Press the right side to the glass and mirrors. 55 Do not remove ice from the mirrors with a scraper or attempt to operate the power windows. Driver Controls Window lock The window...
... the control in place. Accessory delay With accessory delay, the window switches and audio system may be in place. Press the right side to the glass and mirrors. 55 Do not remove ice from the mirrors with a scraper or attempt to operate the power windows. Driver Controls Window lock The window...
Owner Guide 3rd Printing
Page 61
... at any time during the one -touch, express opening , press the control a second time. Press and release the rear portion of the control until the glass panel stops moving. To close the moon roof: Press and hold the front portion of the control. To open or tilt up to open the...
... at any time during the one -touch, express opening , press the control a second time. Press and release the rear portion of the control until the glass panel stops moving. To close the moon roof: Press and hold the front portion of the control. To open or tilt up to open the...

Owner Guide 3rd Printing
Page 62
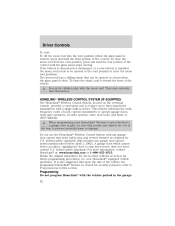
...Programming in device. To close the moon roof from the vent position, press and hold the front portion of the control until the glass panel stops moving. They may seriously hurt themselves. When programming your HomeLink Wireless Control System to three hand-held transmitters with ... programming procedures (i.e. federal safety standards. Driver Controls To vent: To tilt the moon roof into the vent position (when the glass panel is closed when the glass panel is shut. The moon roof has a sliding shade that lacks safety stop and reverse, does not meet current U.S. This...
...Programming in device. To close the moon roof from the vent position, press and hold the front portion of the control until the glass panel stops moving. They may seriously hurt themselves. When programming your HomeLink Wireless Control System to three hand-held transmitters with ... programming procedures (i.e. federal safety standards. Driver Controls To vent: To tilt the moon roof into the vent position (when the glass panel is closed when the glass panel is shut. The moon roof has a sliding shade that lacks safety stop and reverse, does not meet current U.S. This...
Owner Guide 3rd Printing
Page 79
... side under the license plate lamp shield. To manually lock or unlock the liftgate, move the button located below the window down or up. Liftgate glass and liftgate should be open at the same time. To remove the floor mat, reverse the installation procedure.
... side under the license plate lamp shield. To manually lock or unlock the liftgate, move the button located below the window down or up. Liftgate glass and liftgate should be open at the same time. To remove the floor mat, reverse the installation procedure.
