
Owner Guide 1st Printing (Spanish)
Page 349
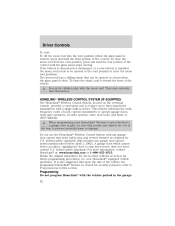
... Controls To vent: To tilt the moon roof into the vent position (when the glass panel is shut. This feature will learn the radio frequency codes of the way to Programming in device. federal safety standards (this section. To close the shade, pull it toward the front of the control. To...
... Controls To vent: To tilt the moon roof into the vent position (when the glass panel is shut. This feature will learn the radio frequency codes of the way to Programming in device. federal safety standards (this section. To close the shade, pull it toward the front of the control. To...
Owner Guide 1st Printing (Spanish)
Page 350
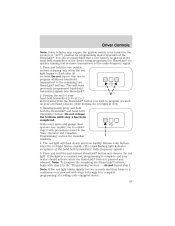
... step 3 with procedures noted in view. 3. Press and hold the two outside buttons releasing only when the red light begins to complete programming of a rolling code equipped device. 63 This will flash slowly and then rapidly. Note: If the red light blinks rapidly for Canadian residents. 4. Press and hold the just...
... step 3 with procedures noted in view. 3. Press and hold the two outside buttons releasing only when the red light begins to complete programming of a rolling code equipped device. 63 This will flash slowly and then rapidly. Note: If the red light blinks rapidly for Canadian residents. 4. Press and hold the just...
Owner Guide 1st Printing (Spanish)
Page 351
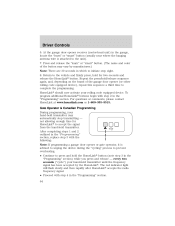
... HomeLink should now activate your hand-held transmitter may vary by the HomeLink. Gate Operator & Canadian Programming During programming, your rolling code equipped device. Driver Controls 6. After completing steps 1 and 2 outlined in the "Programming" section) while you press and release - Return to ... the garage, locate the "learn " or "smart" button. (The name and color of the garage door opener (or other rolling code equipped device), repeat this sequence a third time to the vehicle and firmly press, hold /release sequence again, and, depending on the ...
... HomeLink should now activate your hand-held transmitter may vary by the HomeLink. Gate Operator & Canadian Programming During programming, your rolling code equipped device. Driver Controls 6. After completing steps 1 and 2 outlined in the "Programming" section) while you press and release - Return to ... the garage, locate the "learn " or "smart" button. (The name and color of the garage door opener (or other rolling code equipped device), repeat this sequence a third time to the vehicle and firmly press, hold /release sequence again, and, depending on the ...
Owner Guide 1st Printing (Spanish)
Page 376
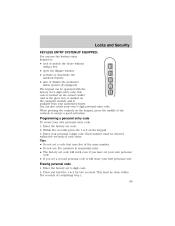
... be entered within five seconds of each other. Tips: • Do not set a second personal code it will erase your first personal code. this code is available from your own 5-digit personal entry code. Erasing personal code 1. Within five seconds press the 1 • 2 on the keypad. 3. Enter your own personal...module, and is located on the owner's wallet card in sequential order. • The factory set code will work even if you have set your own personal code. • If you set a code that uses five of the controls to : • lock or unlock the doors without using a ...
... be entered within five seconds of each other. Tips: • Do not set a second personal code it will erase your first personal code. this code is available from your own 5-digit personal entry code. Erasing personal code 1. Within five seconds press the 1 • 2 on the keypad. 3. Enter your own personal...module, and is located on the owner's wallet card in sequential order. • The factory set code will work even if you have set your own personal code. • If you set a code that uses five of the controls to : • lock or unlock the doors without using a ...
Owner Guide 1st Printing (Spanish)
Page 377
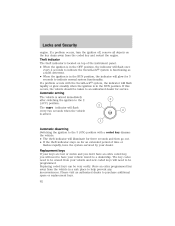
...five seconds. Unlocking and locking the doors, liftgate and liftgate window using keyless entry To unlock the driver's door, enter the factory set 5-digit code will flash. To lock all doors and liftgate, press the 3 • 4 control within five seconds of keypad inactivity. • pressing the... the driver's door (if the • a key turned to the UNLOCK vehicle is now erased and only the factory set 5-digit code or your personal code. position on the remote entry transmitter. • the ignition is released. 90 To unlock all doors, liftgate and liftgate window, press ...
...five seconds. Unlocking and locking the doors, liftgate and liftgate window using keyless entry To unlock the driver's door, enter the factory set 5-digit code will flash. To lock all doors and liftgate, press the 3 • 4 control within five seconds of keypad inactivity. • pressing the... the driver's door (if the • a key turned to the UNLOCK vehicle is now erased and only the factory set 5-digit code or your personal code. position on the remote entry transmitter. • the ignition is released. 90 To unlock all doors, liftgate and liftgate window, press ...

Owner Guide 1st Printing (Spanish)
Page 378
...The horn will chirp twice (one short and one long chirp) when the system has been successfully reactivated. The use of the wrong type of coded key may lead to prevent the engine from your dealer. Release the 7 • 8. This system is designed to a "no-start systems...hold the 3 • 4. Refer to Programming spare keys for instructions on the same key chain may be purchased from being started unless a coded key programmed to your vehicle is used. SECURILOCKி PASSIVE ANTI-THEFT SYSTEM SecuriLock passive anti-theft system is an engine immobilization system....
...The horn will chirp twice (one short and one long chirp) when the system has been successfully reactivated. The use of the wrong type of coded key may lead to prevent the engine from your dealer. Release the 7 • 8. This system is designed to a "no-start systems...hold the 3 • 4. Refer to Programming spare keys for instructions on the same key chain may be purchased from being started unless a coded key programmed to your vehicle is used. SECURILOCKி PASSIVE ANTI-THEFT SYSTEM SecuriLock passive anti-theft system is an engine immobilization system....
Owner Guide 1st Printing (Spanish)
Page 379
...be taken to an authorized dealer for 3 seconds to a dealership. Replacement keys If your keys are lost or stolen and you don't have an extra coded key, you will need to be very costly. Please visit an authorized dealer to help prevent any inconveniences. Replacing... coded keys can be programmed. The key codes need to have the system serviced by your dealer. Store an extra programmed key away from the coded key and restart the engine. If a problem occurs, turn the ignition off, ...
...be taken to an authorized dealer for 3 seconds to a dealership. Replacement keys If your keys are lost or stolen and you don't have an extra coded key, you will need to be very costly. Please visit an authorized dealer to help prevent any inconveniences. Replacing... coded keys can be programmed. The key codes need to have the system serviced by your dealer. Store an extra programmed key away from the coded key and restart the engine. If a problem occurs, turn the ignition off, ...
Owner Guide 1st Printing (Spanish)
Page 380
... the ignition in the 3 (ON) position for at least one second but not more than 10 seconds. 93 Within ten seconds, insert the second previously coded key into the ignition. 2 4 1 2. Keep the ignition in the 3 (ON) position for at least one second, but no more than 10 seconds. 6. Tips: &#...ignition. 5. Turn the ignition to the 3 (ON) position. Turn the ignition from the 1 (LOCK) position to the 1 (LOCK) position and remove the coded key from the ignition. 7. Keep the ignition in the 3 (ON) position for at least one second, but no more than 10 seconds. 3. Within twenty ...
... the ignition in the 3 (ON) position for at least one second but not more than 10 seconds. 93 Within ten seconds, insert the second previously coded key into the ignition. 2 4 1 2. Keep the ignition in the 3 (ON) position for at least one second, but no more than 10 seconds. 6. Tips: &#...ignition. 5. Turn the ignition to the 3 (ON) position. Turn the ignition from the 1 (LOCK) position to the 1 (LOCK) position and remove the coded key from the ignition. 7. Keep the ignition in the 3 (ON) position for at least one second, but no more than 10 seconds. 3. Within twenty ...

Owner Guide 1st Printing (Spanish)
Page 381
... additional key. If the key was not successfully programmed, it will start your dealer to enter the 20 second countdown. 94 Remove the newly programmed coded key from step 1 for three seconds and then go out. If the key has been successfully programmed it will not start the vehicle's engine and...
... additional key. If the key was not successfully programmed, it will start your dealer to enter the 20 second countdown. 94 Remove the newly programmed coded key from step 1 for three seconds and then go out. If the key has been successfully programmed it will not start the vehicle's engine and...
Owner Guide 1st Printing (Spanish)
Page 455
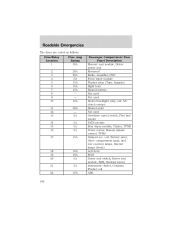
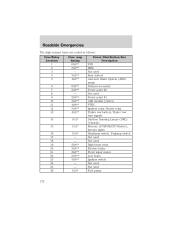
Roadside Emergencies The fuses are coded as follows: Fuse/Relay Location 1 2 3 4 5 6 7 8 9 10 11 12 13 14 15 16 17 Fuse Amp Rating 30A 20A 20A 5A 15A 10A 15A - - 10A 20A - ...
Roadside Emergencies The fuses are coded as follows: Fuse/Relay Location 1 2 3 4 5 6 7 8 9 10 11 12 13 14 15 16 17 Fuse Amp Rating 30A 20A 20A 5A 15A 10A 15A - - 10A 20A - ...
Owner Guide 1st Printing (Spanish)
Page 459
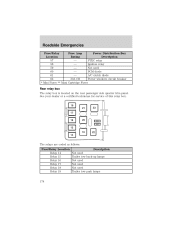
Roadside Emergencies The high-current fuses are coded as follows: Fuse/Relay Location 1 2 3 4 5 6 7 8 9 10 11 12 13 14 15 16 17 18 19 20 21 22 23 24 25 26 Fuse Amp Rating ...
Roadside Emergencies The high-current fuses are coded as follows: Fuse/Relay Location 1 2 3 4 5 6 7 8 9 10 11 12 13 14 15 16 17 18 19 20 21 22 23 24 25 26 Fuse Amp Rating ...
Owner Guide 1st Printing (Spanish)
Page 461
... The relay box is located on the rear passenger side quarter trim panel. Ignition relay 59 - PTEC relay 58 - PCM diode 61 - The relays are coded as follows: Fuse/Relay Location Relay 14 Relay 15 Relay 16 Relay 17 Relay 18 Relay 19 Description Not used Trailer tow back-up lamps...
... The relay box is located on the rear passenger side quarter trim panel. Ignition relay 59 - PTEC relay 58 - PCM diode 61 - The relays are coded as follows: Fuse/Relay Location Relay 14 Relay 15 Relay 16 Relay 17 Relay 18 Relay 19 Description Not used Trailer tow back-up lamps...
Owner Guide 1st Printing (Spanish)
Page 462
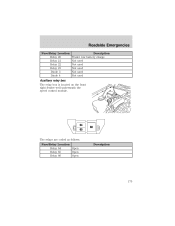
Roadside Emergencies Fuse/Relay Location Relay 20 Relay 21 Relay 22 Relay 23 Diode 3 Diode 4 Description Trailer tow battery charge Not used Not used Not used Not used Not used Auxiliary relay box The relay box is located on the front right fender well underneath the speed control module. The relays are coded as follows: Fuse/Relay Location Relay 64 Open Relay 65 Open Relay 66 Open Description 175
Roadside Emergencies Fuse/Relay Location Relay 20 Relay 21 Relay 22 Relay 23 Diode 3 Diode 4 Description Trailer tow battery charge Not used Not used Not used Not used Not used Auxiliary relay box The relay box is located on the front right fender well underneath the speed control module. The relays are coded as follows: Fuse/Relay Location Relay 64 Open Relay 65 Open Relay 66 Open Description 175
Owner Guide 1st Printing (Spanish)
Page 485
...following address: Ford Motor Company 16800 Executive Plaza Drive Mail Drop 3NE-B Dearborn, MI 48126 198 Customer Assistance IN CALIFORNIA (U.S. California Civil Code Section 1793.22(b) presumes that , if a manufacturer or its applicable express warranties if, within the first 18 months of ownership of the...repurchase the vehicle and reimburse the buyer in an amount equal to cause death or serious bodily injury OR 2. ONLY) California Civil Code Section 1793.2(d) requires that the manufacturer has had a reasonable number of attempts to conform the vehicle to its representative is out ...
...following address: Ford Motor Company 16800 Executive Plaza Drive Mail Drop 3NE-B Dearborn, MI 48126 198 Customer Assistance IN CALIFORNIA (U.S. California Civil Code Section 1793.22(b) presumes that , if a manufacturer or its applicable express warranties if, within the first 18 months of ownership of the...repurchase the vehicle and reimburse the buyer in an amount equal to cause death or serious bodily injury OR 2. ONLY) California Civil Code Section 1793.2(d) requires that the manufacturer has had a reasonable number of attempts to conform the vehicle to its representative is out ...
Owner Guide 1st Printing (Spanish)
Page 488
...: • Take care when using the products. Cleaning PAINT CHIPS Your dealer has touch-up paint and sprays to match your dealer. Take your color code (printed on a sticker in combination with brush agitation to remove brake dust and dirt, could penetrate the sealed parts and cause damage. • Do not...
...: • Take care when using the products. Cleaning PAINT CHIPS Your dealer has touch-up paint and sprays to match your dealer. Take your color code (printed on a sticker in combination with brush agitation to remove brake dust and dirt, could penetrate the sealed parts and cause damage. • Do not...
Owner Guide 1st Printing (Spanish)
Page 526
... the United States Department of asphalt and concrete. Department of Transportation requires Ford to variations in driving habits, service practices, and differences in Title 49 Code of the tire when tested under controlled conditions on a specified government test course. Traction AA A B C The traction grades, from the norm due to give you...
... the United States Department of asphalt and concrete. Department of Transportation requires Ford to variations in driving habits, service practices, and differences in Title 49 Code of the tire when tested under controlled conditions on a specified government test course. Traction AA A B C The traction grades, from the norm due to give you...

Owner Guide 3rd Printing
Page 62
... to a garage door or gate, be opened or closed ), press and hold the rear portion of the vehicle. This feature will learn the radio frequency codes of the vehicle, the programmed Homelink buttons be opened to the vent position to Programming in the garage. 62 Retain the original transmitter for...
... to a garage door or gate, be opened or closed ), press and hold the rear portion of the vehicle. This feature will learn the radio frequency codes of the vehicle, the programmed Homelink buttons be opened to the vent position to Programming in the garage. 62 Retain the original transmitter for...

Owner Guide 3rd Printing
Page 63
... (or "ACC") position for Canadian residents. 4. do not repeat step 1. Note: If the red light blinks rapidly for quicker training and accurate transmission of a rolling code equipped device. 63 Position the end of your hand-held transmitter of the device being programmed to HomeLink for two seconds and then turns...
... (or "ACC") position for Canadian residents. 4. do not repeat step 1. Note: If the red light blinks rapidly for quicker training and accurate transmission of a rolling code equipped device. 63 Position the end of your hand-held transmitter of the device being programmed to HomeLink for two seconds and then turns...

Owner Guide 3rd Printing
Page 64
... 64 not allowing enough time for two seconds and release the HomeLink button. Gate Operator & Canadian Programming During programming, your rolling code equipped device. Return to the vehicle and firmly press, hold for HomeLink to complete the programming. To program additional HomeLink ...in the garage, locate the "learn " or "smart" button. (The name and color of the garage door opener (or other rolling code equipped device), repeat this sequence a third time to accept the signal from the hand-held transmitter may vary by the HomeLink. After ...
... 64 not allowing enough time for two seconds and release the HomeLink button. Gate Operator & Canadian Programming During programming, your rolling code equipped device. Return to the vehicle and firmly press, hold for HomeLink to complete the programming. To program additional HomeLink ...in the garage, locate the "learn " or "smart" button. (The name and color of the garage door opener (or other rolling code equipped device), repeat this sequence a third time to accept the signal from the hand-held transmitter may vary by the HomeLink. After ...

Owner Guide 3rd Printing
Page 89
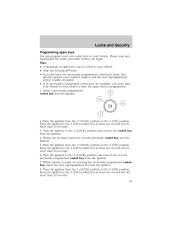
...8226; Do not use the keyless entry keypad to ensure a good activation. Each number must be operated with the factory set 5-digit code. 2. Locks and Security KEYLESS ENTRY SYSTEM (IF EQUIPPED) You can use five numbers in the glove box, is available from your ... deactivate the autolock feature. • arm or disarm the perimeter alarm system (if equipped). Programming a personal entry code To create your personal 5-digit code. Enter your own personal entry code: 1. The keypad can also create your authorized dealer. Within five seconds press the 1 • 2 on the...
...8226; Do not use the keyless entry keypad to ensure a good activation. Each number must be operated with the factory set 5-digit code. 2. Locks and Security KEYLESS ENTRY SYSTEM (IF EQUIPPED) You can use five numbers in the glove box, is available from your ... deactivate the autolock feature. • arm or disarm the perimeter alarm system (if equipped). Programming a personal entry code To create your personal 5-digit code. Enter your own personal entry code: 1. The keypad can also create your authorized dealer. Within five seconds press the 1 • 2 on the...


