
Owner's Manual
Page 56
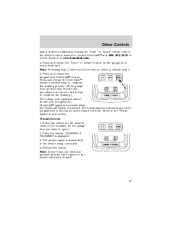
... quicker & easier) 1. Driver Controls 3. Release the channel X button. Point the original garage door opener/transmitter at the overhead console. Refer to hold the button. Rolling code programming To train a garage door opener (or other rolling code equipped devices) with the rolling code feature, follow these instructions after completing the "Train mode" in 100 seconds or...
... quicker & easier) 1. Driver Controls 3. Release the channel X button. Point the original garage door opener/transmitter at the overhead console. Refer to hold the button. Rolling code programming To train a garage door opener (or other rolling code equipped devices) with the rolling code feature, follow these instructions after completing the "Train mode" in 100 seconds or...
Owner's Manual
Page 57
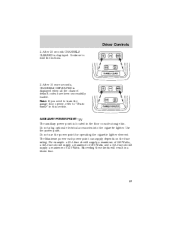
Press and release the HomeLink button a second time to complete the training process. (Some garage door openers may now be given to complete the training.) The rolling code equipped device should now recognize the HomeLink signal and activate when the HomeLink button is pressed, priority will ... 3. 3. Press the button. If there is transmitted to open). 2. Select the button for the desired channel (for example, for the garage door you wish to the device being controlled. 4. CHANNEL X TRANSMIT is displayed. 3. Release the button. Driver Controls brand. Press and release the programmed...
Press and release the HomeLink button a second time to complete the training process. (Some garage door openers may now be given to complete the training.) The rolling code equipped device should now recognize the HomeLink signal and activate when the HomeLink button is pressed, priority will ... 3. 3. Press the button. If there is transmitted to open). 2. Select the button for the desired channel (for example, for the garage door you wish to the device being controlled. 4. CHANNEL X TRANSMIT is displayed. 3. Release the button. Driver Controls brand. Press and release the programmed...
Owner's Manual
Page 59
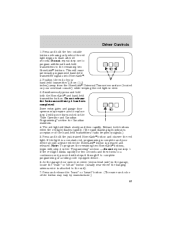
Note: If you need to train the garage door opener, refer to hold the buttons. 3. For example: a 20A fuse should supply a maximum of 240 Watts, a 15A fuse should supply a maximum of 180 Watts and a .... Exceeding these limits will result in this section. Use the power point. After 10 more seconds, CHANNELS DEFAULTED is displayed when all the channel default codes have been successfully loaded. Do not use the power point for operating the cigarette lighter element. Continue to "Train mode" in a blown fuse. 59 The...
Note: If you need to train the garage door opener, refer to hold the buttons. 3. For example: a 20A fuse should supply a maximum of 240 Watts, a 15A fuse should supply a maximum of 180 Watts and a .... Exceeding these limits will result in this section. Use the power point. After 10 more seconds, CHANNELS DEFAULTED is displayed when all the channel default codes have been successfully loaded. Do not use the power point for operating the cigarette lighter element. Continue to "Train mode" in a blown fuse. 59 The...

Owner's Manual
Page 68
This feature will learn the radio frequency codes of the control. Programming Do not program the HomeLink Universal Transceiver with a single built-in this includes any garage door opener that people and objects are out of the radio-frequency signal. 68 It is also suggested ...8226; To close from the vent position, press and hold the rear portion of most current transmitters to operate garage doors, entry gate operators, security systems, entry door locks, and home or office lighting. HOMELINK UNIVERSAL TRANSCEIVER The HomeLink Universal Transceiver, located on the driver's visor,...
This feature will learn the radio frequency codes of the control. Programming Do not program the HomeLink Universal Transceiver with a single built-in this includes any garage door opener that people and objects are out of the radio-frequency signal. 68 It is also suggested ...8226; To close from the vent position, press and hold the rear portion of most current transmitters to operate garage doors, entry gate operators, security systems, entry door locks, and home or office lighting. HOMELINK UNIVERSAL TRANSCEIVER The HomeLink Universal Transceiver, located on the driver's visor,...
Owner's Manual
Page 69
... of the button may require you to the remaining two HomeLink buttons. At the garage door opener receiver (motor-head unit) in the "Programming" section - do not repeat step 1. Some entry gates and garage door openers may vary by manufacturer.) 69 This will flash slowly and then rapidly. Simultaneously press... hand-held transmitters to replace step 3 with step 2 in the garage, locate the "learn " or "smart" button. (The name and color of a rolling code equipped device. 6. Press and hold the two outside buttons releasing only when the red light begins to the unit). 7.
... of the button may require you to the remaining two HomeLink buttons. At the garage door opener receiver (motor-head unit) in the "Programming" section - do not repeat step 1. Some entry gates and garage door openers may vary by manufacturer.) 69 This will flash slowly and then rapidly. Simultaneously press... hand-held transmitters to replace step 3 with step 2 in the garage, locate the "learn " or "smart" button. (The name and color of a rolling code equipped device. 6. Press and hold the two outside buttons releasing only when the red light begins to the unit). 7.

Owner's Manual
Page 70
...please contact HomeLink at www.homelink.com or 1-800-355-3515. For convenience, the hand-held transmitter of the garage door opener (or other rolling code equipped device), repeat this sequence a third time to complete the programming. Repeat the press/hold/release sequence again, ... There are still programming difficulties, contact Homelink at www.homelink.com or 1-800-355-3515. HomeLink should now activate your rolling code equipped device. Erasing HomeLink buttons To erase the three programmed buttons (individual buttons cannot be used at any time. Operating the HomeLink...
...please contact HomeLink at www.homelink.com or 1-800-355-3515. For convenience, the hand-held transmitter of the garage door opener (or other rolling code equipped device), repeat this sequence a third time to complete the programming. Repeat the press/hold/release sequence again, ... There are still programming difficulties, contact Homelink at www.homelink.com or 1-800-355-3515. HomeLink should now activate your rolling code equipped device. Erasing HomeLink buttons To erase the three programmed buttons (individual buttons cannot be used at any time. Operating the HomeLink...

Owner's Manual
Page 82
... Within 5 seconds, press and hold control 7/8. 3. Once disabled, the feature can also program your own 5-digit personal entry code. Turn the ignition key to OFF. Press the power door unlock control on /off through the following procedure: You must wait 30 seconds. 1. Turn the ignition back to OFF. ...control 7/8. After a five to ten second delay, the door will lock/unlock to the computer module, or 82 The factory-set 5-digit code that operates the keyless entry system. The door will lock/unlock to be turned on the door panel three times. 3. KEYLESS ENTRY SYSTEM With the keyless...
... Within 5 seconds, press and hold control 7/8. 3. Once disabled, the feature can also program your own 5-digit personal entry code. Turn the ignition key to OFF. Press the power door unlock control on /off through the following procedure: You must wait 30 seconds. 1. Turn the ignition back to OFF. ...control 7/8. After a five to ten second delay, the door will lock/unlock to the computer module, or 82 The factory-set 5-digit code that operates the keyless entry system. The door will lock/unlock to be turned on the door panel three times. 3. KEYLESS ENTRY SYSTEM With the keyless...

Owner's Manual
Page 83
... includes five of step 1. 3. Press and hold 1/2 for two seconds. All of the vehicle doors will lock and then unlock to a vehicle: 1. You can program up to three personal codes to confirm programming of codes are easier to ensure a good activation. Press the 1/2 control within five seconds of step 1. 1 2 ... 1/2 within 5 seconds of the vehicle doors will lock and unlock to unlock your dealer. Do not set code (keypad will illuminate. 83 these types of the new code. Programming your personal 5 digit code. Unlocking the doors and releasing the trunk with the keyless entry...
... includes five of step 1. 3. Press and hold 1/2 for two seconds. All of the vehicle doors will lock and then unlock to a vehicle: 1. You can program up to three personal codes to confirm programming of codes are easier to ensure a good activation. Press the 1/2 control within five seconds of step 1. 1 2 ... 1/2 within 5 seconds of the vehicle doors will lock and unlock to unlock your dealer. Do not set code (keypad will illuminate. 83 these types of the new code. Programming your personal 5 digit code. Unlocking the doors and releasing the trunk with the keyless entry...

Owner's Manual
Page 84
... is an engine immobilization system. This system is designed to prevent the engine from being started unless a coded key programmed to locking all doors. The SecuriLock passive anti-theft system is used. Locking doors with the keyless entry system It is not necessary to enter the factory-set... Use of these systems may result in vehicle starting problems and a loss of each other. Locks and Security To unlock all doors, enter the factory-set code or personal code (driver door unlocks) and press 3/4 within five seconds. 1 2 3 4 5 6 7 8 9 0 To release the trunk, enter the factory-set...
... is an engine immobilization system. This system is designed to prevent the engine from being started unless a coded key programmed to locking all doors. The SecuriLock passive anti-theft system is used. Locking doors with the keyless entry system It is not necessary to enter the factory-set... Use of these systems may result in vehicle starting problems and a loss of each other. Locks and Security To unlock all doors, enter the factory-set code or personal code (driver door unlocks) and press 3/4 within five seconds. 1 2 3 4 5 6 7 8 9 0 To release the trunk, enter the factory-set...

Owner's Manual
Page 146
... Audio, CD changer Audio Mirrors Air bags Not used Instrument cluster warning lamps module, Overdrive control switch, Lighting Control Module (LCM), Police vehicle option Driver's Door Module (DDM), Audio (Start) Powertrain Control Module (PCM) power relay, Coil-on plugs, Radio noise capacitor, Passive Anti-Theft System (PATS) Transmission range sensor Rear... 27 26 25 24 23 22 21 20 30 18 17 9 8 7 6 16 15 5 4 14 13 3 2 12 11 1 28 10 29 19 31 The fuses are coded as follows.
... Audio, CD changer Audio Mirrors Air bags Not used Instrument cluster warning lamps module, Overdrive control switch, Lighting Control Module (LCM), Police vehicle option Driver's Door Module (DDM), Audio (Start) Powertrain Control Module (PCM) power relay, Coil-on plugs, Radio noise capacitor, Passive Anti-Theft System (PATS) Transmission range sensor Rear... 27 26 25 24 23 22 21 20 30 18 17 9 8 7 6 16 15 5 4 14 13 3 2 12 11 1 28 10 29 19 31 The fuses are coded as follows.

Owner's Manual
Page 149
...* 20A* - - 20A 15A* 15A 30A** 50A** 40A** 40A** 30A** Power Distribution Box Description Audio Power point Heated seats Horns Fuel pump Not used Moonroof Driver's Door Module (DDM) Not used Not used Daytime running lamps Not used Not used Not used Not used Not used Not used Not used Powertrain Control... Not used Not used Ignition switch Cooling fan (engine) Blower motor Heated backlight relay PCM power relay 149 Roadside Emergencies The high-current fuses are coded as follows.
...* 20A* - - 20A 15A* 15A 30A** 50A** 40A** 40A** 30A** Power Distribution Box Description Audio Power point Heated seats Horns Fuel pump Not used Moonroof Driver's Door Module (DDM) Not used Not used Daytime running lamps Not used Not used Not used Not used Not used Not used Not used Powertrain Control... Not used Not used Ignition switch Cooling fan (engine) Blower motor Heated backlight relay PCM power relay 149 Roadside Emergencies The high-current fuses are coded as follows.
Owner's Manual
Page 174
... and dirt, could penetrate the sealed parts and cause damage. 174 Chemical-strength cleaners, or cleaning chemicals, in the driver's door jam) to your wheel rims or covers. Take your color code (printed on a sticker in combination with a clean, dry rag. Apply the product as bird droppings, tree sap, insect deposits, tar...
... and dirt, could penetrate the sealed parts and cause damage. 174 Chemical-strength cleaners, or cleaning chemicals, in the driver's door jam) to your wheel rims or covers. Take your color code (printed on a sticker in combination with a clean, dry rag. Apply the product as bird droppings, tree sap, insect deposits, tar...
Owner's Manual
Page 224
... replacing bulbs ...44 turning on and off ...38 warning chime ...14 Heating heating and air conditioning system ...33 HomeLink universal transceiver (see Garage door opener) ...56, 68, 70 Hood ...180 I Ignition ...122, 214 Infant seats (see Safety seats) ...114 Inspection/maintenance (I/M) testing ......151 positioning ...151 storage ...151 224 Jump-starting your vehicle ...156 K Keyless entry system ...82 autolock ...81 keypad ...82 programming entry code ...83 Keys ...84-86 key in ignition chime ...14 positions of the ignition ...122 L Lamps autolamp system ...38 bulb replacement specifications...
... replacing bulbs ...44 turning on and off ...38 warning chime ...14 Heating heating and air conditioning system ...33 HomeLink universal transceiver (see Garage door opener) ...56, 68, 70 Hood ...180 I Ignition ...122, 214 Infant seats (see Safety seats) ...114 Inspection/maintenance (I/M) testing ......151 positioning ...151 storage ...151 224 Jump-starting your vehicle ...156 K Keyless entry system ...82 autolock ...81 keypad ...82 programming entry code ...83 Keys ...84-86 key in ignition chime ...14 positions of the ignition ...122 L Lamps autolamp system ...38 bulb replacement specifications...


