
Owner's Manual
Page 2
only) 163 172 Cleaning Maintenance and Specifications Engine compartment Engine oil Battery Fuel information Air filter(s) Part numbers Refill capacities Lubricant specifications 173 179 181 182 186 194 206 211 211 212 2 Table of Contents Driving Starting ...
only) 163 172 Cleaning Maintenance and Specifications Engine compartment Engine oil Battery Fuel information Air filter(s) Part numbers Refill capacities Lubricant specifications 173 179 181 182 186 194 206 211 211 212 2 Table of Contents Driving Starting ...

Owner's Manual
Page 9
Introduction Vehicle Symbol Glossary Power Windows Front/Rear Child Safety Door Lock/Unlock Panic Alarm Engine Coolant Power Window Lockout Interior Luggage Compartment Release Symbol Engine Oil Engine Coolant Temperature Battery Do Not Open When Hot Avoid Smoking, Flames, or Sparks Explosive Gas Battery Acid Fan Warning Maintain Correct Fluid Level Engine Air Filter Jack MAX MIN Power Steering Fluid Emission System Passenger Compartment Air Filter Check fuel cap Low tire warning 9
Introduction Vehicle Symbol Glossary Power Windows Front/Rear Child Safety Door Lock/Unlock Panic Alarm Engine Coolant Power Window Lockout Interior Luggage Compartment Release Symbol Engine Oil Engine Coolant Temperature Battery Do Not Open When Hot Avoid Smoking, Flames, or Sparks Explosive Gas Battery Acid Fan Warning Maintain Correct Fluid Level Engine Air Filter Jack MAX MIN Power Steering Fluid Emission System Passenger Compartment Air Filter Check fuel cap Low tire warning 9
Owner's Manual
Page 12
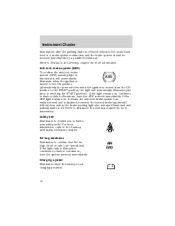
... turned to the ON position (alternatively for more information, refer to the Seating and safety restraints chapter. For more information. Charging system Illuminates when the battery is off. Refer to Brakes in the Driving chapter for some vehicles when the ignition is released indicates low brake fluid level or a brake system...
... turned to the ON position (alternatively for more information, refer to the Seating and safety restraints chapter. For more information. Charging system Illuminates when the battery is off. Refer to Brakes in the Driving chapter for some vehicles when the ignition is released indicates low brake fluid level or a brake system...

Owner's Manual
Page 16
... soon as possible, shut off the engine and check the oil level. Voltmeter gauge Located in the lower center of the instrument panel, measures the battery charging voltage. Do not continue to operate your vehicle as soon as safe to cool before handling any components.
... soon as possible, shut off the engine and check the oil level. Voltmeter gauge Located in the lower center of the instrument panel, measures the battery charging voltage. Do not continue to operate your vehicle as soon as safe to cool before handling any components.

Owner's Manual
Page 68
... or gate, be placed in the hand-held transmitters with any garage door opener model manufactured before April 1, 1982). It is also recommended that a new battery be sure that people and objects are out of the way to HomeLink for quicker training and accurate transmission of the vehicle, the programmed Homelink...
... or gate, be placed in the hand-held transmitters with any garage door opener model manufactured before April 1, 1982). It is also recommended that a new battery be sure that people and objects are out of the way to HomeLink for quicker training and accurate transmission of the vehicle, the programmed Homelink...

Owner's Manual
Page 79
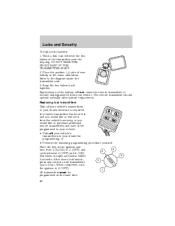
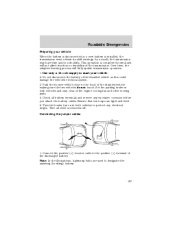
... the OFF position. After a five to ten second delay, the door locks will allow you to be caused by one coin type three-volt lithium battery CR2032 or equivalent. Opening the trunk Press the control once to ACC or ON. This feature will only operate with the transmission out of the.... Typical operating range will cycle lock/unlock to the vehicle 79 Ensure that the trunk is closed and latched before driving your vehicle. Replacing the battery The remote transmitter is in either the ACC or ON position. Failure to latch the trunk may cause objects to fall out of P (Park) or...
... the OFF position. After a five to ten second delay, the door locks will allow you to be caused by one coin type three-volt lithium battery CR2032 or equivalent. Opening the trunk Press the control once to ACC or ON. This feature will only operate with the transmission out of the.... Typical operating range will cycle lock/unlock to the vehicle 79 Ensure that the trunk is closed and latched before driving your vehicle. Replacing the battery The remote transmitter is in either the ACC or ON position. Failure to latch the trunk may cause objects to fall out of P (Park) or...
Owner's Manual
Page 80
... to your dealer if service is required. Place the positive (+) side of the transmitter near the key ring. The remote transmitter should operate normally after battery replacement. If a remote transmitter has been lost transmitters Take all your vehicle's transmitters to four). Locks and Security To replace the... the key in the ignition and 4 turn the ignition to 3 (OFF) and 3 cycle between the two halves of new battery in rapid succession within 3 seconds. Replacing lost and you would like to remove it from 2 (LOCK) to 3 (OFF). 1 All transmitters must be programmed at the...
... to your dealer if service is required. Place the positive (+) side of the transmitter near the key ring. The remote transmitter should operate normally after battery replacement. If a remote transmitter has been lost transmitters Take all your vehicle's transmitters to four). Locks and Security To replace the... the key in the ignition and 4 turn the ignition to 3 (OFF) and 3 cycle between the two halves of new battery in rapid succession within 3 seconds. Replacing lost and you would like to remove it from 2 (LOCK) to 3 (OFF). 1 All transmitters must be programmed at the...
Owner's Manual
Page 81
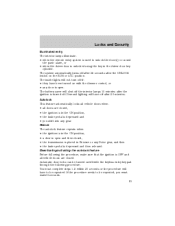
... the interior lamps 10 minutes after the ignition is unlocked using the key in the ON position, • a door is depressed and then released. The battery saver will turn off if: • they have to be repeated.
... the interior lamps 10 minutes after the ignition is unlocked using the key in the ON position, • a door is depressed and then released. The battery saver will turn off if: • they have to be repeated.

Owner's Manual
Page 148
... box contains high-current fuses that protect your vehicle's main electrical systems from overloads. Always disconnect the battery before reconnecting the battery or refilling fluid reservoirs If the battery has been disconnected and reconnected, refer to the power distribution box before servicing high current fuses. Always ...replace the cover to the Battery section of the Maintenance and specifications chapter. 503 204 502 501 208 24 401 23 RELAY 304 207 201 205...
... box contains high-current fuses that protect your vehicle's main electrical systems from overloads. Always disconnect the battery before reconnecting the battery or refilling fluid reservoirs If the battery has been disconnected and reconnected, refer to the power distribution box before servicing high current fuses. Always ...replace the cover to the Battery section of the Maintenance and specifications chapter. 503 204 502 501 208 24 401 23 RELAY 304 207 201 205...

Owner's Manual
Page 156
... stowing the flat tire, be sure to tie down fastener clockwise to flames, sparks, or lit cigarettes. JUMP STARTING YOUR VEHICLE The gases around the battery can burn skin, eyes and clothing, if contacted. An explosion could result in the order shown. 1 3 4 5 2 10. Automatic transmissions do ...not have push-start your vehicle. Put flat tire, jack and lug wrench away. Batteries contain sulfuric acid which can explode if exposed to tighten the road wheel. 11. Turn on the shelf area of the fastener to push-start...
... stowing the flat tire, be sure to tie down fastener clockwise to flames, sparks, or lit cigarettes. JUMP STARTING YOUR VEHICLE The gases around the battery can burn skin, eyes and clothing, if contacted. An explosion could result in the order shown. 1 3 4 5 2 10. Automatic transmissions do ...not have push-start your vehicle. Put flat tire, jack and lug wrench away. Batteries contain sulfuric acid which can explode if exposed to tighten the road wheel. 11. Turn on the shelf area of the fastener to push-start...
Owner's Manual
Page 157
... fan and other accessories off. Over time, the adaptive learning process will not affect function or durability of the discharged battery. Turn all battery terminals and remove any electrical surges. Ensure that vent caps are used to start your vehicle When the..., the transmission may have firm and/or soft shifts. Note: In the illustrations, lightning bolts are tight and level. 5. Do not disconnect the battery of the disabled vehicle making sure the two vehicles do not touch. Connect the positive (+) booster cable to protect any excessive corrosion before you attach...
... fan and other accessories off. Over time, the adaptive learning process will not affect function or durability of the discharged battery. Turn all battery terminals and remove any electrical surges. Ensure that vent caps are used to start your vehicle When the..., the transmission may have firm and/or soft shifts. Note: In the illustrations, lightning bolts are tight and level. 5. Do not disconnect the battery of the disabled vehicle making sure the two vehicles do not touch. Connect the positive (+) booster cable to protect any excessive corrosion before you attach...

Owner's Manual
Page 158
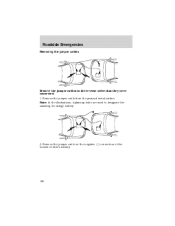
Connect the negative (-) cable to the positive (+) terminal of the assisting battery. 158 - - - + + - + + Connect the other end of the positive (+) cable to the negative (-) terminal of the assisting battery. 3. Roadside Emergencies 2.
Connect the negative (-) cable to the positive (+) terminal of the assisting battery. 158 - - - + + - + + Connect the other end of the positive (+) cable to the negative (-) terminal of the assisting battery. 3. Roadside Emergencies 2.

Owner's Manual
Page 159
..., belts, moving parts of both engines for an additional three minutes before disconnecting the jumper cables. - - + + 159 Ensure that surround the battery. 5. Jump starting 1. Start the engine of the disabled vehicle. 3. Do not use fuel lines, engine rocker covers or the intake manifold as ...grounding points. Make the final connection of the stalled vehicle's engine, away from the battery and the carburetor/fuel injection system. Start the engine of the booster vehicle and run both engines, or any fuel delivery system ...
..., belts, moving parts of both engines for an additional three minutes before disconnecting the jumper cables. - - + + 159 Ensure that surround the battery. 5. Jump starting 1. Start the engine of the disabled vehicle. 3. Do not use fuel lines, engine rocker covers or the intake manifold as ...grounding points. Make the final connection of the stalled vehicle's engine, away from the battery and the carburetor/fuel injection system. Start the engine of the booster vehicle and run both engines, or any fuel delivery system ...
Owner's Manual
Page 160
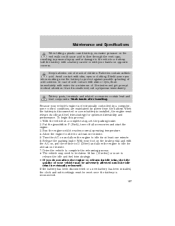
Remove the jumper cable on the negative (-) connection of the booster vehicle's battery. 160 - - - - + + + + Note: In the illustrations, lightning bolts are used to designate the assisting (boosting) battery. 2. Remove the jumper cable from the ground metal surface. Roadside Emergencies Removing the jumper cables Remove the jumper cables in the reverse order that they were connected. 1.
Remove the jumper cable on the negative (-) connection of the booster vehicle's battery. 160 - - - - + + + + Note: In the illustrations, lightning bolts are used to designate the assisting (boosting) battery. 2. Remove the jumper cable from the ground metal surface. Roadside Emergencies Removing the jumper cables Remove the jumper cables in the reverse order that they were connected. 1.

Owner's Manual
Page 161
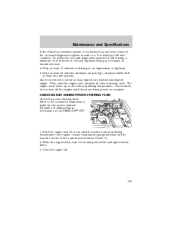
After the disabled vehicle has been started and the jumper cables removed, allow it to idle for several minutes so the engine computer can relearn its idle conditions. - - - + + - + + 161 Roadside Emergencies 3. Remove the jumper cable from the positive (+) terminal of the booster vehicle's battery. 4. Remove the jumper cable from the positive (+) terminal of the disabled vehicle's battery.
After the disabled vehicle has been started and the jumper cables removed, allow it to idle for several minutes so the engine computer can relearn its idle conditions. - - - + + - + + 161 Roadside Emergencies 3. Remove the jumper cable from the positive (+) terminal of the booster vehicle's battery. 4. Remove the jumper cable from the positive (+) terminal of the disabled vehicle's battery.

Owner's Manual
Page 179
... P (Park). 2. Maintenance and Specifications SERVICE RECOMMENDATIONS To help you have enough ventilation. • Keep all open flames and other burning (cigarettes) material away from the battery and all fuel related parts. Motorcraft parts are covered. Set the parking brake and shift to specifications. Working with the engine off the engine and...
... P (Park). 2. Maintenance and Specifications SERVICE RECOMMENDATIONS To help you have enough ventilation. • Keep all open flames and other burning (cigarettes) material away from the battery and all fuel related parts. Motorcraft parts are covered. Set the parking brake and shift to specifications. Working with the engine off the engine and...

Owner's Manual
Page 186
... provide proper ventilation. 186 Do not overfill the battery cells. When working near the battery. However, for the service interval schedules. Keep the electrolyte level in high temperature climates, check the battery electrolyte level. If possible, however, try to the battery terminals. Therefore, do not use hard water (... eyes. Refer to the scheduled maintenance guide for severe usage or in each cell up to the battery, as long as you see any corrosion on the battery or terminals, remove the cables from the terminals and clean with distilled water. Also, make sure it...
... provide proper ventilation. 186 Do not overfill the battery cells. When working near the battery. However, for the service interval schedules. Keep the electrolyte level in high temperature climates, check the battery electrolyte level. If possible, however, try to the battery terminals. Therefore, do not use hard water (... eyes. Refer to the scheduled maintenance guide for severe usage or in each cell up to the battery, as long as you see any corrosion on the battery or terminals, remove the cables from the terminals and clean with distilled water. Also, make sure it...
Owner's Manual
Page 187
... flush immediately with your hands on opposite corners. If acid is electronically controlled by a computer, some control conditions are maintained by power from the battery. Because your foot on the brake pedal and with skin, eyes or clothing. Put the gearshift in P (Park), turn off all accessories and..., the clock and radio settings must relearn its idle trim, the idle quality of your eyes when working near the battery to the vehicle or battery. Lift the battery with a battery carrier or with water for at least one minute. 5. Shield your vehicle may need to be driven 16 km (...
... flush immediately with your hands on opposite corners. If acid is electronically controlled by a computer, some control conditions are maintained by power from the battery. Because your foot on the brake pedal and with skin, eyes or clothing. Put the gearshift in P (Park), turn off all accessories and..., the clock and radio settings must relearn its idle trim, the idle quality of your eyes when working near the battery to the vehicle or battery. Lift the battery with a battery carrier or with water for at least one minute. 5. Shield your vehicle may need to be driven 16 km (...

Owner's Manual
Page 188
...level falls below 40% or above 60%, the engine parts could become damaged or not work properly. 188 If the concentration of automotive batteries in a responsible manner. Maintenance and Specifications • Always dispose of coolant falls below , add coolant per the instructions in the Adding...50/50 coolant and distilled water, which equates to a freeze point of corrosion. • Enables calibrated gauges to find out more about recycling automotive batteries. A 50-50 mixture of coolant and water provides the following: • Freeze protection down to -36° C (-34° F). &#...
...level falls below 40% or above 60%, the engine parts could become damaged or not work properly. 188 If the concentration of automotive batteries in a responsible manner. Maintenance and Specifications • Always dispose of coolant falls below , add coolant per the instructions in the Adding...50/50 coolant and distilled water, which equates to a freeze point of corrosion. • Enables calibrated gauges to find out more about recycling automotive batteries. A 50-50 mixture of coolant and water provides the following: • Freeze protection down to -36° C (-34° F). &#...
Owner's Manual
Page 203
..., do not turn the steering wheel left and right several times. 3. CHECKING AND ADDING POWER STEERING FLUID Check the power steering fluid. Refer to its battery has just been serviced, the on an expressway or highway. • Next, at least 20 minutes driving in stop-and-go, city-type traffic with...
..., do not turn the steering wheel left and right several times. 3. CHECKING AND ADDING POWER STEERING FLUID Check the power steering fluid. Refer to its battery has just been serviced, the on an expressway or highway. • Next, at least 20 minutes driving in stop-and-go, city-type traffic with...
