Owner's Manual
Page 80
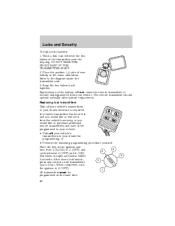
... key in the ignition and 4 turn the ignition to your dealer for programming, or • Perform the following programming procedure yourself. Refer to remove it from your vehicle. After doors lock/unlock, 2 press any control on all your vehicle's transmitters to 3 (OFF). 1 All transmitters must...and 4 (ON) four times in the same orientation. Locks and Security To replace the battery: 1. When completed, turn from 2 (LOCK) to 3 (OFF) and 3 cycle between the two halves of the battery will not cause the remote transmitter to become deprogrammed from the vehicle's memory, or you ...
... key in the ignition and 4 turn the ignition to your dealer for programming, or • Perform the following programming procedure yourself. Refer to remove it from your vehicle. After doors lock/unlock, 2 press any control on all your vehicle's transmitters to 3 (OFF). 1 All transmitters must...and 4 (ON) four times in the same orientation. Locks and Security To replace the battery: 1. When completed, turn from 2 (LOCK) to 3 (OFF) and 3 cycle between the two halves of the battery will not cause the remote transmitter to become deprogrammed from the vehicle's memory, or you ...

Owner's Manual
Page 156
... on the shelf area of the fastener to flames, sparks, or lit cigarettes. Batteries contain sulfuric acid which can explode if exposed to the shelf floor. • ... tire, be sure to tie down fastener clockwise to push-start capability; JUMP STARTING YOUR VEHICLE The gases around the battery can burn skin, eyes and clothing, if contacted. Note: To make sure the road wheel is properly stowed: &#...in the order shown. 1 3 4 5 2 10. Do not attempt to tighten the road wheel. 11. Remove the jack and fully tighten the lug nuts in injury or vehicle damage. Roadside Emergencies 9.
... on the shelf area of the fastener to flames, sparks, or lit cigarettes. Batteries contain sulfuric acid which can explode if exposed to the shelf floor. • ... tire, be sure to tie down fastener clockwise to push-start capability; JUMP STARTING YOUR VEHICLE The gases around the battery can burn skin, eyes and clothing, if contacted. Note: To make sure the road wheel is properly stowed: &#...in the order shown. 1 3 4 5 2 10. Do not attempt to tighten the road wheel. 11. Remove the jack and fully tighten the lug nuts in injury or vehicle damage. Roadside Emergencies 9.
Owner's Manual
Page 157
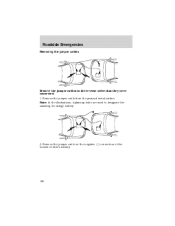
...the booster vehicle close to the positive (+) terminal of the disabled vehicle making sure the two vehicles do not touch. Turn all battery terminals and remove any electrical surges. Note: In the illustrations, lightning bolts are tight and level. 5. Over time, the adaptive learning process will ... off. Check all other moving parts. 4. Turn the heater fan on both vehicles to start your vehicle When the battery is disconnected or a new battery is considered normal and will fully update transmission operation. 1. Use only a 12-volt supply to protect any excessive corrosion...
...the booster vehicle close to the positive (+) terminal of the disabled vehicle making sure the two vehicles do not touch. Turn all battery terminals and remove any electrical surges. Note: In the illustrations, lightning bolts are tight and level. 5. Over time, the adaptive learning process will ... off. Check all other moving parts. 4. Turn the heater fan on both vehicles to start your vehicle When the battery is disconnected or a new battery is considered normal and will fully update transmission operation. 1. Use only a 12-volt supply to protect any excessive corrosion...
Owner's Manual
Page 160
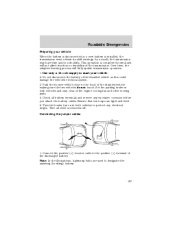
Remove the jumper cable on the negative (-) connection of the booster vehicle's battery. 160 - - - - + + + + Note: In the illustrations, lightning bolts are used to designate the assisting (boosting) battery. 2. Roadside Emergencies Removing the jumper cables Remove the jumper cables in the reverse order that they were connected. 1. Remove the jumper cable from the ground metal surface.
Remove the jumper cable on the negative (-) connection of the booster vehicle's battery. 160 - - - - + + + + Note: In the illustrations, lightning bolts are used to designate the assisting (boosting) battery. 2. Roadside Emergencies Removing the jumper cables Remove the jumper cables in the reverse order that they were connected. 1. Remove the jumper cable from the ground metal surface.

Owner's Manual
Page 161
Remove the jumper cable from the positive (+) terminal of the booster vehicle's battery. 4. Remove the jumper cable from the positive (+) terminal of the disabled vehicle's battery. Roadside Emergencies 3. After the disabled vehicle has been started and the jumper cables removed, allow it to idle for several minutes so the engine computer can relearn its idle conditions. - - - + + - + + 161
Remove the jumper cable from the positive (+) terminal of the booster vehicle's battery. 4. Remove the jumper cable from the positive (+) terminal of the disabled vehicle's battery. Roadside Emergencies 3. After the disabled vehicle has been started and the jumper cables removed, allow it to idle for several minutes so the engine computer can relearn its idle conditions. - - - + + - + + 161

Owner's Manual
Page 179
... wheels. Turn off 1. Set the parking brake and shift to provide the best performance in your vehicle: • We highlight do not remove it -yourself items in moving parts. • Do not work on 1. Maintenance and Specifications SERVICE RECOMMENDATIONS To help you have enough ventilation.... • Keep all open flames and other burning (cigarettes) material away from the battery and all fuel related parts. Note: Do not start your dealership can provide the necessary parts and service. PRECAUTIONS WHEN SERVICING ...
... wheels. Turn off 1. Set the parking brake and shift to provide the best performance in your vehicle: • We highlight do not remove it -yourself items in moving parts. • Do not work on 1. Maintenance and Specifications SERVICE RECOMMENDATIONS To help you have enough ventilation.... • Keep all open flames and other burning (cigarettes) material away from the battery and all fuel related parts. Note: Do not start your dealership can provide the necessary parts and service. PRECAUTIONS WHEN SERVICING ...

Owner's Manual
Page 186
... during its life of service. When working near the battery. If the electrolyte level in the battery is low, you can add plain tap water to the battery, as long as you see any corrosion on the battery or terminals, remove the cables from the terminals and clean with a solution... of the battery clean and dry. Always provide proper ventilation. 186 Keep the electrolyte level in high temperature climates, check the battery electrolyte level. ...
... during its life of service. When working near the battery. If the electrolyte level in the battery is low, you can add plain tap water to the battery, as long as you see any corrosion on the battery or terminals, remove the cables from the terminals and clean with a solution... of the battery clean and dry. Always provide proper ventilation. 186 Keep the electrolyte level in high temperature climates, check the battery electrolyte level. ...


