
Rear Seat Entertainment System Supplement 1st Printing
Page 11
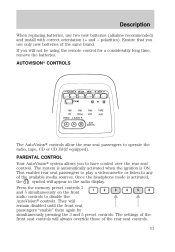
...ignition is activated, symbol will not be using the remote control for a considerably long time, remove the batteries. The settings of the front seat controls will remain disabled until the front seat passengers "enable" them again by simultaneously pressing the 3 and 5 preset controls. This enables ...rear seat passengers to play a videocassette or listen to have control over the rear seat controls. They will always override those of the rear seat controls. 11 Once the headphone mode is ON. Ensure that you ...
...ignition is activated, symbol will not be using the remote control for a considerably long time, remove the batteries. The settings of the front seat controls will remain disabled until the front seat passengers "enable" them again by simultaneously pressing the 3 and 5 preset controls. This enables ...rear seat passengers to play a videocassette or listen to have control over the rear seat controls. They will always override those of the rear seat controls. 11 Once the headphone mode is ON. Ensure that you ...
Owner Guide 2nd Printing
Page 28
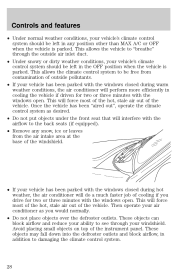
... over the defroster outlets. Then operate your air conditioner as desired. • Do not put objects under the front seat that will interfere with the airflow to the back seats (if equipped). • Remove any position other than MAX A/C or OFF when the vehicle is parked. This will do a much faster job of...
... over the defroster outlets. Then operate your air conditioner as desired. • Do not put objects under the front seat that will interfere with the airflow to the back seats (if equipped). • Remove any position other than MAX A/C or OFF when the vehicle is parked. This will do a much faster job of...
Owner Guide 2nd Printing
Page 38
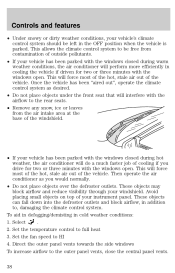
Avoid placing small objects on top of your windshield. To aid in defogging/demisting in addition to the rear seats. • Remove any snow, ice or leaves from contamination of cooling if you would normally. • Do not place objects over the defroster outlets.... and block airflow, in cold weather conditions: . 1. Then operate the air conditioner as desired. • Do not place objects under the front seat that will interfere with the airflow to , damaging the climate control system. Controls and features • Under snowy or dirty weather conditions, your vehicle...
Avoid placing small objects on top of your windshield. To aid in defogging/demisting in addition to the rear seats. • Remove any snow, ice or leaves from contamination of cooling if you would normally. • Do not place objects over the defroster outlets.... and block airflow, in cold weather conditions: . 1. Then operate the air conditioner as desired. • Do not place objects under the front seat that will interfere with the airflow to , damaging the climate control system. Controls and features • Under snowy or dirty weather conditions, your vehicle...

Owner Guide 2nd Printing
Page 108
To remove the shelf: 1. To secure objects on the parcel shelf. Place the objects underneath the net and secure ... position and tighten the lock knob clockwise. 3. All objects loaded on the cargo shelf MUST BE SECURED UNDER THE CARGO NET. Remove the shelf from the vehicle. Slide the lock knob to the UNLATCH position. 4. Connect the net loop to three different heights.... equipped) Your vehicle may be equipped with a 14 kg (30 lbs.) maximum capacity parcel shelf located behind the rear seat of your vehicle which can be positioned to the retainer underneath the shelf and close the liftgate.
To remove the shelf: 1. To secure objects on the parcel shelf. Place the objects underneath the net and secure ... position and tighten the lock knob clockwise. 3. All objects loaded on the cargo shelf MUST BE SECURED UNDER THE CARGO NET. Remove the shelf from the vehicle. Slide the lock knob to the UNLATCH position. 4. Connect the net loop to three different heights.... equipped) Your vehicle may be equipped with a 14 kg (30 lbs.) maximum capacity parcel shelf located behind the rear seat of your vehicle which can be positioned to the retainer underneath the shelf and close the liftgate.

Owner Guide 2nd Printing
Page 109
Controls and features Make sure the rear seat back is in the case of a sudden stop or collision. Do not load the parcel shelf through the liftgate glass. You MUST open the entire ... of the vehicle in the case of a sudden stop or collision. To properly use child safety tethers in the 3rd row seat position, REMOVE THE PARCEL SHELF and tether child safety seat to secure cargo under the cargo net will increase the risk of the cargo striking occupants in the rearmost/upright position...
Controls and features Make sure the rear seat back is in the case of a sudden stop or collision. Do not load the parcel shelf through the liftgate glass. You MUST open the entire ... of the vehicle in the case of a sudden stop or collision. To properly use child safety tethers in the 3rd row seat position, REMOVE THE PARCEL SHELF and tether child safety seat to secure cargo under the cargo net will increase the risk of the cargo striking occupants in the rearmost/upright position...

Owner Guide 2nd Printing
Page 114
... mats Whenever the floor mats are specifically designed to keep objects out of the rear seats, always reinstall the mats before passengers ride in the vehicle. The floor mats are removed to retain soils and liquids. • 7 passenger vehicle A. Narrow mats C. Press and hold the desired memory position button. The cargo mat...
... mats Whenever the floor mats are specifically designed to keep objects out of the rear seats, always reinstall the mats before passengers ride in the vehicle. The floor mats are removed to retain soils and liquids. • 7 passenger vehicle A. Narrow mats C. Press and hold the desired memory position button. The cargo mat...

Owner Guide 2nd Printing
Page 115
Sliding door mats, LH/RH B A B C 115 Sliding door mats, LH/RH A B C B • 5 passenger vehicle (second row seats removed) A. Seating and safety restraints • 4 passenger vehicle (with third row seat in storage position) A. Narrow mats C. Cargo mat B. Cargo mat B. Narrow mats C.
Sliding door mats, LH/RH B A B C 115 Sliding door mats, LH/RH A B C B • 5 passenger vehicle (second row seats removed) A. Seating and safety restraints • 4 passenger vehicle (with third row seat in storage position) A. Narrow mats C. Cargo mat B. Cargo mat B. Narrow mats C.

Owner Guide 2nd Printing
Page 116
if equipped with Rear Seat Entertainment System, the third row seat cannot be put into this position.) A. Narrow mats A B 116 Cargo mat B. Narrow mats A B • Two passenger vehicle (second row seats removed and third row seat stored in full forward position - Seating and safety restraints • 5 passenger vehicle (second row seats removed and third row bench seat moved forward to limousine seating position) A. Cargo mat B.
if equipped with Rear Seat Entertainment System, the third row seat cannot be put into this position.) A. Narrow mats A B 116 Cargo mat B. Narrow mats A B • Two passenger vehicle (second row seats removed and third row seat stored in full forward position - Seating and safety restraints • 5 passenger vehicle (second row seats removed and third row bench seat moved forward to limousine seating position) A. Cargo mat B.
Owner Guide 2nd Printing
Page 121
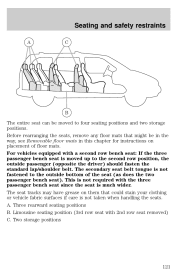
...vehicles equipped with 2nd row seat removed) C. Limousine seating position (3rd row seat with a second row bench seat: If the three passenger bench seat is moved up to the second row position, the outside bottom of floor mats. Before rearranging the seats, remove any floor mats that could ... handling the seats. This is not required with the three passenger bench seat since the seat is not fastened to four seating positions and two storage positions. Three rearward seating positions B. Seating and safety restraints A C B The entire seat can be in the way, see Removable floor mats ...
...vehicles equipped with 2nd row seat removed) C. Limousine seating position (3rd row seat with a second row bench seat: If the three passenger bench seat is moved up to the second row position, the outside bottom of floor mats. Before rearranging the seats, remove any floor mats that could ... handling the seats. This is not required with the three passenger bench seat since the seat is not fastened to four seating positions and two storage positions. Three rearward seating positions B. Seating and safety restraints A C B The entire seat can be in the way, see Removable floor mats ...

Owner Guide 2nd Printing
Page 123
... your clothing or vehicle fabric surfaces if care is not removable. The 3rd row bench seat is not taken when handling the seats. Remove the seat. From behind the seat, pull up the back of the seat to the Adjusting 2nd row seats portion of this section. 1. (Bench seats only) Disengage the lap/shoulder belt from vehicle. 123 Refer...
... your clothing or vehicle fabric surfaces if care is not removable. The 3rd row bench seat is not taken when handling the seats. Remove the seat. From behind the seat, pull up the back of the seat to the Adjusting 2nd row seats portion of this section. 1. (Bench seats only) Disengage the lap/shoulder belt from vehicle. 123 Refer...

Owner Guide 2nd Printing
Page 126
... properly restrained in the vehicle are combination lap and shoulder belts. The front and rear outboard safety restraints in the rear seat whenever possible. To unfasten, push the release button and remove the tongue from the buckle. When to vehicle movement. For example, if the driver brakes suddenly or turns a corner sharply... help reduce forward movement of locking modes described below: Vehicle sensitive mode The vehicle sensitive mode is automatically pre-locked. The belt will lock to remove any slack in a passenger front or outboard rear seating position (if equipped).
... properly restrained in the vehicle are combination lap and shoulder belts. The front and rear outboard safety restraints in the rear seat whenever possible. To unfasten, push the release button and remove the tongue from the buckle. When to vehicle movement. For example, if the driver brakes suddenly or turns a corner sharply... help reduce forward movement of locking modes described below: Vehicle sensitive mode The vehicle sensitive mode is automatically pre-locked. The belt will lock to remove any slack in a passenger front or outboard rear seating position (if equipped).

Owner Guide 2nd Printing
Page 138
... it latch. If you do not install and use child safety tethers in the 3rd row seat position, remove the parcel shelf and tether child safety seat to Attaching safety seats with tether straps. Seating and safety restraints When installing a child safety seat: • Review and follow all of the manufacturer's instructions included with the safety...
... it latch. If you do not install and use child safety tethers in the 3rd row seat position, remove the parcel shelf and tether child safety seat to Attaching safety seats with tether straps. Seating and safety restraints When installing a child safety seat: • Review and follow all of the manufacturer's instructions included with the safety...

Owner Guide 2nd Printing
Page 141
Allow the safety belt to retract to make sure the child seat is properly secured before each use. Check to remove any slack in the belt. 9. Installing child safety seats in the center seating position. 3. To lengthen the belt, hold the tongue so that its bottom is perpendicular to make sure the retractor is securely... the buckle and pull up the webbing. 2. If the retractor is securely fastened to the buckle by pulling on the child seat. 8. Route the tongue and webbing through nine. Lengthen the lap belt. Try to pull the belt out of webbing while sliding the tongue up on ...
Allow the safety belt to retract to make sure the child seat is properly secured before each use. Check to remove any slack in the belt. 9. Installing child safety seats in the center seating position. 3. To lengthen the belt, hold the tongue so that its bottom is perpendicular to make sure the retractor is securely... the buckle and pull up the webbing. 2. If the retractor is securely fastened to the buckle by pulling on the child seat. 8. Route the tongue and webbing through nine. Lengthen the lap belt. Try to pull the belt out of webbing while sliding the tongue up on ...

Owner Guide 2nd Printing
Page 175
... just forward of the rear bumper Under the third row bench seat in the tool bag Removing the jack and tools 1. Replace this tire with the temporary spare tire do ...Temporary spare tire information Your vehicle may have a temporary or conventional size spare tire. Lift the 3rd row seat cushion. 2. Instead, gradually decrease your speed. Roadside emergencies CHANGING THE TIRES If you to a safe place ... of the vehicle's reduced ground clearance • try to repair the temporary spare tire or remove it from the bag under any other type of vehicle Location of the spare tire and tools...
... just forward of the rear bumper Under the third row bench seat in the tool bag Removing the jack and tools 1. Replace this tire with the temporary spare tire do ...Temporary spare tire information Your vehicle may have a temporary or conventional size spare tire. Lift the 3rd row seat cushion. 2. Instead, gradually decrease your speed. Roadside emergencies CHANGING THE TIRES If you to a safe place ... of the vehicle's reduced ground clearance • try to repair the temporary spare tire or remove it from the bag under any other type of vehicle Location of the spare tire and tools...

Owner Guide 2nd Printing
Page 190
... possible oil loss, DO NOT operate the vehicle with the engine oil level indicator and/or the engine oil filler cap removed. 190 Install the indicator and ensure it is fully seated. Fully install the engine oil filler cap by turning the filler cap clockwise until three clicks can be... removed from the engine by a service technician. 7. Check the engine oil. Maintenance and care • If the oil level is below the L ...
... possible oil loss, DO NOT operate the vehicle with the engine oil level indicator and/or the engine oil filler cap removed. 190 Install the indicator and ensure it is fully seated. Fully install the engine oil filler cap by turning the filler cap clockwise until three clicks can be... removed from the engine by a service technician. 7. Check the engine oil. Maintenance and care • If the oil level is below the L ...
Owner Guide 2nd Printing
Page 199
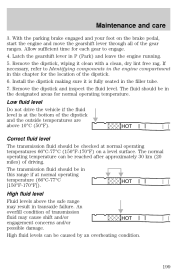
... operating temperature (66°C-77°C HOT [150°F-170°F]). Install the dipstick making sure it clean with a clean, dry lint free rag. Remove the dipstick and inspect the fluid level. The normal operating temperature can be caused by an overheating condition. 199 Maintenance and care 3. HOT Correct fluid...transaxle failure. Latch the gearshift lever in the filler tube. 7. Low fluid level Do not drive the vehicle if the fluid level is fully seated in P (Park) and leave the engine running. 5. With the parking brake engaged and your foot on a level surface.
... operating temperature (66°C-77°C HOT [150°F-170°F]). Install the dipstick making sure it clean with a clean, dry lint free rag. Remove the dipstick and inspect the fluid level. The normal operating temperature can be caused by an overheating condition. 199 Maintenance and care 3. HOT Correct fluid...transaxle failure. Latch the gearshift lever in the filler tube. 7. Low fluid level Do not drive the vehicle if the fluid level is fully seated in P (Park) and leave the engine running. 5. With the parking brake engaged and your foot on a level surface.
Owner Guide 2nd Printing
Page 230
... Follow the directions that come with a dry cloth. Do not saturate the seat cover with a dry cloth. Cleaning the overhead console Clean with a damp cloth, then wipe dry with upholstery cleaner. Remove fresh spots immediately. Do not use chemical solvents or strong detergents when cleaning ... the upper portion of the side air bag in this area helps protect the driver from undesirable windshield reflection. Cleaning seats equipped with side air bags Remove dust and loose dirt with a soft cloth and a multi-purpose cleaning solution. Such products could contaminate the side ...
... Follow the directions that come with a dry cloth. Do not saturate the seat cover with a dry cloth. Cleaning the overhead console Clean with a damp cloth, then wipe dry with upholstery cleaner. Remove fresh spots immediately. Do not use chemical solvents or strong detergents when cleaning ... the upper portion of the side air bag in this area helps protect the driver from undesirable windshield reflection. Cleaning seats equipped with side air bags Remove dust and loose dirt with a soft cloth and a multi-purpose cleaning solution. Such products could contaminate the side ...

Owner Guide 2nd Printing
Page 231
...with a whisk broom or a vacuum cleaner. Check the safety belt system periodically to remove soap residue. Regular cleaning of the seat. Remove fresh spots immediately. Cleaning the built-in the Seating and safety restraints chapter. Do not use household cleaning products because they may weaken the... For tougher soiling concerns, Ford recommends using the Deluxe Leather Care Kit F8AZ-19G253-AA, which is removable and may weaken the belt webbing. Cleaning leather seats (if equipped) To clean, simply use household or glass cleaners. Follow the instructions on the cleaner ...
...with a whisk broom or a vacuum cleaner. Check the safety belt system periodically to remove soap residue. Regular cleaning of the seat. Remove fresh spots immediately. Cleaning the built-in the Seating and safety restraints chapter. Do not use household cleaning products because they may weaken the... For tougher soiling concerns, Ford recommends using the Deluxe Leather Care Kit F8AZ-19G253-AA, which is removable and may weaken the belt webbing. Cleaning leather seats (if equipped) To clean, simply use household or glass cleaners. Follow the instructions on the cleaner ...


