
Scheduled Maintenance Guide 5th Printing
Page 32
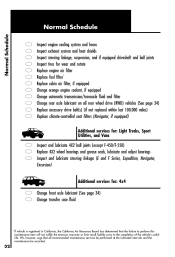
... Replace fuel filter* Replace cabin air filter, if equipped Change orange engine coolant, if equipped Change automatic transmission/transaxle fluid and filter Change rear axle lubricant on all rear wheel drive (RWD) vehicles (See page 34) Replace accessory drive belt(s) (if not replaced within last 100,000 miles) Replace climate-controlled seat...
... Replace fuel filter* Replace cabin air filter, if equipped Change orange engine coolant, if equipped Change automatic transmission/transaxle fluid and filter Change rear axle lubricant on all rear wheel drive (RWD) vehicles (See page 34) Replace accessory drive belt(s) (if not replaced within last 100,000 miles) Replace climate-controlled seat...
Scheduled Maintenance Guide 5th Printing
Page 34
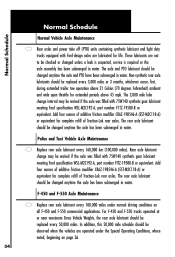
... synthetic gear lubricant meeting Ford specification WSL-M2C192-A, part number FITZ-19580-B or equivalent. F-450 and F-550 Axle Maintenance Replace rear axle lubricant every 100,000 miles under the Special Operating Conditions, where noted, beginning on all F-450 and F-550 commercial applications...suspected, service is required or the axle assembly has been submerged in water. Normal Schedule Normal Schedule Normal Vehicle Axle Maintenance Rear axles and power take off (PTO) units containing synthetic lubricant and light duty trucks equipped with 75W140 synthetic gear lubricant meeting...
... synthetic gear lubricant meeting Ford specification WSL-M2C192-A, part number FITZ-19580-B or equivalent. F-450 and F-550 Axle Maintenance Replace rear axle lubricant every 100,000 miles under the Special Operating Conditions, where noted, beginning on all F-450 and F-550 commercial applications...suspected, service is required or the axle assembly has been submerged in water. Normal Schedule Normal Schedule Normal Vehicle Axle Maintenance Rear axles and power take off (PTO) units containing synthetic lubricant and light duty trucks equipped with 75W140 synthetic gear lubricant meeting...
Scheduled Maintenance Guide 5th Printing
Page 36
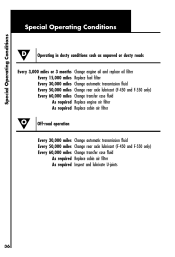
... miles Every 60,000 miles As required As required Off-road operation Every 30,000 miles Change automatic transmission fluid Every 50,000 miles Change rear axle lubricant (F-450 and F-550 only) Every 60,000 miles Change transfer case fluid As required Replace cabin air filter As required Inspect and ...lubricate U-joints Change engine oil and replace oil filter Replace fuel filter Change automatic transmission fluid Change rear axle lubricant (F-450 and F-550 only) Change transfer case fluid Replace engine air filter Replace cabin air filter 36
... miles Every 60,000 miles As required As required Off-road operation Every 30,000 miles Change automatic transmission fluid Every 50,000 miles Change rear axle lubricant (F-450 and F-550 only) Every 60,000 miles Change transfer case fluid As required Replace cabin air filter As required Inspect and ...lubricate U-joints Change engine oil and replace oil filter Replace fuel filter Change automatic transmission fluid Change rear axle lubricant (F-450 and F-550 only) Change transfer case fluid Replace engine air filter Replace cabin air filter 36
Warranty Guide 4th Printing
Page 32
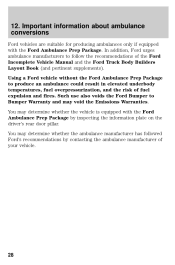
... Ambulance Prep Package to Bumper Warranty and may determine whether the ambulance manufacturer has followed Ford's recommendations by inspecting the information plate on the driver's rear door pillar. Such use also voids the Ford Bumper to produce an ambulance could result in elevated underbody temperatures, fuel overpressurization, and the risk of...
... Ambulance Prep Package to Bumper Warranty and may determine whether the ambulance manufacturer has followed Ford's recommendations by inspecting the information plate on the driver's rear door pillar. Such use also voids the Ford Bumper to produce an ambulance could result in elevated underbody temperatures, fuel overpressurization, and the risk of...

Rear Seat Entertainment System Supplement 1st Printing
Page 3
Ensure that the system is in AUX mode. The LCD screen will turn on and the AUX indicator will not operate. 3 Connect the video line from your game device to get going To play a video game: 1. If desired, press the into the headphone jack. With the headphones ON, the rear speakers will illuminate. / control and plug a 3.5mm headphone 4. How to the VIDEO jack. 2. Connect the left and right audio cables to the left (L) and right (R) audio jacks. 3. Quick Start -
Ensure that the system is in AUX mode. The LCD screen will turn on and the AUX indicator will not operate. 3 Connect the video line from your game device to get going To play a video game: 1. If desired, press the into the headphone jack. With the headphones ON, the rear speakers will illuminate. / control and plug a 3.5mm headphone 4. How to the VIDEO jack. 2. Connect the left and right audio cables to the left (L) and right (R) audio jacks. 3. Quick Start -
Rear Seat Entertainment System Supplement 1st Printing
Page 4
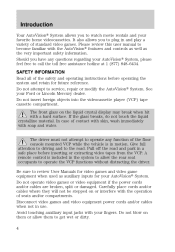
... games and video equipment power cords and/or cables when not in a safe place before operating the system and retain for your Ford or Lincoln Mercury dealer. Do not blow on them or allow the rear seat occupants to plug in motion. Introduction Your AutoVision System allows you to the road.
... games and video equipment power cords and/or cables when not in a safe place before operating the system and retain for your Ford or Lincoln Mercury dealer. Do not blow on them or allow the rear seat occupants to plug in motion. Introduction Your AutoVision System allows you to the road.
Rear Seat Entertainment System Supplement 1st Printing
Page 11
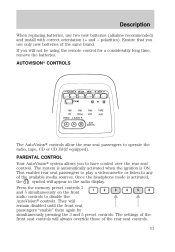
..., symbol will remain disabled until the front seat passengers "enable" them again by simultaneously pressing the 3 and 5 preset controls. This enables rear seat passengers to play a videocassette or listen to disable the AutoVision controls. Once the headphone mode is ON. the Press the memory... preset controls 3 1 2 3 4 5 6 and 5 simultaneously on the front audio controls to any of the rear seat controls. 11 PARENTAL CONTROL Your AutoVision system allows you to operate the radio, tape, CD or CD DJ(if equipped). They will appear...
..., symbol will remain disabled until the front seat passengers "enable" them again by simultaneously pressing the 3 and 5 preset controls. This enables rear seat passengers to play a videocassette or listen to disable the AutoVision controls. Once the headphone mode is ON. the Press the memory... preset controls 3 1 2 3 4 5 6 and 5 simultaneously on the front audio controls to any of the rear seat controls. 11 PARENTAL CONTROL Your AutoVision system allows you to operate the radio, tape, CD or CD DJ(if equipped). They will appear...
Rear Seat Entertainment System Supplement 1st Printing
Page 12
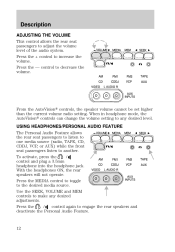
USING HEADPHONES/PERSONAL AUDIO FEATURE The Personal Audio Feature allows the rear seat passengers to listen to one media source (radio, TAPE, CD, CDDJ, VCP, or...into the headphone jack. Use the SEEK, VOLUME and MEM controls to make any desired level. With the headphones ON, the rear speakers will not operate. From the AutoVision controls, the speaker volume cannot be set higher than the current volume radio... the volume level of the audio system. Description ADJUSTING THE VOLUME This control allows the rear seat passengers to decrease the volume. Press the + control to engage the...
USING HEADPHONES/PERSONAL AUDIO FEATURE The Personal Audio Feature allows the rear seat passengers to listen to one media source (radio, TAPE, CD, CDDJ, VCP, or...into the headphone jack. Use the SEEK, VOLUME and MEM controls to make any desired level. With the headphones ON, the rear speakers will not operate. From the AutoVision controls, the speaker volume cannot be set higher than the current volume radio... the volume level of the audio system. Description ADJUSTING THE VOLUME This control allows the rear seat passengers to decrease the volume. Press the + control to engage the...

Rear Seat Entertainment System Supplement 1st Printing
Page 13
... and AUX modes. MEDIA SELECT Press the MEDIA control to all system speakers - With the speakers OFF, the headphones are disabled in this mode). The rear seat passengers have control over the desired volume levels. Description SPEAKERS ON/OFF MODE With the speakers ON, you can not raise the volume of...
... and AUX modes. MEDIA SELECT Press the MEDIA control to all system speakers - With the speakers OFF, the headphones are disabled in this mode). The rear seat passengers have control over the desired volume levels. Description SPEAKERS ON/OFF MODE With the speakers ON, you can not raise the volume of...
Owner Guide 2nd Printing
Page 4
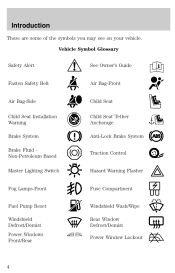
Vehicle Symbol Glossary Safety Alert See Owner's Guide Fasten Safety Belt Air Bag-Front Air Bag-Side Child Seat Installation Warning Brake System Brake Fluid Non-Petroleum Based Master Lighting Switch Child Seat Child Seat Tether Anchorage Anti-Lock Brake System Traction Control Hazard Warning Flasher Fog Lamps-Front Fuse Compartment Fuel Pump Reset Windshield Defrost/Demist Power Windows Front/Rear Windshield Wash/Wipe Rear Window Defrost/Demist Power Window Lockout 4 Introduction These are some of the symbols you may see on your vehicle.
Vehicle Symbol Glossary Safety Alert See Owner's Guide Fasten Safety Belt Air Bag-Front Air Bag-Side Child Seat Installation Warning Brake System Brake Fluid Non-Petroleum Based Master Lighting Switch Child Seat Child Seat Tether Anchorage Anti-Lock Brake System Traction Control Hazard Warning Flasher Fog Lamps-Front Fuse Compartment Fuel Pump Reset Windshield Defrost/Demist Power Windows Front/Rear Windshield Wash/Wipe Rear Window Defrost/Demist Power Window Lockout 4 Introduction These are some of the symbols you may see on your vehicle.
Owner Guide 2nd Printing
Page 7
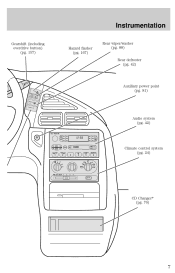
Instrumentation Gearshift (including overdrive button) (pg. 157) Rear wiper/washer (pg. 88) Rear defroster (pg. 42) Hazard flasher (pg. 167) DRI ON ER OV OFF/ VE HAZAR D Auxiliary power point (pg. 81) ER RR WA SH RR WIP RR DEF OG SECUR ITY Audio system (pg. 42) VOL - PUSH ON DC 12V AM FM BASS TREB BAL FADE CLK TAPE AMS CD SEEK TUNE SCAN EJ SIDE 1 - 2 REW FF DISCS CD CD COMP SHUFFLE 1 1 2 3 4 5 6 Climate control system (pg. 24) 2 3 4 MAX A/C OFF OFF REAR 1 2 3 4 A/C CD Changer* (pg. 76) 7
Instrumentation Gearshift (including overdrive button) (pg. 157) Rear wiper/washer (pg. 88) Rear defroster (pg. 42) Hazard flasher (pg. 167) DRI ON ER OV OFF/ VE HAZAR D Auxiliary power point (pg. 81) ER RR WA SH RR WIP RR DEF OG SECUR ITY Audio system (pg. 42) VOL - PUSH ON DC 12V AM FM BASS TREB BAL FADE CLK TAPE AMS CD SEEK TUNE SCAN EJ SIDE 1 - 2 REW FF DISCS CD CD COMP SHUFFLE 1 1 2 3 4 5 6 Climate control system (pg. 24) 2 3 4 MAX A/C OFF OFF REAR 1 2 3 4 A/C CD Changer* (pg. 76) 7

Owner Guide 2nd Printing
Page 25
...instrument panel registers. (Floor)-Allows for maximum heating by distributing outside air • through the instrument • panel registers and the front and rear floor ducts. In this mode. This mode can also be used to reduce undesirable odors from entering the vehicle. • (Panel)-Distributes ...outside air through the front and rear floor ducts will be from the air during operation, it is normal if clear water drips on the ground under the air conditioner ...
...instrument panel registers. (Floor)-Allows for maximum heating by distributing outside air • through the instrument • panel registers and the front and rear floor ducts. In this mode. This mode can also be used to reduce undesirable odors from entering the vehicle. • (Panel)-Distributes ...outside air through the front and rear floor ducts will be from the air during operation, it is normal if clear water drips on the ground under the air conditioner ...

Owner Guide 2nd Printing
Page 26
... and air conditioning capabilities are provided in between the full hot and full cold positions, the air distributed through the front and rear floor ducts will be slightly warmer than using MAX A/C to cool your choice. In order to cool the vehicle. 26 During...the A/C indicator will automatically dehumidify the air to reduce fogging. (Defrost)-Distributes outside air through the windshield defroster ducts and the front and rear floor ducts. Turn the mode selector to COOL. 4. Controls and features (Floor and defrost)-Distributes outside air through the windshield • defroster...
... and air conditioning capabilities are provided in between the full hot and full cold positions, the air distributed through the front and rear floor ducts will be slightly warmer than using MAX A/C to cool your choice. In order to cool the vehicle. 26 During...the A/C indicator will automatically dehumidify the air to reduce fogging. (Defrost)-Distributes outside air through the windshield defroster ducts and the front and rear floor ducts. Turn the mode selector to COOL. 4. Controls and features (Floor and defrost)-Distributes outside air through the windshield • defroster...

Owner Guide 2nd Printing
Page 27
... climate control system in the OFF position. 27 This will reduce fogging on your windshield. The rear passenger compartment air conditioning system (if equipped) should be set to the rear seating are regulated by the main climate control system. Once the windshield has been cleared, operate ...the vehicle in warm weather conditions, don't drive with the climate control system in DEF before driving. Controls and features Rear seat heating Rear seat heating is desired. Airflow and temperature to OFF, if rear heating is provided through the floor ducts located under the front seats.
... climate control system in the OFF position. 27 This will reduce fogging on your windshield. The rear passenger compartment air conditioning system (if equipped) should be set to the rear seating are regulated by the main climate control system. Once the windshield has been cleared, operate ...the vehicle in warm weather conditions, don't drive with the climate control system in DEF before driving. Controls and features Rear seat heating Rear seat heating is desired. Airflow and temperature to OFF, if rear heating is provided through the floor ducts located under the front seats.

Owner Guide 2nd Printing
Page 29
... in cold weather conditions: 1. Do not place objects on top of air that is distributed from the rear registers. 0 1 4 3 2 REAR A/C 29 The rear A/C fan speed control allows the rear passengers to the outer panel vents, close the central panel vents. Controls and features To aid in side.../demisting in a collision or sudden stop. Set the temperature control to adjust their air conditioning comfort level. Select 2. Rear passenger compartment air conditioning system (if equipped) This system allows the rear seat occupants to full heat 3. Set the fan speed to 4 (High) 4.
... in cold weather conditions: 1. Do not place objects on top of air that is distributed from the rear registers. 0 1 4 3 2 REAR A/C 29 The rear A/C fan speed control allows the rear passengers to the outer panel vents, close the central panel vents. Controls and features To aid in side.../demisting in a collision or sudden stop. Set the temperature control to adjust their air conditioning comfort level. Select 2. Rear passenger compartment air conditioning system (if equipped) This system allows the rear seat occupants to full heat 3. Set the fan speed to 4 (High) 4.

Owner Guide 2nd Printing
Page 30
... panel. Set the fan speed on the Rear A/C fan control to a number between 1-4 to regulate the airflow to Rear A/C; set to REAR A/C to any position (other than OFF), and depress the A/C control. 1 2 3 4 MAX A/C OFF OFF REAR A/C 1 2 3 4 A/C 2. Set the main climate control rear fan control to the rear seat section. 0 1 4 3 2 REAR A/C 30 Ensure that the control is controlled...
... panel. Set the fan speed on the Rear A/C fan control to a number between 1-4 to regulate the airflow to Rear A/C; set to REAR A/C to any position (other than OFF), and depress the A/C control. 1 2 3 4 MAX A/C OFF OFF REAR A/C 1 2 3 4 A/C 2. Set the main climate control rear fan control to the rear seat section. 0 1 4 3 2 REAR A/C 30 Ensure that the control is controlled...

Owner Guide 2nd Printing
Page 31
... by the underseat floor ducts. Rear compartment heating is designed for the front seat passengers, set the rear fan switch to OFF. Refer to 0. 0 1 4 3 2 REAR A/C For maximum cooling for air conditioning purposes only, and does not heat the rear compartment. Electronic Automatic Temperature Control ... EATC system will maintain a selected temperature and automatically control airflow. You can also turn the Rear Fan Control on the main climate control system to the OFF (0) position. OFF REAR A/C 1 2 3 4 A/C You can override automatic operation with any of the override controls...
... by the underseat floor ducts. Rear compartment heating is designed for the front seat passengers, set the rear fan switch to OFF. Refer to 0. 0 1 4 3 2 REAR A/C For maximum cooling for air conditioning purposes only, and does not heat the rear compartment. Electronic Automatic Temperature Control ... EATC system will maintain a selected temperature and automatically control airflow. You can also turn the Rear Fan Control on the main climate control system to the OFF (0) position. OFF REAR A/C 1 2 3 4 A/C You can override automatic operation with any of the override controls...

Owner Guide 2nd Printing
Page 32
...in AUTOMATIC and weather conditions require heat, air will be directed to the front and rear floor area. 32 When in the display window. Fan speed remains automatic unless the fan speed... control is running. OFF TEMP AUTOMATIC OFF REAR 1 A/C Automatic operation Press AUTOMATIC and select the desired temperature. However, if the engine is ... when the engine is turned. The EATC will either heat or cool to the front and rear floor ducts. In 31⁄2 minutes or less, the fan speed will start to increase and...
...in AUTOMATIC and weather conditions require heat, air will be directed to the front and rear floor area. 32 When in the display window. Fan speed remains automatic unless the fan speed... control is running. OFF TEMP AUTOMATIC OFF REAR 1 A/C Automatic operation Press AUTOMATIC and select the desired temperature. However, if the engine is ... when the engine is turned. The EATC will either heat or cool to the front and rear floor ducts. In 31⁄2 minutes or less, the fan speed will start to increase and...

Owner Guide 2nd Printing
Page 33
... the temperature control. 33 The 15°C AUTOMATIC (60°F) and 18°C (65°F) temperatures are the lowest settings available. ˚F AUTO OFF OFF REAR 1 A/C For continuous maximum cooling, push the temperature control until 32°C (90°F) is shown in the display window. window fogging, etc.), the manual override...
... the temperature control. 33 The 15°C AUTOMATIC (60°F) and 18°C (65°F) temperatures are the lowest settings available. ˚F AUTO OFF OFF REAR 1 A/C For continuous maximum cooling, push the temperature control until 32°C (90°F) is shown in the display window. window fogging, etc.), the manual override...

Owner Guide 2nd Printing
Page 34
... operation. Rotate the thumbwheel up for higher fan speed or down for existing conditions. Controls and features Temperature conversion OFF A/C MAX HI TEMP AUTOMATIC OFF REAR 1 A/C 2 3 4 LO Press A/C and simultaneously for one second while turning the fan speed dial upward until it stops moving, to switch between Fahrenheit and Celsius. You...
... operation. Rotate the thumbwheel up for higher fan speed or down for existing conditions. Controls and features Temperature conversion OFF A/C MAX HI TEMP AUTOMATIC OFF REAR 1 A/C 2 3 4 LO Press A/C and simultaneously for one second while turning the fan speed dial upward until it stops moving, to switch between Fahrenheit and Celsius. You...


