
Owner Guide 1st Printing
Page 69
...device has now been erased and the new device can occur over the life of the mirror since this may impair proper mirror performance. Controls and features 2. When the indicator light begins to turn the mirror on the backside of the vehicle. When the indicator light begins to flash slowly (...vehicle is placed in vehicle magnetics which has an auto-dimming function. The HomeLink indicator light will return to minimize glare. When the mirror detects bright light from front or behind, it will remain accurate during most driving conditions. Do not block the sensor on or off. ...
...device has now been erased and the new device can occur over the life of the mirror since this may impair proper mirror performance. Controls and features 2. When the indicator light begins to turn the mirror on the backside of the vehicle. When the indicator light begins to flash slowly (...vehicle is placed in vehicle magnetics which has an auto-dimming function. The HomeLink indicator light will return to minimize glare. When the mirror detects bright light from front or behind, it will remain accurate during most driving conditions. Do not block the sensor on or off. ...

Owner Guide 1st Printing
Page 70
... zone you are in by referring to Compass zone adjustment. If a "C" appears repeat this error. If a "C" is shown in the mirror display window. Most geographic areas (zones) have a magnetic north compass point that varies slightly from the northerly direction on , press and hold.... 4. Compass zone adjustment 1. With the compass display turned on maps. Continue to press until your zone number is displayed, refer to Compass calibration adjustment. COMP MIRROR 70 This variation is removed. Refer to the zone map. 1 2 3 13 4 12 5 6 7 8 9 10 11 15 14 2. Controls and features ...
... zone you are in by referring to Compass zone adjustment. If a "C" appears repeat this error. If a "C" is shown in the mirror display window. Most geographic areas (zones) have a magnetic north compass point that varies slightly from the northerly direction on , press and hold.... 4. Compass zone adjustment 1. With the compass display turned on maps. Continue to press until your zone number is displayed, refer to Compass calibration adjustment. COMP MIRROR 70 This variation is removed. Refer to the zone map. 1 2 3 13 4 12 5 6 7 8 9 10 11 15 14 2. Controls and features ...

Owner Guide 1st Printing
Page 71
...hold the COMP side of the control for approximately six NW seconds until the display reads a direction. 4. Compass calibration adjustment Perform this adjustment in the mirror display. 3. The compass is located on your everyday routine until "C" appears in an open area free from steel structures and high voltage lines. 1. ...Drive the vehicle slowly (less than 5 km/h [3 mph]) in circles or on the driver's door trim panel and can be operated at any time. COMP MIRROR TRUNK REMOTE CONTROL The remote trunk release control is now calibrated. Controls and features 5. K UN R T 71
...hold the COMP side of the control for approximately six NW seconds until the display reads a direction. 4. Compass calibration adjustment Perform this adjustment in the mirror display. 3. The compass is located on your everyday routine until "C" appears in an open area free from steel structures and high voltage lines. 1. ...Drive the vehicle slowly (less than 5 km/h [3 mph]) in circles or on the driver's door trim panel and can be operated at any time. COMP MIRROR TRUNK REMOTE CONTROL The remote trunk release control is now calibrated. Controls and features 5. K UN R T 71
Owner Guide 1st Printing
Page 73
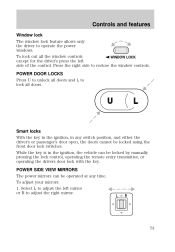
... Window lock The window lock feature allows only the driver to restore the window controls. While the key is in any time. To adjust your mirrors: 1. L R 73 U L Smart locks With the key in the ignition, in the ignition, the vehicle can be operated at any switch position, and ... by manually pressing the lock control, operating the remote entry transmitter, or operating the drivers door lock with the key. POWER SIDE VIEW MIRRORS The power mirrors can be locked using the front door lock switches. Press the right side to operate the power windows. Select L to adjust the left...
... Window lock The window lock feature allows only the driver to restore the window controls. While the key is in any time. To adjust your mirrors: 1. L R 73 U L Smart locks With the key in the ignition, in the ignition, the vehicle can be operated at any switch position, and ... by manually pressing the lock control, operating the remote entry transmitter, or operating the drivers door lock with the key. POWER SIDE VIEW MIRRORS The power mirrors can be locked using the front door lock switches. Press the right side to operate the power windows. Select L to adjust the left...

Owner Guide 1st Printing
Page 74
... that the eyelet is over the pointed end of the retention post and rotate forward to tilt the mirror. The rear doors can be opened from the inside. Move control down to lock mirrors in . To remove the floor mat, reverse the installation procedure. 74 Move lock control up to engage the...
... that the eyelet is over the pointed end of the retention post and rotate forward to tilt the mirror. The rear doors can be opened from the inside. Move control down to lock mirrors in . To remove the floor mat, reverse the installation procedure. 74 Move lock control up to engage the...

Owner Guide 1st Printing
Page 137
... Light Switch 15A Backup Lamps, Variable Assist Power Steering (VAPS), Turn Signals, Air Suspension, Daytime Running Lamps, Electronic Day/Night Mirror, Shift Lock, EATC, Speed Chime Warning 15A Speed Control, Main Light Switch, Lighting Control Module, Clock 25A Powertrain Control Module... (PCM) Power Diode, Ignition Coils 15A Lighting Control Module, Power Mirrors, PATS, Keyless Entry, Module, Clock Memory, Electronic Automatic Temperature Control (EATC), Power Windows, SecuriLock 137 6 7 8 Roadside emergencies ...
... Light Switch 15A Backup Lamps, Variable Assist Power Steering (VAPS), Turn Signals, Air Suspension, Daytime Running Lamps, Electronic Day/Night Mirror, Shift Lock, EATC, Speed Chime Warning 15A Speed Control, Main Light Switch, Lighting Control Module, Clock 25A Powertrain Control Module... (PCM) Power Diode, Ignition Coils 15A Lighting Control Module, Power Mirrors, PATS, Keyless Entry, Module, Clock Memory, Electronic Automatic Temperature Control (EATC), Power Windows, SecuriLock 137 6 7 8 Roadside emergencies ...

Owner Guide 1st Printing
Page 190
... 3156K License plate lamp 168 High-mount brakelamp 912 Luggage compartment lamp 212-2 Dome lamp 906 Rear reading lamp 211-2 Map lamp 168 Illuminated visor mirror 168 Dual floorwell lamp 906 Glove compartment 168 All replacement bulbs are properly aimed at the assembly plant. To replace all instrument panel lights -
... 3156K License plate lamp 168 High-mount brakelamp 912 Luggage compartment lamp 212-2 Dome lamp 906 Rear reading lamp 211-2 Map lamp 168 Illuminated visor mirror 168 Dual floorwell lamp 906 Glove compartment 168 All replacement bulbs are properly aimed at the assembly plant. To replace all instrument panel lights -

Owner Guide 1st Printing
Page 192
...part numbers (shown as XXXX above) will damage the finish of your vehicle. Clean with a dry cloth or abrasive materials. Cleaning mirrors Do not clean your wheels. If necessary, use a tar remover such as the body of special wheel surfaces. Observe the application instructions ... Ford Car Care Chemicals line. Underbody Flush the complete underside of your vehicle's specific coloring. Be careful when removing ice from outside mirrors because you may damage the finish on the products. Remove particles such as the exterior of vehicle frequently. Inspect for routine cleaning. ...
...part numbers (shown as XXXX above) will damage the finish of your vehicle. Clean with a dry cloth or abrasive materials. Cleaning mirrors Do not clean your wheels. If necessary, use a tar remover such as the body of special wheel surfaces. Observe the application instructions ... Ford Car Care Chemicals line. Underbody Flush the complete underside of your vehicle's specific coloring. Be careful when removing ice from outside mirrors because you may damage the finish on the products. Remove particles such as the exterior of vehicle frequently. Inspect for routine cleaning. ...

Owner Guide 1st Printing
Page 215
... seat ...108,111 Cleaning your vehicle ...190 engine compartment ...193 exterior ...192 exterior lamps ...192 instrument panel ...194 instrument panel lens ...194 interior ...195,196 mirrors ...192 plastic parts ...192 safety belts ...195 washing ...191 waxing ...191 wheels ...192 windows ...195 wiper blades ...193 woodtone trim ...195 Climate control (see Air...
... seat ...108,111 Cleaning your vehicle ...190 engine compartment ...193 exterior ...192 exterior lamps ...192 instrument panel ...194 instrument panel lens ...194 interior ...195,196 mirrors ...192 plastic parts ...192 safety belts ...195 washing ...191 waxing ...191 wheels ...192 windows ...195 wiper blades ...193 woodtone trim ...195 Climate control (see Air...

Owner Guide 1st Printing
Page 218
... specifications ...198,200 Lug nuts, anti-theft ...143 Lumbar support, seats ...91 Message center ...20 reset button ...20 select button ...21 Mirrors automatic dimming rearview mirror ...69 cleaning ...192 side view mirrors (power) ...73 Motorcraft parts ...180,197 Octane rating ...179 Odometer ...17 Oil (see Engine oil) ...153 Overdrive ...61,125 Panic alarm...
... specifications ...198,200 Lug nuts, anti-theft ...143 Lumbar support, seats ...91 Message center ...20 reset button ...20 select button ...21 Mirrors automatic dimming rearview mirror ...69 cleaning ...192 side view mirrors (power) ...73 Motorcraft parts ...180,197 Octane rating ...179 Odometer ...17 Oil (see Engine oil) ...153 Overdrive ...61,125 Panic alarm...


