Scheduled Maintenance Guide 3rd Printing
Page 35
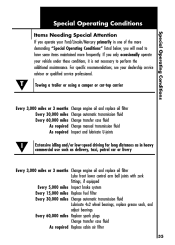
For specific recommendations, see your Ford/Lincoln/Mercury primarily in heavy commercial use such as in one of the more frequently. Towing a trailer or using a camper or car-top carrier Every 3,000 miles ... driving for long distances as delivery, taxi, patrol car or livery Every 3,000 miles or 3 months Change engine oil and replace oil filter Lube front lower control arm ball joints with zerk fittings, if equipped Every 5,000 miles Inspect brake system Every 15,000 miles Replace fuel filter Every 30,000...
For specific recommendations, see your Ford/Lincoln/Mercury primarily in heavy commercial use such as in one of the more frequently. Towing a trailer or using a camper or car-top carrier Every 3,000 miles ... driving for long distances as delivery, taxi, patrol car or livery Every 3,000 miles or 3 months Change engine oil and replace oil filter Lube front lower control arm ball joints with zerk fittings, if equipped Every 5,000 miles Inspect brake system Every 15,000 miles Replace fuel filter Every 30,000...
Owner Guide 1st Printing
Page 37
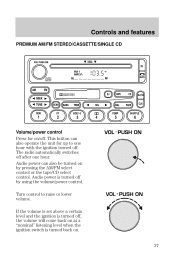
... off . Turn control to one hour. Controls and features PREMIUM AM/FM STEREO/CASSETTE/SINGLE CD Volume/power control Press for up to raise or lower volume.
... off . Turn control to one hour. Controls and features PREMIUM AM/FM STEREO/CASSETTE/SINGLE CD Volume/power control Press for up to raise or lower volume.
Owner Guide 1st Printing
Page 63
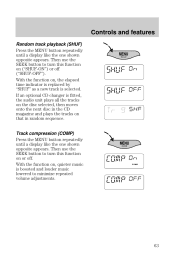
... (SHUF) Press the MENU button repeatedly until a display like the one shown opposite appears. With the function on , quieter music is boosted and louder music lowered to minimize repeated volume adjustments. 63 With the function on , the elapsed time indicator is replaced by SHUF" as a new track is fitted, the audio...
... (SHUF) Press the MENU button repeatedly until a display like the one shown opposite appears. With the function on , quieter music is boosted and louder music lowered to minimize repeated volume adjustments. 63 With the function on , the elapsed time indicator is replaced by SHUF" as a new track is fitted, the audio...

Owner Guide 1st Printing
Page 72
If an optional CD changer is boosted and louder music lowered to minimize repeated volume adjustments. 72 With the function on, quieter music is fitted, the audio unit plays all the tracks on the disc selected ...
If an optional CD changer is boosted and louder music lowered to minimize repeated volume adjustments. 72 With the function on, quieter music is fitted, the audio unit plays all the tracks on the disc selected ...

Owner Guide 1st Printing
Page 80
... cannot reduce the vehicle speed if it . 80 If your vehicle slows down a steep hill, your vehicle speed may want to shift to the next lower gear to reduce your speed control will be greater than the set speed while driving on a downhill. Press = to operate, the speed control must be...
... cannot reduce the vehicle speed if it . 80 If your vehicle slows down a steep hill, your vehicle speed may want to shift to the next lower gear to reduce your speed control will be greater than the set speed while driving on a downhill. Press = to operate, the speed control must be...

Owner Guide 1st Printing
Page 81
.... When the desired vehicle speed is reached, or • press and release -. Releasing the accelerator pedal will return your accelerator pedal, then press +. To set a lower speed • Press and hold +. Each press will increase the set speed by 1.6 km/h (1 mph), or • depress the brake pedal. You may accelerate with...
.... When the desired vehicle speed is reached, or • press and release -. Releasing the accelerator pedal will return your accelerator pedal, then press +. To set a lower speed • Press and hold +. Each press will increase the set speed by 1.6 km/h (1 mph), or • depress the brake pedal. You may accelerate with...
Owner Guide 1st Printing
Page 83
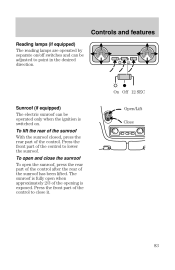
Press the front part of the opening is exposed. The sunroof is fully open when approximately 2/3 of the control to lower the sunroof. To open the sunroof, press the rear part of the control after the rear of the control. Press the front part of the ...
Press the front part of the opening is exposed. The sunroof is fully open when approximately 2/3 of the control to lower the sunroof. To open the sunroof, press the rear part of the control after the rear of the control. Press the front part of the ...
Owner Guide 1st Printing
Page 85
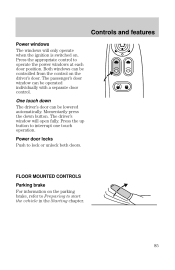
... to operate the power windows at each door position. Both windows can be operated individually with a separate door control. The passenger's door window can be lowered automatically. The driver's window will only operate when the ignition is switched on the parking brake, refer to Preparing to interrupt one touch operation. Press...
... to operate the power windows at each door position. Both windows can be operated individually with a separate door control. The passenger's door window can be lowered automatically. The driver's window will only operate when the ignition is switched on the parking brake, refer to Preparing to interrupt one touch operation. Press...

Owner Guide 1st Printing
Page 98
To lower, push the small catch in the collar around the stem and raise or lower the head restraint to move the seat forward or backward. 98 SEATING Manually adjusting the seats Pull the lever located under the front edge of the seat to the desired height. Seating and safety restraints HEAD RESTRAINTS Adjusting the head restraints If your vehicle is equipped with adjustable head restraints, push or pull the head restraint to raise it to the desired height.
To lower, push the small catch in the collar around the stem and raise or lower the head restraint to move the seat forward or backward. 98 SEATING Manually adjusting the seats Pull the lever located under the front edge of the seat to the desired height. Seating and safety restraints HEAD RESTRAINTS Adjusting the head restraints If your vehicle is equipped with adjustable head restraints, push or pull the head restraint to raise it to the desired height.

Owner Guide 1st Printing
Page 107
... completely retract. Seating and safety restraints Canceling automatic locking mode Unfasten the combination lap and shoulder belt and allow it is locked in a collision. To lower the height of the shoulder belt: 1. Slide the seat belt loop upwards. 2. Front seat safety belt height adjustment Position the shoulder belt height adjusters so...
... completely retract. Seating and safety restraints Canceling automatic locking mode Unfasten the combination lap and shoulder belt and allow it is locked in a collision. To lower the height of the shoulder belt: 1. Slide the seat belt loop upwards. 2. Front seat safety belt height adjustment Position the shoulder belt height adjusters so...
Owner Guide 1st Printing
Page 129
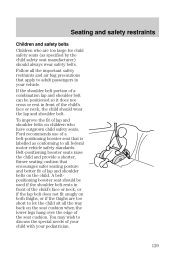
... fit of the child's face or neck, the child should always wear safety belts. Follow all the way back on the seat cushion when the lower legs hang over the edge of the seat cushion. A beltĆ positioning booster seat should be positioned so it does not cross or rest in...
... fit of the child's face or neck, the child should always wear safety belts. Follow all the way back on the seat cushion when the lower legs hang over the edge of the seat cushion. A beltĆ positioning booster seat should be positioned so it does not cross or rest in...

Owner Guide 1st Printing
Page 154
... made by shifting to 2 (Second) or to D (Overdrive) mode, press the transaxle control switch. Selecting 1 (Low) at higher speeds causes the transaxle to shift to a lower gear, and will extinguish. To return to D (Overdrive). Every time the vehicle is shut off and restarted, you must press the transaxle control switch to...
... made by shifting to 2 (Second) or to D (Overdrive) mode, press the transaxle control switch. Selecting 1 (Low) at higher speeds causes the transaxle to shift to a lower gear, and will extinguish. To return to D (Overdrive). Every time the vehicle is shut off and restarted, you must press the transaxle control switch to...

Owner Guide 1st Printing
Page 156
... 53 73 mph 14 25 33 45 During cruise*: km/h 16 32 50 64 mph 10 20 31 40 *The vehicle can be shifted at lower speeds to improve fuel economy. 156
... 53 73 mph 14 25 33 45 During cruise*: km/h 16 32 50 64 mph 10 20 31 40 *The vehicle can be shifted at lower speeds to improve fuel economy. 156
Owner Guide 1st Printing
Page 160
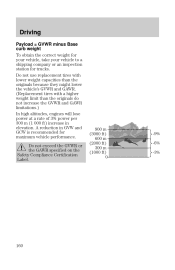
... GAWR specified on the Safety Compliance Certification Label. 900 m (3000 ft) 600 m (2000 ft) 300 m (1000 ft) 0 Ć9% Ć6% Ć3% 160 A reduction in elevation. Do not use replacement tires with lower weight capacities than the originals because they might lower the vehicle's GVWR and GAWR. (Replacement tires with a higher weight limit than the...
... GAWR specified on the Safety Compliance Certification Label. 900 m (3000 ft) 600 m (2000 ft) 300 m (1000 ft) 0 Ć9% Ć6% Ć3% 160 A reduction in elevation. Do not use replacement tires with lower weight capacities than the originals because they might lower the vehicle's GVWR and GAWR. (Replacement tires with a higher weight limit than the...

Owner Guide 1st Printing
Page 161
... and safety belts. Using a luggage rack The sunroof opens to be seriously injured or killed. Driving It is in a seat and using tires with lower weight limits may lower the GVWR or GAWR of your vehicle. In a collision, people riding in these areas are more likely to the outside of a vehicle. The...
... and safety belts. Using a luggage rack The sunroof opens to be seriously injured or killed. Driving It is in a seat and using tires with lower weight limits may lower the GVWR or GAWR of your vehicle. In a collision, people riding in these areas are more likely to the outside of a vehicle. The...
Owner Guide 1st Printing
Page 167
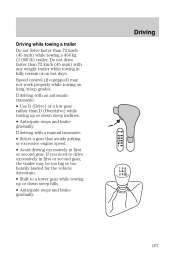
... a manual transaxle: • Select a gear that avoids jerking or excessive engine speed. • Avoid driving excessively in first or second gear. If you need to a lower gear while towing up or down steep hills. • Anticipate stops and brake gradually. 167 If driving with any weight trailer while towing in first...
... a manual transaxle: • Select a gear that avoids jerking or excessive engine speed. • Avoid driving excessively in first or second gear. If you need to a lower gear while towing up or down steep hills. • Anticipate stops and brake gradually. 167 If driving with any weight trailer while towing in first...

Owner Guide 1st Printing
Page 181
Push the spare tire onto the wheel studs. 2. Screw on the wheel nuts, ensuring the tapered end of the hand. 6. Stow the jack and damaged tire in a clockwise direction. 3. Fully tighten the wheel nuts in a crosswise pattern. 5. Align the hub cover and push firmly into position with the ball of the wheel nuts are facing the wheel, and secure in the luggage compartment by turning the handle counterclockwise. 4. Roadside emergencies Replacing a tire 1. Lower the vehicle and remove the jack by reversing the spare tire removal instructions. 181
Push the spare tire onto the wheel studs. 2. Screw on the wheel nuts, ensuring the tapered end of the hand. 6. Stow the jack and damaged tire in a clockwise direction. 3. Fully tighten the wheel nuts in a crosswise pattern. 5. Align the hub cover and push firmly into position with the ball of the wheel nuts are facing the wheel, and secure in the luggage compartment by turning the handle counterclockwise. 4. Roadside emergencies Replacing a tire 1. Lower the vehicle and remove the jack by reversing the spare tire removal instructions. 181
Owner Guide 1st Printing
Page 195
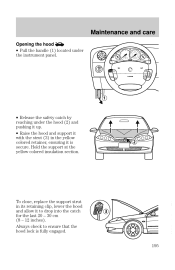
To close, replace the support strut in the yellow colored retainer, ensuring it to ensure that the hood lock is secure. Always check to drop into the catch for the last 20 - 30 cm (8 - 12 inches). Maintenance and care Opening the hood • Pull the handle (1) located under the instrument panel. • Release the safety catch by reaching under the hood (2) and pushing it up. • Raise the hood and support it with the strut (3) in its retaining clip, lower the hood and allow it is fully engaged. 195 Hold the support at the yellow colored insulation section.
To close, replace the support strut in the yellow colored retainer, ensuring it to ensure that the hood lock is secure. Always check to drop into the catch for the last 20 - 30 cm (8 - 12 inches). Maintenance and care Opening the hood • Pull the handle (1) located under the instrument panel. • Release the safety catch by reaching under the hood (2) and pushing it up. • Raise the hood and support it with the strut (3) in its retaining clip, lower the hood and allow it is fully engaged. 195 Hold the support at the yellow colored insulation section.

Owner Guide 1st Printing
Page 240
Foglamps (if equipped) 1. Remove the screw and pull the foglamp assembly out. 3. Disconnect the electrical connectors and release the wire clip from the rear of the foglamp assembly. 5. Remove the cover from the bulb. 6. Install the new bulb in reverse order (do not touch the glass part of removal. Maintenance and care Reinstalling the headlamp assembly All bulb connectors must be correctly connected. Disconnect the electrical connector. 4. Install in the lower radiator grille. 2. Open the flap in the reverse order of the bulb). 240
Foglamps (if equipped) 1. Remove the screw and pull the foglamp assembly out. 3. Disconnect the electrical connectors and release the wire clip from the rear of the foglamp assembly. 5. Remove the cover from the bulb. 6. Install the new bulb in reverse order (do not touch the glass part of removal. Maintenance and care Reinstalling the headlamp assembly All bulb connectors must be correctly connected. Disconnect the electrical connector. 4. Install in the lower radiator grille. 2. Open the flap in the reverse order of the bulb). 240
Owner Guide 1st Printing
Page 248
... droppings, tree sap, insect remains, tar spots, road salt and industrial fallout immediately. After washing, apply the brakes several times to the vehicle. Remove or lower any bugs and tar before entering a car wash. This could be every three or four months depending on a regular basis. Use tar remover to wash...
... droppings, tree sap, insect remains, tar spots, road salt and industrial fallout immediately. After washing, apply the brakes several times to the vehicle. Remove or lower any bugs and tar before entering a car wash. This could be every three or four months depending on a regular basis. Use tar remover to wash...

