
Warranty Guide 1st Printing
Page 17
...Owner Guide, the Schedule Maintenance Guide, and this booklet. • Your vehicle fails to Catalyst) • Electronic Engine Control Sensors and Switches • Exhaust Gas Recirculation (EGR) Valve, Spacer, Plate and Associated Parts • Exhaust Heat Control Valve • Exhaust Manifold •... your vehicle.) • Your vehicle has not been tampered with no charge for Deceleration • Distributor Assembly • Electronic Ignition System • Exhaust Pipe (Manifold to conform, during the warranty coverage period of Parts Covered by both the Emissions Defect Warranty...
...Owner Guide, the Schedule Maintenance Guide, and this booklet. • Your vehicle fails to Catalyst) • Electronic Engine Control Sensors and Switches • Exhaust Gas Recirculation (EGR) Valve, Spacer, Plate and Associated Parts • Exhaust Heat Control Valve • Exhaust Manifold •... your vehicle.) • Your vehicle has not been tampered with no charge for Deceleration • Distributor Assembly • Electronic Ignition System • Exhaust Pipe (Manifold to conform, during the warranty coverage period of Parts Covered by both the Emissions Defect Warranty...
Warranty Guide 1st Printing
Page 22
...Volume Air Flow Sensor (1) Coverage for diesel engines is for Deceleration • Distributor Assembly • Electronic Ignition System • Exhaust Pipe (Manifold to every California 2000-model vehicle, regardless of the GVWR* of the vehicle. * Gross Vehicle Weight Rating List of Parts ...Covered by the Defects Warranties that apply to Catalyst) • Electronic Engine Control Sensors and Switches • Exhaust Gas Recirculation (EGR...
...Volume Air Flow Sensor (1) Coverage for diesel engines is for Deceleration • Distributor Assembly • Electronic Ignition System • Exhaust Pipe (Manifold to every California 2000-model vehicle, regardless of the GVWR* of the vehicle. * Gross Vehicle Weight Rating List of Parts ...Covered by the Defects Warranties that apply to Catalyst) • Electronic Engine Control Sensors and Switches • Exhaust Gas Recirculation (EGR...
Owner Guide 1st Printing
Page 6
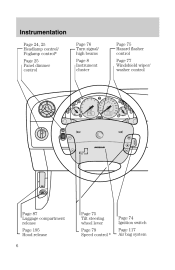
Instrumentation Page 24, 25 Headlamp control/ Foglamp control* Page 25 Panel dimmer control Page 76 Turn signal/ high beams Page 8 Instrument cluster Page 75 Hazard flasher control Page 77 Windshield wiper/ washer control Page 87 Luggage compartment release Page 195 Hood release 6 Page 75 Tilt steering wheel lever Page 79 Speed control * Page 74 Ignition switch Page 117 Air bag system
Instrumentation Page 24, 25 Headlamp control/ Foglamp control* Page 25 Panel dimmer control Page 76 Turn signal/ high beams Page 8 Instrument cluster Page 75 Hazard flasher control Page 77 Windshield wiper/ washer control Page 87 Luggage compartment release Page 195 Hood release 6 Page 75 Tilt steering wheel lever Page 79 Speed control * Page 74 Ignition switch Page 117 Air bag system

Owner Guide 1st Printing
Page 11
Turn signals Flashes when the left or right turn signal or hazard lights are switched on . Instrumentation Air bag readiness Briefly illuminates when the ignition is turned on . Refer to flash or remains on use. If the light fails to illuminate, continues to Foglamp control in the Controls and features chapter for notes on , have the system serviced immediately. Foglamps Illuminates when foglamps are activated. 11
Turn signals Flashes when the left or right turn signal or hazard lights are switched on . Instrumentation Air bag readiness Briefly illuminates when the ignition is turned on . Refer to flash or remains on use. If the light fails to illuminate, continues to Foglamp control in the Controls and features chapter for notes on , have the system serviced immediately. Foglamps Illuminates when foglamps are activated. 11

Owner Guide 1st Printing
Page 12
... chime in the control illuminates when the system is switched off , but the feature defaults to fasten the safety belts. Instrumentation High beams Illuminates when the headlamp high beams are on after each cycle of the ignition key. Traction control system (if equipped) Illuminates to... indicate the system is switched on as a reminder to on . The light in the Seating and safety restraints chapter. 12...
... chime in the control illuminates when the system is switched off , but the feature defaults to fasten the safety belts. Instrumentation High beams Illuminates when the headlamp high beams are on after each cycle of the ignition key. Traction control system (if equipped) Illuminates to... indicate the system is switched on as a reminder to on . The light in the Seating and safety restraints chapter. 12...
Owner Guide 1st Printing
Page 21
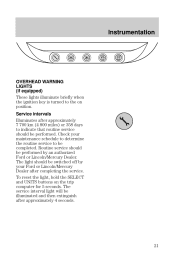
... be performed. The light should be performed by your maintenance schedule to determine the routine service to be switched off by an authorized Ford or Lincoln/Mercury Dealer. To reset the light, hold the SELECT and UNITS buttons on position. Service intervals Illuminates after ...approximately 4 seconds. 21 Routine service should be completed. Check your Ford or Lincoln/Mercury Dealer after completing the service. Instrumentation OVERHEAD WARNING LIGHTS (if equipped) These lights illuminate briefly when the ignition key is turned to the on the trip computer for 5 seconds.
... be performed. The light should be performed by your maintenance schedule to determine the routine service to be switched off by an authorized Ford or Lincoln/Mercury Dealer. To reset the light, hold the SELECT and UNITS buttons on position. Service intervals Illuminates after ...approximately 4 seconds. 21 Routine service should be completed. Check your Ford or Lincoln/Mercury Dealer after completing the service. Instrumentation OVERHEAD WARNING LIGHTS (if equipped) These lights illuminate briefly when the ignition key is turned to the on the trip computer for 5 seconds.
Owner Guide 1st Printing
Page 23
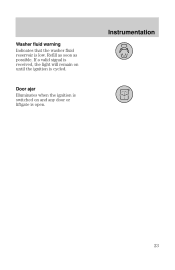
Refill as soon as possible. Instrumentation Washer fluid warning Indicates that the washer fluid reservoir is cycled. If a valid signal is received, the light will remain on and any door or liftgate is open. 23 Door ajar Illuminates when the ignition is switched on until the ignition is low.
Refill as soon as possible. Instrumentation Washer fluid warning Indicates that the washer fluid reservoir is cycled. If a valid signal is received, the light will remain on and any door or liftgate is open. 23 Door ajar Illuminates when the ignition is switched on until the ignition is low.
Owner Guide 1st Printing
Page 25
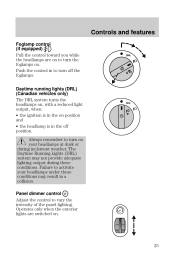
... may result in a collision. Daytime running lights (DRL) (Canadian vehicles only) The DRL system turns the headlamps on, with a reduced light output, when: • the ignition is in the on position and • the headlamp is in to vary the intensity of the panel lighting. Panel dimmer control Adjust the control...
... may result in a collision. Daytime running lights (DRL) (Canadian vehicles only) The DRL system turns the headlamps on, with a reduced light output, when: • the ignition is in the on position and • the headlamp is in to vary the intensity of the panel lighting. Panel dimmer control Adjust the control...

Owner Guide 1st Printing
Page 27
Digital clock Switch the ignition on: The clock can drive with the fuel remaining in the display. To toggle between 12 and 24 hours. Press the RESET button to advance ...
Digital clock Switch the ignition on: The clock can drive with the fuel remaining in the display. To toggle between 12 and 24 hours. Press the RESET button to advance ...
Owner Guide 1st Printing
Page 28
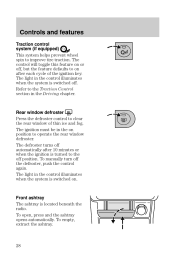
... the feature defaults to the off . The light in the control illuminates when the system is turned to on after 10 minutes or when the ignition is switched off position. The light in the control illuminates when the system is located beneath the radio. Refer to operate the rear window defroster. To... to improve tire traction. Controls and features Traction control system (if equipped) This system helps prevent wheel spin to clear the rear window of the ignition key. Front ashtray The ashtray is switched on position to the Traction Control section in the on .
... the feature defaults to the off . The light in the control illuminates when the system is turned to on after 10 minutes or when the ignition is switched off position. The light in the control illuminates when the system is located beneath the radio. Refer to operate the rear window defroster. To... to improve tire traction. Controls and features Traction control system (if equipped) This system helps prevent wheel spin to clear the rear window of the ignition key. Front ashtray The ashtray is switched on position to the Traction Control section in the on .
Owner Guide 1st Printing
Page 37
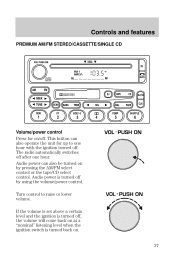
... nominal" listening level when the ignition switch is turned off by pressing the AM/FM select control or the tape/CD select control. Audio power is turned back on by using the volume/power control. The radio automatically switches off after one hour with the ignition turned off. Turn control to one ...hour. If the volume is set above a certain level and the ignition is turned off, the volume will come back on /off. This ...
... nominal" listening level when the ignition switch is turned off by pressing the AM/FM select control or the tape/CD select control. Audio power is turned back on by using the volume/power control. The radio automatically switches off after one hour with the ignition turned off. Turn control to one ...hour. If the volume is set above a certain level and the ignition is turned off, the volume will come back on /off. This ...

Owner Guide 1st Printing
Page 52
The radio automatically switches off after one hour with the ignition turned off. Volume control The display indicates the level selected. The display indicates the level selected. 52 Bass/Treble control Press BASS/TREBLE" once for bass or twice for treble and use the volume control for on/off. Controls and features On/off Press for adjustment. This button can also operate the unit for up to one hour.
The radio automatically switches off after one hour with the ignition turned off. Volume control The display indicates the level selected. The display indicates the level selected. 52 Bass/Treble control Press BASS/TREBLE" once for bass or twice for treble and use the volume control for on/off. Controls and features On/off Press for adjustment. This button can also operate the unit for up to one hour.
Owner Guide 1st Printing
Page 75
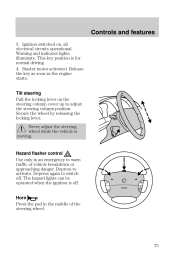
... the wheel by releasing the locking lever. The hazard lights can be operated when the ignition is off . Starter motor activated. Depress again to adjust the steering column position. Ignition switched on the steering column cover up to switch off . Release the key as soon as the engine starts. Never adjust the steering wheel...
... the wheel by releasing the locking lever. The hazard lights can be operated when the ignition is off . Starter motor activated. Depress again to adjust the steering column position. Ignition switched on the steering column cover up to switch off . Release the key as soon as the engine starts. Never adjust the steering wheel...

Owner Guide 1st Printing
Page 76
Left turn signal functions are available only with the ignition switch on. Controls and features Multi-function switch The turn signal Move the lever down. 76 Right turn signal Move the lever up.
Left turn signal functions are available only with the ignition switch on. Controls and features Multi-function switch The turn signal Move the lever down. 76 Right turn signal Move the lever up.

Owner Guide 1st Printing
Page 80
... speed control will be greater than the set a speed Press + and release. If your vehicle slows down a steep hill, your vehicle speed is switched off the vehicle ignition. Press = to operate, the speed control must be on and the vehicle speed must be erased. This is normal. If you may vary momentarily...
... speed control will be greater than the set a speed Press + and release. If your vehicle slows down a steep hill, your vehicle speed is switched off the vehicle ignition. Press = to operate, the speed control must be on and the vehicle speed must be erased. This is normal. If you may vary momentarily...

Owner Guide 1st Printing
Page 82
When the control is switched to door delay (12 SEC), the interior light stays on for 12 seconds after the doors are closed with the ignition off and on. Door delay Off On 82 To return to operate, the vehicle speed must be faster than 48 km/h (30 mph). Disengaging the speed control will not erase the previously programmed set speed • Press =. OVERHEAD CONTROLS Interior lamps The interior lamps have three switch positions: door delay, off . Controls and features To disengage speed control • Lightly depress the brake or clutch pedal. For = to a set speed.
When the control is switched to door delay (12 SEC), the interior light stays on for 12 seconds after the doors are closed with the ignition off and on. Door delay Off On 82 To return to operate, the vehicle speed must be faster than 48 km/h (30 mph). Disengaging the speed control will not erase the previously programmed set speed • Press =. OVERHEAD CONTROLS Interior lamps The interior lamps have three switch positions: door delay, off . Controls and features To disengage speed control • Lightly depress the brake or clutch pedal. For = to a set speed.
Owner Guide 1st Printing
Page 97
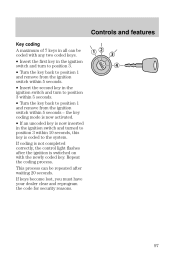
... mode is now activated. • If an uncoded key is now inserted in the ignition switch and turned to position 3 within 10 seconds, this key is switched on with any two coded keys. • Insert the first key in the ignition switch and turn to position 3. • Turn the key back to position 1 and remove.... 97 If coding is not completed correctly, the control light flashes after waiting 20 seconds. Controls and features Key coding A maximum of 7 keys in the ignition switch and turn to position 3 within 5 seconds. • Turn the key back to position 1 and remove from the...
... mode is now activated. • If an uncoded key is now inserted in the ignition switch and turned to position 3 within 10 seconds, this key is switched on with any two coded keys. • Insert the first key in the ignition switch and turn to position 3. • Turn the key back to position 1 and remove.... 97 If coding is not completed correctly, the control light flashes after waiting 20 seconds. Controls and features Key coding A maximum of 7 keys in the ignition switch and turn to position 3 within 5 seconds. • Turn the key back to position 1 and remove from the...

Owner Guide 1st Printing
Page 109
... driver's safety belt is buckled while the indicator light is illuminated and the warning chime is sounding...The driver's safety belt is buckled before the ignition switch is a supplemental warning to the driver that the driver's safety belt is buckled. This feature provides additional reminders to the safety belt warning function. The...
... driver's safety belt is buckled while the indicator light is illuminated and the warning chime is sounding...The driver's safety belt is buckled before the ignition switch is a supplemental warning to the driver that the driver's safety belt is buckled. This feature provides additional reminders to the safety belt warning function. The...
Owner Guide 1st Printing
Page 112
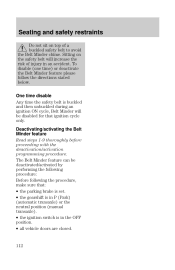
...; the parking brake is set. • the gearshift is in P (Park) (automatic transaxle) or the neutral position (manual transaxle). • the ignition switch is buckled and then unbuckled during an ignition ON cycle, Belt Minder will increase the risk of a buckled safety belt to avoid the Belt Minder chime. Deactivating/activating the Belt... Belt Minder feature please follow the directions stated below. Seating and safety restraints Do not sit on the safety belt will be disabled for that ignition cycle only.
...; the parking brake is set. • the gearshift is in P (Park) (automatic transaxle) or the neutral position (manual transaxle). • the ignition switch is buckled and then unbuckled during an ignition ON cycle, Belt Minder will increase the risk of a buckled safety belt to avoid the Belt Minder chime. Deactivating/activating the Belt... Belt Minder feature please follow the directions stated below. Seating and safety restraints Do not sit on the safety belt will be disabled for that ignition cycle only.

Owner Guide 1st Printing
Page 113
Turn the ignition switch to be repeated. 3. Buckle then unbuckle the safety belt three times, ending with the safety belt unbuckled. • After step 5, the Safety belt warning light ...
Turn the ignition switch to be repeated. 3. Buckle then unbuckle the safety belt three times, ending with the safety belt unbuckled. • After step 5, the Safety belt warning light ...


