Owner Guide 1st Printing
Page 6
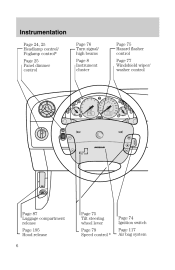
Instrumentation Page 24, 25 Headlamp control/ Foglamp control* Page 25 Panel dimmer control Page 76 Turn signal/ high beams Page 8 Instrument cluster Page 75 Hazard flasher control Page 77 Windshield wiper/ washer control Page 87 Luggage compartment release Page 195 Hood release 6 Page 75 Tilt steering wheel lever Page 79 Speed control * Page 74 Ignition switch Page 117 Air bag system
Instrumentation Page 24, 25 Headlamp control/ Foglamp control* Page 25 Panel dimmer control Page 76 Turn signal/ high beams Page 8 Instrument cluster Page 75 Hazard flasher control Page 77 Windshield wiper/ washer control Page 87 Luggage compartment release Page 195 Hood release 6 Page 75 Tilt steering wheel lever Page 79 Speed control * Page 74 Ignition switch Page 117 Air bag system

Owner Guide 1st Printing
Page 12
... is switched off. For more information, refer to on . The light in the Seating and safety restraints chapter. 12 Instrumentation High beams Illuminates when the headlamp high beams are on after each cycle of the ignition key. Traction control system (if equipped) Illuminates to indicate the system is switched on as...
... is switched off. For more information, refer to on . The light in the Seating and safety restraints chapter. 12 Instrumentation High beams Illuminates when the headlamp high beams are on after each cycle of the ignition key. Traction control system (if equipped) Illuminates to indicate the system is switched on as...
Owner Guide 1st Printing
Page 17
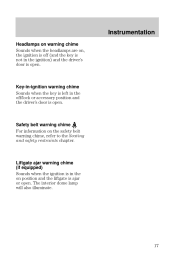
... warning chime Sounds when the headlamps are on, the ignition is off /lock or accessory position and the driver's door is open. The interior dome lamp will also illuminate. 17 Key-...
... warning chime Sounds when the headlamps are on, the ignition is off /lock or accessory position and the driver's door is open. The interior dome lamp will also illuminate. 17 Key-...
Owner Guide 1st Printing
Page 24
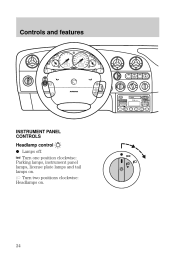
Turn one position clockwise: Parking lamps, instrument panel lamps, license plate lamps and tail lamps on . 24 Controls and features INSTRUMENT PANEL CONTROLS Headlamp control Lamps off. Turn two positions clockwise: Headlamps on .
Turn one position clockwise: Parking lamps, instrument panel lamps, license plate lamps and tail lamps on . 24 Controls and features INSTRUMENT PANEL CONTROLS Headlamp control Lamps off. Turn two positions clockwise: Headlamps on .
Owner Guide 1st Printing
Page 25
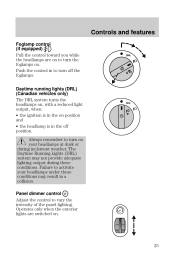
...the intensity of the panel lighting. Panel dimmer control Adjust the control to activate your headlamps at dusk or during these conditions may not provide adequate lighting output during inclement weather....and features Foglamp control (if equipped) Pull the control toward you while the headlamps are switched on. 25 Operates only when the exterior lights are on to turn on position and •... the headlamp is in to turn off position. Push the control in the off the foglamps. The Daytime...
...the intensity of the panel lighting. Panel dimmer control Adjust the control to activate your headlamps at dusk or during these conditions may not provide adequate lighting output during inclement weather....and features Foglamp control (if equipped) Pull the control toward you while the headlamps are switched on. 25 Operates only when the exterior lights are on to turn on position and •... the headlamp is in to turn off position. Push the control in the off the foglamps. The Daytime...
Owner Guide 1st Printing
Page 77
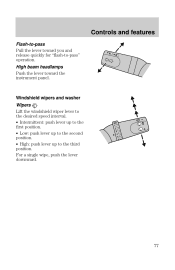
For a single wipe, push the lever downward. 77 Windshield wipers and washer Wipers Lift the windshield wiper lever to the desired speed interval. • Intermittent: push lever up to the first position. • Low: push lever up to the second position. • High: push lever up to Ćpass" operation. High beam headlamps Push the lever toward you and release quickly for flashĆto the third position. Controls and features Flash-to-pass Pull the lever toward the instrument panel.
For a single wipe, push the lever downward. 77 Windshield wipers and washer Wipers Lift the windshield wiper lever to the desired speed interval. • Intermittent: push lever up to the first position. • Low: push lever up to the second position. • High: push lever up to Ćpass" operation. High beam headlamps Push the lever toward you and release quickly for flashĆto the third position. Controls and features Flash-to-pass Pull the lever toward the instrument panel.

Owner Guide 1st Printing
Page 113
... unbuckled. Seating and safety restraints • the driver's safety belt is unbuckled. • the parklamps/headlamps are in OFF position. Wait until the Safety belt warning light turns off the headlamps. 5. This can be turned on the headlamps, turn off (approximately 1Ć2 minutes). • Steps 3-5 must be repeated. 3. Turn the ignition switch to...
... unbuckled. Seating and safety restraints • the driver's safety belt is unbuckled. • the parklamps/headlamps are in OFF position. Wait until the Safety belt warning light turns off the headlamps. 5. This can be turned on the headlamps, turn off (approximately 1Ć2 minutes). • Steps 3-5 must be repeated. 3. Turn the ignition switch to...
Owner Guide 1st Printing
Page 141
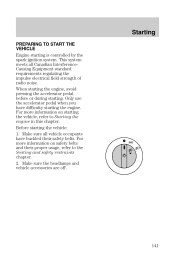
This system meets all vehicle occupants have difficulty starting the vehicle: 1. Make sure the headlamps and vehicle accessories are off. 141 Only use the accelerator pedal when you have buckled their proper usage, refer to Starting the engine in this ...
This system meets all vehicle occupants have difficulty starting the vehicle: 1. Make sure the headlamps and vehicle accessories are off. 141 Only use the accelerator pedal when you have buckled their proper usage, refer to Starting the engine in this ...
Owner Guide 1st Printing
Page 173
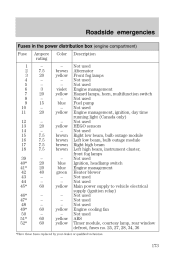
... low beam, bulb outage module Left low beam, bulb outage module Right high beam Left high beam, instrument cluster, front fog lamps Not used Ignition, headlamp switch Engine management Heater blower Not used Not used Main power supply to vehicle electrical supply (ignition relay) Not used Not used Not used Engine...
... low beam, bulb outage module Left low beam, bulb outage module Right high beam Left high beam, instrument cluster, front fog lamps Not used Ignition, headlamp switch Engine management Heater blower Not used Not used Main power supply to vehicle electrical supply (ignition relay) Not used Not used Not used Engine...
Owner Guide 1st Printing
Page 237
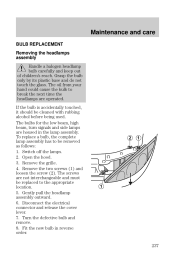
...only by its plastic base and do not touch the glass. Maintenance and care BULB REPLACEMENT Removing the headlamps assembly Handle a halogen headlamp bulb carefully and keep out of children's reach. Gently pull the headlamp assembly outward. 6. Turn the defective bulb and remove. 8. Disconnect the electrical connector and release the ... the two screws (1) and loosen the screw (2). To replace a bulb, the complete lamp assembly has to break the next time the headlamps are operated. The oil from your hand could cause the bulb to be cleaned with rubbing alcohol before being used.
...only by its plastic base and do not touch the glass. Maintenance and care BULB REPLACEMENT Removing the headlamps assembly Handle a halogen headlamp bulb carefully and keep out of children's reach. Gently pull the headlamp assembly outward. 6. Turn the defective bulb and remove. 8. Disconnect the electrical connector and release the ... the two screws (1) and loosen the screw (2). To replace a bulb, the complete lamp assembly has to break the next time the headlamps are operated. The oil from your hand could cause the bulb to be cleaned with rubbing alcohol before being used.

Owner Guide 1st Printing
Page 238
Pull the bulb out and replace it . Pull the bulb out and replace it . Parking lamps Turn the socket counterclockwise and pull it out. Opening the headlamp assembly Release the wire clip on the rear of the headlamp assembly and remove the cover. 238 Maintenance and care Front turn signal Turn the bulb holder counterclockwise and pull it out.
Pull the bulb out and replace it . Pull the bulb out and replace it . Parking lamps Turn the socket counterclockwise and pull it out. Opening the headlamp assembly Release the wire clip on the rear of the headlamp assembly and remove the cover. 238 Maintenance and care Front turn signal Turn the bulb holder counterclockwise and pull it out.
Owner Guide 1st Printing
Page 239
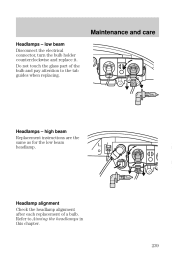
Maintenance and care Headlamps - low beam Disconnect the electrical connector, turn the bulb holder counterclockwise and replace it. Do not touch the glass part of a bulb. Headlamp alignment Check the headlamp alignment after each replacement of the bulb and pay attention to Aiming the headlamps in this chapter. 239 high beam Replacement instructions are the same as for the low beam headlamp. Refer to the tab guides when replacing. Headlamps -
Maintenance and care Headlamps - low beam Disconnect the electrical connector, turn the bulb holder counterclockwise and replace it. Do not touch the glass part of a bulb. Headlamp alignment Check the headlamp alignment after each replacement of the bulb and pay attention to Aiming the headlamps in this chapter. 239 high beam Replacement instructions are the same as for the low beam headlamp. Refer to the tab guides when replacing. Headlamps -

Owner Guide 1st Printing
Page 240
Disconnect the electrical connectors and release the wire clip from the rear of removal. Remove the screw and pull the foglamp assembly out. 3. Disconnect the electrical connector. 4. Remove the cover from the bulb. 6. Install in the reverse order of the foglamp assembly. 5. Open the flap in reverse order (do not touch the glass part of the bulb). 240 Install the new bulb in the lower radiator grille. 2. Maintenance and care Reinstalling the headlamp assembly All bulb connectors must be correctly connected. Foglamps (if equipped) 1.
Disconnect the electrical connectors and release the wire clip from the rear of removal. Remove the screw and pull the foglamp assembly out. 3. Disconnect the electrical connector. 4. Remove the cover from the bulb. 6. Install in the reverse order of the foglamp assembly. 5. Open the flap in reverse order (do not touch the glass part of the bulb). 240 Install the new bulb in the lower radiator grille. 2. Maintenance and care Reinstalling the headlamp assembly All bulb connectors must be correctly connected. Foglamps (if equipped) 1.
Owner Guide 1st Printing
Page 243
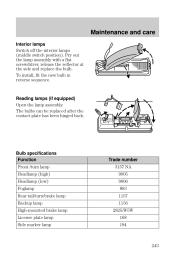
.... Pry out the lamp assembly with a flat screwdriver, release the reflector at the side and replace the bulb. Bulb specifications Function Front /turn lamp Headlamp (high) Headlamp (low) Foglamp Rear tail/turn/brake lamp Backup lamp HighĆmounted brake lamp License plate lamp Side marker lamp Trade number 3157 NA 9005...
.... Pry out the lamp assembly with a flat screwdriver, release the reflector at the side and replace the bulb. Bulb specifications Function Front /turn lamp Headlamp (high) Headlamp (low) Foglamp Rear tail/turn/brake lamp Backup lamp HighĆmounted brake lamp License plate lamp Side marker lamp Trade number 3157 NA 9005...
Owner Guide 1st Printing
Page 244
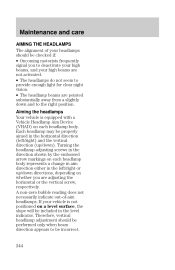
...to be properly aimed in the level indicator. Turning the headlamp adjusting screws in the left /right) and the vertical direction (up /down directions, depending on each headlamp body. Therefore, vertical headlamp adjustment should be checked if: • Oncoming motorists ...frequently signal you are pointed substantially away from a slightly down ). Each headlamp may be incorrect. 244 A nonĆzero bubble...
...to be properly aimed in the level indicator. Turning the headlamp adjusting screws in the left /right) and the vertical direction (up /down directions, depending on each headlamp body. Therefore, vertical headlamp adjustment should be checked if: • Oncoming motorists ...frequently signal you are pointed substantially away from a slightly down ). Each headlamp may be incorrect. 244 A nonĆzero bubble...
Owner Guide 1st Printing
Page 245
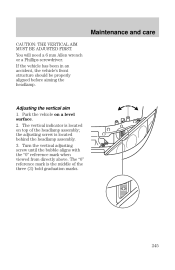
The 0" reference mark is located behind the headlamp assembly. 3. You will need a 6 mm Allen wrench or a Phillips screwdriver. If the vehicle has been in an accident, the vehicle's front structure should be properly aligned before aiming the headlamp. Park the vehicle on top of the three (3) bold graduation marks. 245... the adjusting screw is the middle of the headlamp assembly; Maintenance and care CAUTION: THE VERTICAL AIM MUST BE ADJUSTED FIRST. The vertical indicator is located on a level surface. 2. Turn the ...
The 0" reference mark is located behind the headlamp assembly. 3. You will need a 6 mm Allen wrench or a Phillips screwdriver. If the vehicle has been in an accident, the vehicle's front structure should be properly aligned before aiming the headlamp. Park the vehicle on top of the three (3) bold graduation marks. 245... the adjusting screw is the middle of the headlamp assembly; Maintenance and care CAUTION: THE VERTICAL AIM MUST BE ADJUSTED FIRST. The vertical indicator is located on a level surface. 2. Turn the ...

Owner Guide 1st Printing
Page 246
The horizontal indicator and the adjusting screw are set to the 0" mark, the headlamp has been properly aimed. 246 When the horizontal and vertical indicators are located behind the headlamp assembly. 3. Park the vehicle on the indicator housing (vial). Turn the horizontal adjusting screw until after adjusting the vertical aim. 1. Maintenance and care Adjusting the horizontal aim CAUTION: Do not adjust the horizontal aim until the indicator in the vial aligns with the 0" mark on the plastic slide located on a level surface. 2.
The horizontal indicator and the adjusting screw are set to the 0" mark, the headlamp has been properly aimed. 246 When the horizontal and vertical indicators are located behind the headlamp assembly. 3. Park the vehicle on the indicator housing (vial). Turn the horizontal adjusting screw until after adjusting the vertical aim. 1. Maintenance and care Adjusting the horizontal aim CAUTION: Do not adjust the horizontal aim until the indicator in the vial aligns with the 0" mark on the plastic slide located on a level surface. 2.
Owner Guide 1st Printing
Page 275
...) 159 Gross vehicle weight (GVW) ...158 Gross vehicle weight rating (GVWR) ...159 H Hazard flasher control ...75, 169 Head restraints ...98 Headlamp control ...24 Headlamps on warning chime ...17 Headlamps, aiming ...239, 244 Headlamps, replacing bulbs ...237 High beams ...12, 77 High mounted brake lamp ...242 Hood, opening ...195 Horn ...75 Icons ...2 Idle speed ...257...
...) 159 Gross vehicle weight (GVW) ...158 Gross vehicle weight rating (GVWR) ...159 H Hazard flasher control ...75, 169 Head restraints ...98 Headlamp control ...24 Headlamps on warning chime ...17 Headlamps, aiming ...239, 244 Headlamps, replacing bulbs ...237 High beams ...12, 77 High mounted brake lamp ...242 Hood, opening ...195 Horn ...75 Icons ...2 Idle speed ...257...