Scheduled Maintenance Guide 3rd Printing
Page 18
... seat filters (Navigator, if equipped) Additional services for: Light Trucks, Sport Utilities, and Vans Inspect and lubricate 4X2 ball joints (except F-450/F-550) Lubricate 4X2 wheel bearings, replace grease seals, and adjust bearings Change manual transmission fluid Inspect and lubricate steering linkage (E and F Series, Expedition, Navigator, Excursion) Additional services for your...
... seat filters (Navigator, if equipped) Additional services for: Light Trucks, Sport Utilities, and Vans Inspect and lubricate 4X2 ball joints (except F-450/F-550) Lubricate 4X2 wheel bearings, replace grease seals, and adjust bearings Change manual transmission fluid Inspect and lubricate steering linkage (E and F Series, Expedition, Navigator, Excursion) Additional services for your...
Scheduled Maintenance Guide 3rd Printing
Page 28
... oil filter Inspect tires for wear. Normal Schedule Normal Schedule Additional services for: Light Trucks, Sport Utilities, and Vans Change manual transmission fluid Lubricate 4X2 wheel bearings (except F-450/F-550) Inspect and lubricate 4X2 ball joints (except F-450/F-550) Inspect camshaft belt on 4 cylinder engine (2.5L Ranger) Inspect and lubricate steering...
... oil filter Inspect tires for wear. Normal Schedule Normal Schedule Additional services for: Light Trucks, Sport Utilities, and Vans Change manual transmission fluid Lubricate 4X2 wheel bearings (except F-450/F-550) Inspect and lubricate 4X2 ball joints (except F-450/F-550) Inspect camshaft belt on 4 cylinder engine (2.5L Ranger) Inspect and lubricate steering...
Scheduled Maintenance Guide 3rd Printing
Page 32
... equipped) Additional services for: Light Trucks, Sport Utilities, and Vans Inspect and lubricate 4X2 ball joints (except F-450/F-550) Replace 4x2 wheel bearings, grease seals, lubricate and adjust bearings Inspect and lubricate steering linkage (E and F Series, Expedition, Navigator, Excursion) Additional services for... conditioner to cooling system * If vehicle is registered in California, the California Air Resources Board has determined that all rear wheel drive (RWD) vehicles. We, however, urge that the failure to perform this maintenance item will not nullify the emission warranty...
... equipped) Additional services for: Light Trucks, Sport Utilities, and Vans Inspect and lubricate 4X2 ball joints (except F-450/F-550) Replace 4x2 wheel bearings, grease seals, lubricate and adjust bearings Inspect and lubricate steering linkage (E and F Series, Expedition, Navigator, Excursion) Additional services for... conditioner to cooling system * If vehicle is registered in California, the California Air Resources Board has determined that all rear wheel drive (RWD) vehicles. We, however, urge that the failure to perform this maintenance item will not nullify the emission warranty...
Scheduled Maintenance Guide 3rd Printing
Page 35
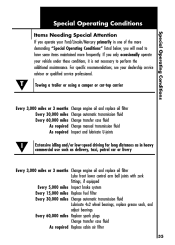
...if equipped Every 5,000 miles Inspect brake system Every 15,000 miles Replace fuel filter Every 30,000 miles Change automatic transmission fluid Lubricate 4x2 wheel bearings, replace grease seals, and adjust bearings Every 60,000 miles Replace spark plugs Change transfer case fluid As required Replace cabin air filter ...your dealership service advisor or qualified service professional. Special Operating Conditions Special Operating Conditions Items Needing Special Attention If you operate your Ford/Lincoln/Mercury primarily in heavy commercial use such as in one of the more frequently.
...if equipped Every 5,000 miles Inspect brake system Every 15,000 miles Replace fuel filter Every 30,000 miles Change automatic transmission fluid Lubricate 4x2 wheel bearings, replace grease seals, and adjust bearings Every 60,000 miles Replace spark plugs Change transfer case fluid As required Replace cabin air filter ...your dealership service advisor or qualified service professional. Special Operating Conditions Special Operating Conditions Items Needing Special Attention If you operate your Ford/Lincoln/Mercury primarily in heavy commercial use such as in one of the more frequently.

Warranty Guide 1st Printing
Page 13
...", "flood", "junk", "rebuilt", "reconstructed", or "salvaged"; Time Limits on Coverage • After the first 12 months in service or 12,000 miles, whichever occurs first, wheel alignment and tire balancing are not equipped with the Ford Ambulance Prep Package, see important information about ambulance conversions (page 28). this will void the...
...", "flood", "junk", "rebuilt", "reconstructed", or "salvaged"; Time Limits on Coverage • After the first 12 months in service or 12,000 miles, whichever occurs first, wheel alignment and tire balancing are not equipped with the Ford Ambulance Prep Package, see important information about ambulance conversions (page 28). this will void the...
Owner Guide 1st Printing
Page 6
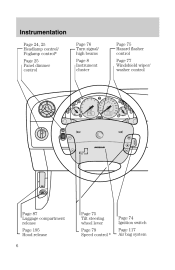
Instrumentation Page 24, 25 Headlamp control/ Foglamp control* Page 25 Panel dimmer control Page 76 Turn signal/ high beams Page 8 Instrument cluster Page 75 Hazard flasher control Page 77 Windshield wiper/ washer control Page 87 Luggage compartment release Page 195 Hood release 6 Page 75 Tilt steering wheel lever Page 79 Speed control * Page 74 Ignition switch Page 117 Air bag system
Instrumentation Page 24, 25 Headlamp control/ Foglamp control* Page 25 Panel dimmer control Page 76 Turn signal/ high beams Page 8 Instrument cluster Page 75 Hazard flasher control Page 77 Windshield wiper/ washer control Page 87 Luggage compartment release Page 195 Hood release 6 Page 75 Tilt steering wheel lever Page 79 Speed control * Page 74 Ignition switch Page 117 Air bag system
Owner Guide 1st Printing
Page 28
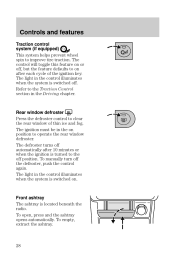
... cycle of thin ice and fog. Refer to operate the rear window defroster. Controls and features Traction control system (if equipped) This system helps prevent wheel spin to the off position. To open, press and the ashtray opens automatically. To manually turn off the defroster, push the control again.
... cycle of thin ice and fog. Refer to operate the rear window defroster. Controls and features Traction control system (if equipped) This system helps prevent wheel spin to the off position. To open, press and the ashtray opens automatically. To manually turn off the defroster, push the control again.
Owner Guide 1st Printing
Page 74
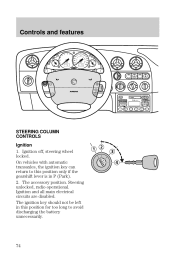
Ignition off, steering wheel locked. Steering unlocked, radio operational. Controls and features STEERING COLUMN CONTROLS Ignition 1. Ignition and all main electrical circuits are disabled. The accessory position. The ignition key should not be left in P (Park). 2. On vehicles with automatic transaxles, the ignition key can return to this position only if the gearshift lever is in this position for too long to avoid discharging the battery unnecessarily. 74
Ignition off, steering wheel locked. Steering unlocked, radio operational. Controls and features STEERING COLUMN CONTROLS Ignition 1. Ignition and all main electrical circuits are disabled. The accessory position. The ignition key should not be left in P (Park). 2. On vehicles with automatic transaxles, the ignition key can return to this position only if the gearshift lever is in this position for too long to avoid discharging the battery unnecessarily. 74
Owner Guide 1st Printing
Page 75
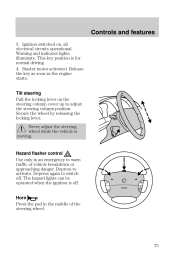
... to adjust the steering column position. Tilt steering Pull the locking lever on , all electrical circuits operational. Controls and features 3. Secure the wheel by releasing the locking lever. This key position is moving. Release the key as soon as the engine starts. Ignition switched on the steering... column cover up to switch off . Depress to warn traffic of the steering wheel. 75 The hazard lights can be operated when the ignition is off . Hazard flasher control Use only in the middle of vehicle ...
... to adjust the steering column position. Tilt steering Pull the locking lever on , all electrical circuits operational. Controls and features 3. Secure the wheel by releasing the locking lever. This key position is moving. Release the key as soon as the engine starts. Ignition switched on the steering... column cover up to switch off . Depress to warn traffic of the steering wheel. 75 The hazard lights can be operated when the ignition is off . Hazard flasher control Use only in the middle of vehicle ...
Owner Guide 1st Printing
Page 78
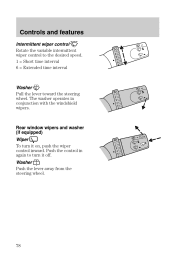
Controls and features Intermittent wiper control Rotate the variable intermittent wiper control to turn it off. Rear window wipers and washer (if equipped) Wiper To turn it on, push the wiper control inward. Washer Push the lever away from the steering wheel. 78 The washer operates in again to the desired speed. 1 = Short time interval 6 = Extended time interval Washer Pull the lever toward the steering wheel. Push the control in conjunction with the windshield wipers.
Controls and features Intermittent wiper control Rotate the variable intermittent wiper control to turn it off. Rear window wipers and washer (if equipped) Wiper To turn it on, push the wiper control inward. Washer Push the lever away from the steering wheel. 78 The washer operates in again to the desired speed. 1 = Short time interval 6 = Extended time interval Washer Pull the lever toward the steering wheel. Push the control in conjunction with the windshield wipers.

Owner Guide 1st Printing
Page 145
...;lock brake system. Pedal pulsation coupled with an antiĆlock braking system (ABS), a noise from the hydraulic pump motor and pulsation in the steering wheel, the vehicle most likely needs service. 145
...;lock brake system. Pedal pulsation coupled with an antiĆlock braking system (ABS), a noise from the hydraulic pump motor and pulsation in the steering wheel, the vehicle most likely needs service. 145

Owner Guide 1st Printing
Page 146
... prevented from locking even when the brakes are firmly applied. The ABS will be activated immediately, allowing you to retain full steering control of wheel lock up during brake applications and compensating for this braking technique. No matter how hard you familiarize yourself with ABS • In an emergency, apply ...
... prevented from locking even when the brakes are firmly applied. The ABS will be activated immediately, allowing you to retain full steering control of wheel lock up during brake applications and compensating for this braking technique. No matter how hard you familiarize yourself with ABS • In an emergency, apply ...

Owner Guide 1st Printing
Page 148
... it could damage the vehicle the vehicle. To reactivate the system, depress the switch again or restart the engine. 148 This may allow the excess wheel spin to indicate a fault in conjunction with engine torque reductions. This can occur when accelerating on a slippery road, a loose surface or when pulling away on... traction control lamp flashes when the system is functioning to on after each cycle of the system's safety potential. Driving TRACTION CONTROL This system prevents wheel spin at all speeds.
... it could damage the vehicle the vehicle. To reactivate the system, depress the switch again or restart the engine. 148 This may allow the excess wheel spin to indicate a fault in conjunction with engine torque reductions. This can occur when accelerating on a slippery road, a loose surface or when pulling away on... traction control lamp flashes when the system is functioning to on after each cycle of the system's safety potential. Driving TRACTION CONTROL This system prevents wheel spin at all speeds.

Owner Guide 1st Printing
Page 149
... by power from the engine to optimize shift smoothness. Optimal shifting will resume within a few hundred kilometers (miles) of operation. 149 Never hold the steering wheel to adjust during the first few hundred kilometers (miles) of operation until the adaptive strategy has been learned. It is running. If the amount of...
... by power from the engine to optimize shift smoothness. Optimal shifting will resume within a few hundred kilometers (miles) of operation. 149 Never hold the steering wheel to adjust during the first few hundred kilometers (miles) of operation until the adaptive strategy has been learned. It is running. If the amount of...

Owner Guide 1st Printing
Page 152
... must relearn its adaptive strategy. Make sure the gearshift is maintained by using an adaptive learning strategy. This locks the transaxle and prevents the front wheels from P (Park) to another position. The adaptive learning strategy is securely latched in P (Park). When the battery is disconnected or a new battery is normal for...
... must relearn its adaptive strategy. Make sure the gearshift is maintained by using an adaptive learning strategy. This locks the transaxle and prevents the front wheels from P (Park) to another position. The adaptive learning strategy is securely latched in P (Park). When the battery is disconnected or a new battery is normal for...
Owner Guide 1st Printing
Page 177
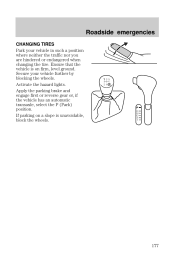
Activate the hazard lights. Secure your vehicle in such a position where neither the traffic nor you are hindered or endangered when changing the tire. Apply the parking brake and engage first or reverse gear or, if the vehicle has an automatic transaxle, select the P (Park) position. If parking on a slope is on firm, level ground. Roadside emergencies CHANGING TIRES Park your vehicle further by blocking the wheels. Ensure that the vehicle is unavoidable, block the wheels. 177
Activate the hazard lights. Secure your vehicle in such a position where neither the traffic nor you are hindered or endangered when changing the tire. Apply the parking brake and engage first or reverse gear or, if the vehicle has an automatic transaxle, select the P (Park) position. If parking on a slope is on firm, level ground. Roadside emergencies CHANGING TIRES Park your vehicle further by blocking the wheels. Ensure that the vehicle is unavoidable, block the wheels. 177
Owner Guide 1st Printing
Page 178
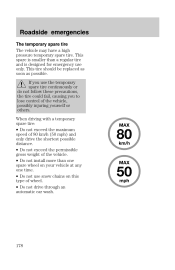
... possible. If you use the temporary spare tire continuously or do not follow these precautions, the tire could fail, causing you to lose control of wheel. • Do not drive through an automatic car wash. 178 Roadside emergencies The temporary spare tire The vehicle may have a high pressure temporary spare ... • Do not exceed the permissible gross weight of the vehicle. • Do not install more than a regular tire and is smaller than one spare wheel on your vehicle at any one time. • Do not use only. This spare is designed for emergency use snow chains on this type of...
... possible. If you use the temporary spare tire continuously or do not follow these precautions, the tire could fail, causing you to lose control of wheel. • Do not drive through an automatic car wash. 178 Roadside emergencies The temporary spare tire The vehicle may have a high pressure temporary spare ... • Do not exceed the permissible gross weight of the vehicle. • Do not install more than a regular tire and is smaller than one spare wheel on your vehicle at any one time. • Do not use only. This spare is designed for emergency use snow chains on this type of...
Owner Guide 1st Printing
Page 179
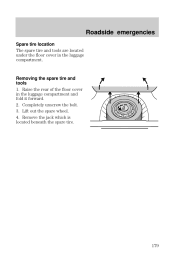
Lift out the spare wheel. 4. Roadside emergencies Spare tire location The spare tire and tools are located under the floor cover in the luggage compartment and fold it forward. 2. Raise the rear of the floor cover in the luggage compartment. Completely unscrew the bolt. 3. Remove the jack which is located beneath the spare tire. 179 Removing the spare tire and tools 1.
Lift out the spare wheel. 4. Roadside emergencies Spare tire location The spare tire and tools are located under the floor cover in the luggage compartment and fold it forward. 2. Raise the rear of the floor cover in the luggage compartment. Completely unscrew the bolt. 3. Remove the jack which is located beneath the spare tire. 179 Removing the spare tire and tools 1.
Owner Guide 1st Printing
Page 180
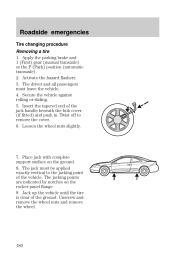
Roadside emergencies Tire changing procedure Removing a tire 1. Twist off to the jacking point of the ground. Unscrew and remove the wheel nuts and remove the wheel. 180 The jack must leave the vehicle. 4. Jack up the vehicle until the tire is clear of the vehicle. The driver ... against rolling or sliding. 5. Activate the hazard flashers. 3. Place jack with complete support surface on the rocker panel flange. 9. Loosen the wheel nuts slightly. 7. Apply the parking brake and 1 (First) gear (manual transaxle) or the P (Park) position (automatic transaxle). 2.
Roadside emergencies Tire changing procedure Removing a tire 1. Twist off to the jacking point of the ground. Unscrew and remove the wheel nuts and remove the wheel. 180 The jack must leave the vehicle. 4. Jack up the vehicle until the tire is clear of the vehicle. The driver ... against rolling or sliding. 5. Activate the hazard flashers. 3. Place jack with complete support surface on the rocker panel flange. 9. Loosen the wheel nuts slightly. 7. Apply the parking brake and 1 (First) gear (manual transaxle) or the P (Park) position (automatic transaxle). 2.

Owner Guide 1st Printing
Page 181
Lower the vehicle and remove the jack by reversing the spare tire removal instructions. 181 Roadside emergencies Replacing a tire 1. Screw on the wheel nuts, ensuring the tapered end of the hand. 6. Align the hub cover and push firmly into position with the ball of the wheel nuts are facing the wheel, and secure in a clockwise direction. 3. Fully tighten the wheel nuts in the luggage compartment by turning the handle counterclockwise. 4. Stow the jack and damaged tire in a crosswise pattern. 5. Push the spare tire onto the wheel studs. 2.
Lower the vehicle and remove the jack by reversing the spare tire removal instructions. 181 Roadside emergencies Replacing a tire 1. Screw on the wheel nuts, ensuring the tapered end of the hand. 6. Align the hub cover and push firmly into position with the ball of the wheel nuts are facing the wheel, and secure in a clockwise direction. 3. Fully tighten the wheel nuts in the luggage compartment by turning the handle counterclockwise. 4. Stow the jack and damaged tire in a crosswise pattern. 5. Push the spare tire onto the wheel studs. 2.


