
Owner Guide 1st Printing
Page 18
Stop the vehicle, turn off the engine and let the engine cool. Instrumentation INSTRUMENT CLUSTER GAUGES Engine coolant temperature gauge Indicates the temperature of the engine coolant. At normal operating temperature, the needle remains within the normal area. Never remove the coolant reservoir cap while the engine is overheating. If it enters the red section, the engine is running or hot. 18 Refer to Cooling system in the Maintenance and care chapter.
Stop the vehicle, turn off the engine and let the engine cool. Instrumentation INSTRUMENT CLUSTER GAUGES Engine coolant temperature gauge Indicates the temperature of the engine coolant. At normal operating temperature, the needle remains within the normal area. Never remove the coolant reservoir cap while the engine is overheating. If it enters the red section, the engine is running or hot. 18 Refer to Cooling system in the Maintenance and care chapter.
Owner Guide 1st Printing
Page 35
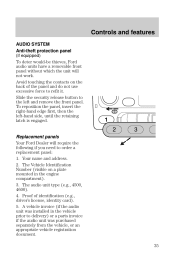
...3 35 Controls and features AUDIO SYSTEM Anti-theft protection panel (if equipped) To deter wouldĆbe thieves, Ford audio units have a removable front panel without which the unit will require the following if you need to delivery) or a parts invoice if the audio unit was installed... in the engine compartment). 3. Your name and address. 2. To reposition the panel, insert the rightĆhand edge first, then the left and remove the front panel. The Vehicle Identification Number (visible on the back of identification ...
...3 35 Controls and features AUDIO SYSTEM Anti-theft protection panel (if equipped) To deter wouldĆbe thieves, Ford audio units have a removable front panel without which the unit will require the following if you need to delivery) or a parts invoice if the audio unit was installed... in the engine compartment). 3. Your name and address. 2. To reposition the panel, insert the rightĆhand edge first, then the left and remove the front panel. The Vehicle Identification Number (visible on the back of identification ...

Owner Guide 1st Printing
Page 96
...all other objects on the key ring held away from outside the vehicle. If a problem occurs, turn the ignition off and restart the engine with aftermarket remote start . Have the malfunction repaired by your dealer or a qualified technician as soon as the ignition key may cause ... control light flashes rapidly for approximately one minute and then flashes repeatedly at irregular intervals, the system did not recognize the key code. Remove the key and try again. Metallic objects or electronic devices on , the control light will illuminate for approximately one minute and then repeatedly...
...all other objects on the key ring held away from outside the vehicle. If a problem occurs, turn the ignition off and restart the engine with aftermarket remote start . Have the malfunction repaired by your dealer or a qualified technician as soon as the ignition key may cause ... control light flashes rapidly for approximately one minute and then flashes repeatedly at irregular intervals, the system did not recognize the key code. Remove the key and try again. Metallic objects or electronic devices on , the control light will illuminate for approximately one minute and then repeatedly...

Owner Guide 1st Printing
Page 150
... are equipped with a brakeĆshift interlock feature that prevents the gearshift lever from being moved from P (Park) with the brake pedal depressed: 1. Start the engine. 2. Insert a screwdriver or similar item about 5 cm (2 inches) into the square opening to the position you cannot move the gearshift lever from the P (Park) position... the brake pedal. 3. Apply the parking brake and the brake pedal. 3. Overriding the brake-shift interlock feature If you choose. Turn the ignition off and remove the ignition key. 2.
... are equipped with a brakeĆshift interlock feature that prevents the gearshift lever from being moved from P (Park) with the brake pedal depressed: 1. Start the engine. 2. Insert a screwdriver or similar item about 5 cm (2 inches) into the square opening to the position you cannot move the gearshift lever from the P (Park) position... the brake pedal. 3. Apply the parking brake and the brake pedal. 3. Overriding the brake-shift interlock feature If you choose. Turn the ignition off and remove the ignition key. 2.

Owner Guide 1st Printing
Page 172
Roadside emergencies Power distribution box To check or replace a fuse or a relay, remove the cover of the fuse box in the wire. Always replace the cover to the Power Distribution Box before reconnecting the battery or refilling fluid reservoirs. 1 D1 R7 D2 R8 R9 R10 R11 10 11 12 13 14 15 16 17 18 46 47 48 49 50 51 52 1 2 3 4 5 6 7 8 9 39 40 41 42 43 44 45 R1 R2 R3 R4 R5 R6 172 All fuses are a push fit. A blown fuse can be identified by a break in the engine compartment by releasing the latch (1) and lifting up.
Roadside emergencies Power distribution box To check or replace a fuse or a relay, remove the cover of the fuse box in the wire. Always replace the cover to the Power Distribution Box before reconnecting the battery or refilling fluid reservoirs. 1 D1 R7 D2 R8 R9 R10 R11 10 11 12 13 14 15 16 17 18 46 47 48 49 50 51 52 1 2 3 4 5 6 7 8 9 39 40 41 42 43 44 45 R1 R2 R3 R4 R5 R6 172 All fuses are a push fit. A blown fuse can be identified by a break in the engine compartment by releasing the latch (1) and lifting up.
Owner Guide 1st Printing
Page 183
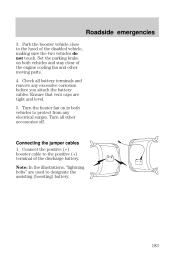
Check all other moving parts. 4. Turn the heater fan on both vehicles to the hood of the discharge battery. Turn all battery terminals and remove any electrical surges. Connecting the jumper cables 1. Roadside emergencies 3. Park the booster vehicle close to protect from any excessive corrosion before you attach the battery ... of the disabled vehicle, making sure the two vehicles do not touch. Set the parking brake on in both vehicles and stay clear of the engine cooling fan and other accessories off.
Check all other moving parts. 4. Turn the heater fan on both vehicles to the hood of the discharge battery. Turn all battery terminals and remove any electrical surges. Connecting the jumper cables 1. Roadside emergencies 3. Park the booster vehicle close to protect from any excessive corrosion before you attach the battery ... of the disabled vehicle, making sure the two vehicles do not touch. Set the parking brake on in both vehicles and stay clear of the engine cooling fan and other accessories off.
Owner Guide 1st Printing
Page 186
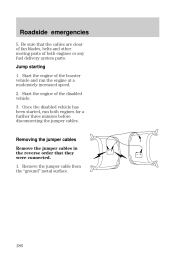
... booster vehicle and run both engines or any fuel delivery system parts. Remove the jumper cable from the ground" metal surface. 186 Removing the jumper cables Remove the jumper cables in the reverse order that the cables are clear of fan blades, belts and other moving parts of both engines for a further three minutes before...
... booster vehicle and run both engines or any fuel delivery system parts. Remove the jumper cable from the ground" metal surface. 186 Removing the jumper cables Remove the jumper cables in the reverse order that the cables are clear of fan blades, belts and other moving parts of both engines for a further three minutes before...
Owner Guide 1st Printing
Page 187
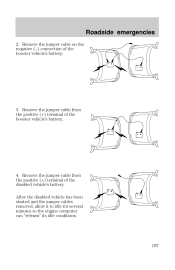
Remove the jumper cable on the negative (-) connection of the disabled vehicle's battery. Remove the jumper cable from the positive (+) terminal of the booster vehicle's battery. 4. Remove the jumper cable from the positive (+) terminal of the booster vehicle's battery. 3. Roadside emergencies 2. After the disabled vehicle has been started and the jumper cables removed, allow it to idle for several minutes so the engine computer can relearn" its idle conditions. 187
Remove the jumper cable on the negative (-) connection of the disabled vehicle's battery. Remove the jumper cable from the positive (+) terminal of the booster vehicle's battery. 4. Remove the jumper cable from the positive (+) terminal of the booster vehicle's battery. 3. Roadside emergencies 2. After the disabled vehicle has been started and the jumper cables removed, allow it to idle for several minutes so the engine computer can relearn" its idle conditions. 187
Owner Guide 1st Printing
Page 193
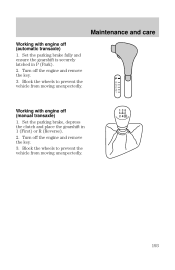
Set the parking brake fully and ensure the gearshift is securely latched in 1 (First) or R (Reverse). 2. Turn off (manual transaxle) 1. Working with engine off the engine and remove the key. 3. Block the wheels to prevent the vehicle from moving unexpectedly. 193 Set the parking brake, depress the clutch and place the gearshift in P (Park). 2. Turn off (automatic transaxle) 1. Block the wheels to prevent the vehicle from moving unexpectedly. Maintenance and care Working with engine off the engine and remove the key. 3.
Set the parking brake fully and ensure the gearshift is securely latched in 1 (First) or R (Reverse). 2. Turn off (manual transaxle) 1. Working with engine off the engine and remove the key. 3. Block the wheels to prevent the vehicle from moving unexpectedly. 193 Set the parking brake, depress the clutch and place the gearshift in P (Park). 2. Turn off (automatic transaxle) 1. Block the wheels to prevent the vehicle from moving unexpectedly. Maintenance and care Working with engine off the engine and remove the key. 3.

Owner Guide 1st Printing
Page 194
Set the parking brake fully and ensure the gearshift is running. Working with engine on (manual transaxle) 1. Maintenance and care Working with engine on (automatic transaxle) 1. Set the parking brake, depress the clutch and place the gearshift in P (Park). 2. Block the wheels to prevent the vehicle from moving unexpectedly. Do not start your engine with the air cleaner removed and do not remove it while the engine is securely latched in neutral. 2. Block the wheels to prevent the vehicle from moving unexpectedly. 194
Set the parking brake fully and ensure the gearshift is running. Working with engine on (manual transaxle) 1. Maintenance and care Working with engine on (automatic transaxle) 1. Set the parking brake, depress the clutch and place the gearshift in P (Park). 2. Block the wheels to prevent the vehicle from moving unexpectedly. Do not start your engine with the air cleaner removed and do not remove it while the engine is securely latched in neutral. 2. Block the wheels to prevent the vehicle from moving unexpectedly. 194
Owner Guide 1st Printing
Page 198
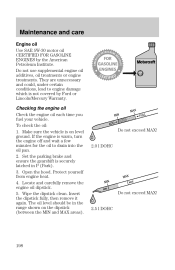
...securely latched in the range shown on level ground. Open the hood. Protect yourself from engine heat. 4. Insert the dipstick fully, then remove it again. Checking the engine oil Check the engine oil each time you fuel your vehicle. Set the parking brake and ensure the gearshift... is on the dipstick (between the MIN and MAX areas). Wipe the dipstick clean. Maintenance and care Engine oil Use SAE 5WĆ30 motor oil CERTIFIED FOR GASOLINE ENGINES by Ford or Lincoln/Mercury...
...securely latched in the range shown on level ground. Open the hood. Protect yourself from engine heat. 4. Insert the dipstick fully, then remove it again. Checking the engine oil Check the engine oil each time you fuel your vehicle. Set the parking brake and ensure the gearshift... is on the dipstick (between the MIN and MAX areas). Wipe the dipstick clean. Maintenance and care Engine oil Use SAE 5WĆ30 motor oil CERTIFIED FOR GASOLINE ENGINES by Ford or Lincoln/Mercury...

Owner Guide 1st Printing
Page 199
..., refer to pour oil in this chapter. 2. Remove the filler cap and use a funnel to Checking the engine oil in the opening. 3. Adding engine oil 1. If the oil level is not above the MAX mark on the dipstick. Change your engine oil and oil filter according to the scheduled mileage and...has caused cancer in and ensure it is fully seated. Add engine oil through the oil filler cap. If the fluid level is beyond the maximum line, engine damage or high oil consumption may occur and some oil must be removed from the engine by a service technician. 7. Recheck the oil level.
..., refer to pour oil in this chapter. 2. Remove the filler cap and use a funnel to Checking the engine oil in the opening. 3. Adding engine oil 1. If the oil level is not above the MAX mark on the dipstick. Change your engine oil and oil filter according to the scheduled mileage and...has caused cancer in and ensure it is fully seated. Add engine oil through the oil filler cap. If the fluid level is beyond the maximum line, engine damage or high oil consumption may occur and some oil must be removed from the engine by a service technician. 7. Recheck the oil level.
Owner Guide 1st Printing
Page 206
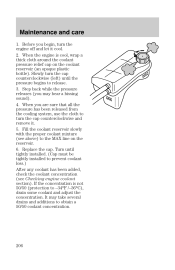
... line on the coolant reservoir (an opaque plastic bottle). It may hear a hissing sound). 4. When you begin, turn the cap counterclockwise and remove it cool. 2. If the concentration is cool, wrap a thick cloth around the coolant pressure relief cap on the reservoir. 6. When the... engine is not 50/50 (protection to turn the engine off and let it . 5. Replace the cap. Slowly turn the cap counterclockwise (left) until tightly installed. (Cap must be ...
... line on the coolant reservoir (an opaque plastic bottle). It may hear a hissing sound). 4. When you begin, turn the cap counterclockwise and remove it cool. 2. If the concentration is cool, wrap a thick cloth around the coolant pressure relief cap on the reservoir. 6. When the... engine is not 50/50 (protection to turn the engine off and let it . 5. Replace the cap. Slowly turn the cap counterclockwise (left) until tightly installed. (Cap must be ...
Owner Guide 1st Printing
Page 209
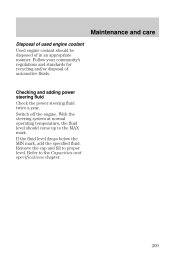
... temperature, the fluid level should be disposed of in an appropriate manner. Remove the cap and fill to the Capacities and specifications chapter. 209 Refer to proper level. Switch off the engine. Maintenance and care Disposal of used engine coolant Used engine coolant should come up to the MAX mark. Checking and adding power...
... temperature, the fluid level should be disposed of in an appropriate manner. Remove the cap and fill to the Capacities and specifications chapter. 209 Refer to proper level. Switch off the engine. Maintenance and care Disposal of used engine coolant Used engine coolant should come up to the MAX mark. Checking and adding power...
Owner Guide 1st Printing
Page 211
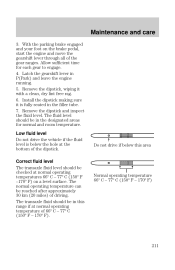
...if below the hole at the bottom of the gear ranges. Remove the dipstick, wiping it is below this range if at normal operating temperatures 66º C - 77º C (150º F -170º F) on the brake pedal, start the engine and move the gearshift lever through all of the dipstick. ... gearshift lever in the designated areas for each gear to engage. 4. Install the dipstick making sure it with a clean, dry lint free rag. 6. Remove the dipstick and inspect the fluid level. The normal operating temperature can be in the filler tube. 7. Low fluid level Do not drive the vehicle...
...if below the hole at the bottom of the gear ranges. Remove the dipstick, wiping it is below this range if at normal operating temperatures 66º C - 77º C (150º F -170º F) on the brake pedal, start the engine and move the gearshift lever through all of the dipstick. ... gearshift lever in the designated areas for each gear to engage. 4. Install the dipstick making sure it with a clean, dry lint free rag. 6. Remove the dipstick and inspect the fluid level. The normal operating temperature can be in the filler tube. 7. Low fluid level Do not drive the vehicle...
Owner Guide 1st Printing
Page 218
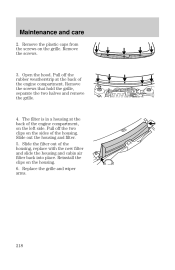
... the grille and wiper arms. 218 The filter is in a housing at the back of the engine compartment, on the grille. Pull off the rubber weatherstrip at the back of the engine compartment. Remove the screws. 3. Maintenance and care 2. Open the hood. Pull off the two clips on the... housing. 6. Remove the plastic caps from the screws on the left side. Remove the screws that hold the grille, separate the two...
... the grille and wiper arms. 218 The filter is in a housing at the back of the engine compartment, on the grille. Pull off the rubber weatherstrip at the back of the engine compartment. Remove the screws. 3. Maintenance and care 2. Open the hood. Pull off the two clips on the... housing. 6. Remove the plastic caps from the screws on the left side. Remove the screws that hold the grille, separate the two...

Owner Guide 1st Printing
Page 231
... If you hear a hissing sound, wait until it with the notches on the filler pipe. 5. Turn the engine off the engine, remove the fuel filler cap and reinstall it stops before completely removing the fuel filler cap. To install the cap, align the tabs on when you or others. 231 Turn off...Motorcraft part. The fuel system may be properly installed. Otherwise fuel may spray out and injure you start the engine, the fuel filler cap may be void for any damage to remove the cap from the fuel filler pipe. 4. The customer warranty may not be under pressure. Maintenance and ...
... If you hear a hissing sound, wait until it with the notches on the filler pipe. 5. Turn the engine off the engine, remove the fuel filler cap and reinstall it stops before completely removing the fuel filler cap. To install the cap, align the tabs on when you or others. 231 Turn off...Motorcraft part. The fuel system may be properly installed. Otherwise fuel may spray out and injure you start the engine, the fuel filler cap may be void for any damage to remove the cap from the fuel filler pipe. 4. The customer warranty may not be under pressure. Maintenance and ...

Owner Guide 1st Printing
Page 235
... about your Warranty Guide" for complete emission warranty information. 235 This decal identifies engine displacement and gives some tune up specifications. Maintenance and care Do not make any unauthorized changes to intentionally remove an emission control device or prevent it from working. By law, vehicle owners and anyone who manufactures, repairs, services...
... about your Warranty Guide" for complete emission warranty information. 235 This decal identifies engine displacement and gives some tune up specifications. Maintenance and care Do not make any unauthorized changes to intentionally remove an emission control device or prevent it from working. By law, vehicle owners and anyone who manufactures, repairs, services...

Owner Guide 1st Printing
Page 254
...* Air filter Cabin air filter Fuel filter Oil filter Battery PCV valve Crankcase ventilation filĆ ter 2.0 litre engine AZFSĆ22F # 1+2** AZFSĆ22FE # 3+4 FAĆ1612 FP4 FGĆ800A FLĆ2005... BXTĆ40R EVĆ224 FAĆ1621 2.5 litre engine AWSFĆ32F FAĆ1613 FP4 FGĆ800A FLĆ820 BXTĆ40R EVĆ152 - ...Control Information (VECI) decal for spark plug and gap specifications. ** If a spark plug is removed for examination, it must be replaced, use only spark plugs with the service part number suffix letter FE" ...
...* Air filter Cabin air filter Fuel filter Oil filter Battery PCV valve Crankcase ventilation filĆ ter 2.0 litre engine AZFSĆ22F # 1+2** AZFSĆ22FE # 3+4 FAĆ1612 FP4 FGĆ800A FLĆ2005... BXTĆ40R EVĆ224 FAĆ1621 2.5 litre engine AWSFĆ32F FAĆ1613 FP4 FGĆ800A FLĆ820 BXTĆ40R EVĆ152 - ...Control Information (VECI) decal for spark plug and gap specifications. ** If a spark plug is removed for examination, it must be replaced, use only spark plugs with the service part number suffix letter FE" ...
Owner Guide 1st Printing
Page 268
... VEHICLE Ford has many quality products available from high quality materials and meets or exceeds Ford's rigid engineering and safety specifications. Vehicle Security Remote keyless entry Styled wheel protector locks Vehicle security systems 268 For ... Ford Custom Vinyl Protectant* Ford Deluxe Leather and Vinyl Cleaner Ford Extra Strength Tar and Road Oil Remover* Ford Extra Strength Upholstery Cleaner Ford Metal Surface Cleaner Ford MultiĆPurpose Cleaner* Motorcraft Car Wash...whichever is available through your local authorized Ford, LincolnĆMercury or Ford of Canada dealer.
... VEHICLE Ford has many quality products available from high quality materials and meets or exceeds Ford's rigid engineering and safety specifications. Vehicle Security Remote keyless entry Styled wheel protector locks Vehicle security systems 268 For ... Ford Custom Vinyl Protectant* Ford Deluxe Leather and Vinyl Cleaner Ford Extra Strength Tar and Road Oil Remover* Ford Extra Strength Upholstery Cleaner Ford Metal Surface Cleaner Ford MultiĆPurpose Cleaner* Motorcraft Car Wash...whichever is available through your local authorized Ford, LincolnĆMercury or Ford of Canada dealer.


