Owner's Manual
Page 17
... must be run only on the type of the displayed values to Speed control in ˚F ˚C MILES/GAL liters/100 km or miles/gallon based L/100 km MILES km on suitable roadways where long distance speed control can be reset. Instrumentation INST ECONOMY Press SELECT until the menu displays AVG...
... must be run only on the type of the displayed values to Speed control in ˚F ˚C MILES/GAL liters/100 km or miles/gallon based L/100 km MILES km on suitable roadways where long distance speed control can be reset. Instrumentation INST ECONOMY Press SELECT until the menu displays AVG...

Owner's Manual
Page 108
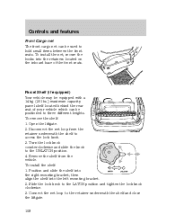
Open the liftgate. 2. Position and slide the shelf into the retainers located on the inboard base of your vehicle which can be positioned to the retainer underneath the shelf and close the liftgate. LOC 108 Remove the shelf from the retainer ...
Open the liftgate. 2. Position and slide the shelf into the retainers located on the inboard base of your vehicle which can be positioned to the retainer underneath the shelf and close the liftgate. LOC 108 Remove the shelf from the retainer ...

Owner's Manual
Page 117
Seating and safety restraints • Bucket seat (driver's side only) inboard side of seat base Use only soft cups in a collision. Hard objects can injure you in the cupholder. Adjusting 2nd row bench Pull control up to flip seatback to forward flat position. 117
Seating and safety restraints • Bucket seat (driver's side only) inboard side of seat base Use only soft cups in a collision. Hard objects can injure you in the cupholder. Adjusting 2nd row bench Pull control up to flip seatback to forward flat position. 117

Owner's Manual
Page 165
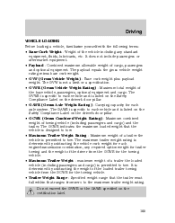
... passengers and cargo) and the trailer. Driving VEHICLE LOADING Before loading a vehicle, familiarize yourself with the following terms: • Base Curb Weight : Weight of the vehicle including any required option weight for trailer towing and the weight of the driver from the GCWR...within that the vehicle is determined by subtracting the weight of the base vehicle, passengers, optional equipment and cargo. The payload equals the gross vehicle weight rating minus base curb weight. • GVW (Gross Vehicle Weight) : Base curb weight plus payload weight. The GVW is not a limit ...
... passengers and cargo) and the trailer. Driving VEHICLE LOADING Before loading a vehicle, familiarize yourself with the following terms: • Base Curb Weight : Weight of the vehicle including any required option weight for trailer towing and the weight of the driver from the GCWR...within that the vehicle is determined by subtracting the weight of the base vehicle, passengers, optional equipment and cargo. The payload equals the gross vehicle weight rating minus base curb weight. • GVW (Gross Vehicle Weight) : Base curb weight plus payload weight. The GVW is not a limit ...
Owner's Manual
Page 208
... climate control components from the windshield surface until the wiper arm is perpendicular to the windshield surface. • Rotate the small retaining clip at the base of the wiper arm counterclockwise while holding the wiper arm. • Lift and remove the wiper arm while holding the retaining clip outward. Remove both...
... climate control components from the windshield surface until the wiper arm is perpendicular to the windshield surface. • Rotate the small retaining clip at the base of the wiper arm counterclockwise while holding the wiper arm. • Lift and remove the wiper arm while holding the retaining clip outward. Remove both...
Owner's Manual
Page 209
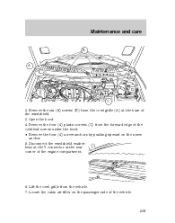
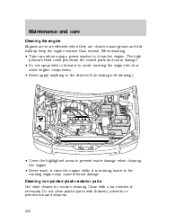
Maintenance and care B A C 2. Open the hood. 4. Lift the cowl grille from the forward edge of the vehicle. 209 Remove the six (6) screws (B) from the cowl grille (A) at the rear corner of the windshield. 3. Disconnect the windshield washer hose at the Y connector at the base of the engine compartment. 6. Locate the cabin air filter on the passenger side of the cowl leaf screen under the hood. • Remove the four (4) screw anchors by pushing upward on the screw anchor. 5. Remove the four (4) plastic screws (C) from the vehicle. 7.
Maintenance and care B A C 2. Open the hood. 4. Lift the cowl grille from the forward edge of the vehicle. 209 Remove the six (6) screws (B) from the cowl grille (A) at the rear corner of the windshield. 3. Disconnect the windshield washer hose at the Y connector at the base of the engine compartment. 6. Locate the cabin air filter on the passenger side of the cowl leaf screen under the hood. • Remove the four (4) screw anchors by pushing upward on the screw anchor. 5. Remove the four (4) plastic screws (C) from the vehicle. 7.

Owner's Manual
Page 212
...and care INFORMATION ABOUT TIRE QUALITY GRADES New vehicles are fitted with nominal rim diameters of 10 to this tire is a comparative rating based on the wear rate of Transportation requires Ford to deep tread, winter-type snow tires, space-saver or temporary use , however, ...use spare tires, tires with tires that the United States Department of Transportation-Tire quality grades: The U.S. Treadwear The treadwear grade is based on the government course as well on straight-ahead braking traction tests, and does not include acceleration, cornering, hydroplaning or peak traction ...
...and care INFORMATION ABOUT TIRE QUALITY GRADES New vehicles are fitted with nominal rim diameters of 10 to this tire is a comparative rating based on the wear rate of Transportation requires Ford to deep tread, winter-type snow tires, space-saver or temporary use , however, ...use spare tires, tires with tires that the United States Department of Transportation-Tire quality grades: The U.S. Treadwear The treadwear grade is based on the government course as well on straight-ahead braking traction tests, and does not include acceleration, cornering, hydroplaning or peak traction ...

Owner's Manual
Page 218
... the fuel filler cap. Turn the engine off the engine, remove the cap, align the cap properly and reinstall it with metallic compounds, including manganese-based compounds containing MMT. Maintenance and care When the fuel filler door is designed for any damage to minimize the possibility of using caution to the...
... the fuel filler cap. Turn the engine off the engine, remove the cap, align the cap properly and reinstall it with metallic compounds, including manganese-based compounds containing MMT. Maintenance and care When the fuel filler door is designed for any damage to minimize the possibility of using caution to the...
Owner's Manual
Page 226
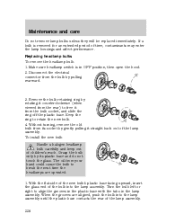
...(when viewed from your hand could cause the bulb to align the grooves in the plastic base with the tabs in OFF position, then open the hood. 2. With the flat side of the new bulb's plastic... switch is removed for an extended period of the bulb into the lamp assembly until the plastic base contacts the rear of children's reach. Grasp the bulb only by its socket by gently pulling it from its plastic... base and do not touch the glass. Keep the ring to free it straight back out of the lamp...
...(when viewed from your hand could cause the bulb to align the grooves in the plastic base with the tabs in OFF position, then open the hood. 2. With the flat side of the new bulb's plastic... switch is removed for an extended period of the bulb into the lamp assembly until the plastic base contacts the rear of children's reach. Grasp the bulb only by its socket by gently pulling it from its plastic... base and do not touch the glass. Keep the ring to free it straight back out of the lamp...

Owner's Manual
Page 227
.... 3. To complete installation, follow removal procedure in the reverse order. 227 Install the bulb retaining ring over the plastic base until you should not need to align it out of the plastic base until it snaps, locking it has a snap fit). 3. Remove bulb socket by turning it counterclockwise about 1⁄4 turn signal...
.... 3. To complete installation, follow removal procedure in the reverse order. 227 Install the bulb retaining ring over the plastic base until you should not need to align it out of the plastic base until it snaps, locking it has a snap fit). 3. Remove bulb socket by turning it counterclockwise about 1⁄4 turn signal...
Owner's Manual
Page 231
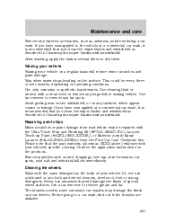
.... Remove particles such as described in some automatic car washes may be every three or four months, depending on the products. Never use acid-based or alcohol-based wheel cleaners, steel wool, fuel or strong detergents. Wax when water stops beading on your vehicle. Use cleaning fluid or alcohol with the Ultra... industrial fallout immediately. Avoid getting wax on the windshield, or on a regular basis will damage the finish of your wheels. Use only carnauba or synthetic-based waxes.
.... Remove particles such as described in some automatic car washes may be every three or four months, depending on the products. Never use acid-based or alcohol-based wheel cleaners, steel wool, fuel or strong detergents. Wax when water stops beading on your vehicle. Use cleaning fluid or alcohol with the Ultra... industrial fallout immediately. Avoid getting wax on the windshield, or on a regular basis will damage the finish of your wheels. Use only carnauba or synthetic-based waxes.
Owner's Manual
Page 232
...). • Cover the highlighted areas to clean the engine. Do not clean plastic parts with a tar remover if necessary. Clean with thinners, solvents or petroleum-based cleaners. 232 When washing: • Take care when using a power washer to prevent water damage when cleaning the engine. • Never wash or rinse the...
...). • Cover the highlighted areas to clean the engine. Do not clean plastic parts with a tar remover if necessary. Clean with thinners, solvents or petroleum-based cleaners. 232 When washing: • Take care when using a power washer to prevent water damage when cleaning the engine. • Never wash or rinse the...

Owner's Manual
Page 17
This will display your fuel economy in ˚F ˚C MILES/GAL liters/100 km or miles/gallon based L/100 km MILES km on the type of traffic you are in. Set the speed control. This procedure requires the vehicle speed control system to ...
This will display your fuel economy in ˚F ˚C MILES/GAL liters/100 km or miles/gallon based L/100 km MILES km on the type of traffic you are in. Set the speed control. This procedure requires the vehicle speed control system to ...
Owner's Manual
Page 108
... the shelf from the retainer underneath the shelf to access the lock knob. 3. Position and slide the shelf into the retainers located on the inboard base of your vehicle which can be positioned to three different heights. Controls and features Front Cargo net The front cargo net can be used to...
... the shelf from the retainer underneath the shelf to access the lock knob. 3. Position and slide the shelf into the retainers located on the inboard base of your vehicle which can be positioned to three different heights. Controls and features Front Cargo net The front cargo net can be used to...

Owner's Manual
Page 117
Seating and safety restraints • Bucket seat (driver's side only) inboard side of seat base Use only soft cups in a collision. Adjusting 2nd row bench Pull control up to flip seatback to forward flat position. 117 Hard objects can injure you in the cupholder.
Seating and safety restraints • Bucket seat (driver's side only) inboard side of seat base Use only soft cups in a collision. Adjusting 2nd row bench Pull control up to flip seatback to forward flat position. 117 Hard objects can injure you in the cupholder.
Owner's Manual
Page 165
...to each axle system. It does not include passengers or aftermarket equipment. • Payload : Combined maximum allowable weight of the base vehicle, passengers, optional equipment and cargo. The maximum trailer weight rating is specific to tow. The payload equals the gross vehicle weight... Compliance Label on the certification label. 165 Driving VEHICLE LOADING Before loading a vehicle, familiarize yourself with the following terms: • Base Curb Weight : Weight of the vehicle including any required option weight for trailer towing and the weight of the driver from zero to...
...to each axle system. It does not include passengers or aftermarket equipment. • Payload : Combined maximum allowable weight of the base vehicle, passengers, optional equipment and cargo. The maximum trailer weight rating is specific to tow. The payload equals the gross vehicle weight... Compliance Label on the certification label. 165 Driving VEHICLE LOADING Before loading a vehicle, familiarize yourself with the following terms: • Base Curb Weight : Weight of the vehicle including any required option weight for trailer towing and the weight of the driver from zero to...

Owner's Manual
Page 208
... climate control components from the windshield surface until the wiper arm is perpendicular to the windshield surface. • Rotate the small retaining clip at the base of the individual. Note the LH and RH wiper arms. 208 Remove both windshield wiper arms. • Lift the wiper arm away from particle deposits...
... climate control components from the windshield surface until the wiper arm is perpendicular to the windshield surface. • Rotate the small retaining clip at the base of the individual. Note the LH and RH wiper arms. 208 Remove both windshield wiper arms. • Lift the wiper arm away from particle deposits...

Owner's Manual
Page 209
Locate the cabin air filter on the screw anchor. 5. Open the hood. 4. Disconnect the windshield washer hose at the Y connector at the base of the cowl leaf screen under the hood. • Remove the four (4) screw anchors by pushing upward on the passenger side of the engine compartment. 6. Remove the six (6) screws (B) from the cowl grille (A) at the rear corner of the vehicle. 209 Remove the four (4) plastic screws (C) from the vehicle. 7. Maintenance and care B A C 2. Lift the cowl grille from the forward edge of the windshield. 3.
Locate the cabin air filter on the screw anchor. 5. Open the hood. 4. Disconnect the windshield washer hose at the Y connector at the base of the cowl leaf screen under the hood. • Remove the four (4) screw anchors by pushing upward on the passenger side of the engine compartment. 6. Remove the six (6) screws (B) from the cowl grille (A) at the rear corner of the vehicle. 209 Remove the four (4) plastic screws (C) from the vehicle. 7. Maintenance and care B A C 2. Lift the cowl grille from the forward edge of the windshield. 3.
Owner's Manual
Page 212
... use on wet pavement as defined in road characteristics and climate. Tire Quality Grades apply to this tire is a comparative rating based on the wear rate of the tire when tested under controlled conditions on straight-ahead braking traction tests, and does not include ...driving habits, service practices, and differences in Title 49 Code of Federal Regulations Part 575.104(c)(2). Treadwear The treadwear grade is based on specified government test surfaces of Transportation-Tire quality grades: The U.S. These Tire Quality Grades are determined by standards that have ...
... use on wet pavement as defined in road characteristics and climate. Tire Quality Grades apply to this tire is a comparative rating based on the wear rate of the tire when tested under controlled conditions on straight-ahead braking traction tests, and does not include ...driving habits, service practices, and differences in Title 49 Code of Federal Regulations Part 575.104(c)(2). Treadwear The treadwear grade is based on specified government test surfaces of Transportation-Tire quality grades: The U.S. These Tire Quality Grades are determined by standards that have ...

Owner's Manual
Page 218
... engine off the engine, remove the cap, align the cap properly and reinstall it. Carefully turn it clockwise until it with metallic compounds, including manganese-based compounds containing MMT. If the "Service Engine Soon" indicator comes on and stays on when you start the engine, the fuel filler cap may be...
... engine off the engine, remove the cap, align the cap properly and reinstall it. Carefully turn it clockwise until it with metallic compounds, including manganese-based compounds containing MMT. If the "Service Engine Soon" indicator comes on and stays on when you start the engine, the fuel filler cap may be...