
Owner Guide 1st Printing
Page 120
Maintenance and care ensure the gearshift is securely latched in P (Park). Block the wheels to prevent the vehicle from moving unexpectedly. • Manual transaxle: 1. Set the parking brake, 120 P R N D D L 2. Turn off the engine and remove the key. 3.
Maintenance and care ensure the gearshift is securely latched in P (Park). Block the wheels to prevent the vehicle from moving unexpectedly. • Manual transaxle: 1. Set the parking brake, 120 P R N D D L 2. Turn off the engine and remove the key. 3.

Owner Guide 1st Printing
Page 122
Set the parking brake, 122 Maintenance and care ensure the gearshift is running. • Manual transaxle: 1. Do not start your engine with the air cleaner removed and do not remove it while the engine is securely latched in P (Park). Block the wheels to prevent the vehicle from moving unexpectedly. P R N D D L 2.
Set the parking brake, 122 Maintenance and care ensure the gearshift is running. • Manual transaxle: 1. Do not start your engine with the air cleaner removed and do not remove it while the engine is securely latched in P (Park). Block the wheels to prevent the vehicle from moving unexpectedly. P R N D D L 2.

Owner Guide 1st Printing
Page 126
... SOHC engine ADD FULL 6. Turn the engine off and wait a few minutes for the oil to drain into the oil pan. 3. Wipe the indicator clean. Maintenance and care ENGINE OIL Checking the engine oil Check the engine oil each time you fuel your vehicle. 1. Set the parking brake and ensure the... gearshift is on level ground. 2. Make sure the vehicle is securely latched in P (automatic transaxle) or 1st (manual transaxle). 4. Insert the indicator fully, then remove it again. 126
... SOHC engine ADD FULL 6. Turn the engine off and wait a few minutes for the oil to drain into the oil pan. 3. Wipe the indicator clean. Maintenance and care ENGINE OIL Checking the engine oil Check the engine oil each time you fuel your vehicle. 1. Set the parking brake and ensure the... gearshift is on level ground. 2. Make sure the vehicle is securely latched in P (automatic transaxle) or 1st (manual transaxle). 4. Insert the indicator fully, then remove it again. 126

Owner Guide 1st Printing
Page 138
... in the filler tube. 6. The fluid level should have the fluid checked 138 20 C 65 C Checking and adding manual transmission fluid The lubricant level and quality should be removed by a qualified technician. Maintenance and care weather or pulling a trailer, the vehicle should be turned off for each gear to cool before checking...
... in the filler tube. 6. The fluid level should have the fluid checked 138 20 C 65 C Checking and adding manual transmission fluid The lubricant level and quality should be removed by a qualified technician. Maintenance and care weather or pulling a trailer, the vehicle should be turned off for each gear to cool before checking...

Owner Guide 1st Printing
Page 140
... quality of baking soda and water. Let the engine idle for at least one minute. 3. The relearning process will drive properly. To begin this process: 1. Maintenance and care neutralize the acid with a solution of your vehicle will automatically complete as you drive the vehicle. • If you are maintained by power.... Reinstall the cables when you do not allow the engine to help prevent corrosion. Put the gearshift in P (Park) (automatic transaxles) or the neutral position (manual transaxles), turn off all accessories and start the vehicle. 2.
... quality of baking soda and water. Let the engine idle for at least one minute. 3. The relearning process will drive properly. To begin this process: 1. Maintenance and care neutralize the acid with a solution of your vehicle will automatically complete as you drive the vehicle. • If you are maintained by power.... Reinstall the cables when you do not allow the engine to help prevent corrosion. Put the gearshift in P (Park) (automatic transaxles) or the neutral position (manual transaxles), turn off all accessories and start the vehicle. 2.
Owner Guide 1st Printing
Page 164
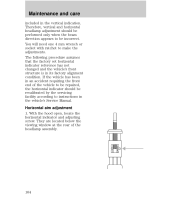
... the vehicle's front structure is in the vertical indication. If the vehicle has been in the vehicle's Service Manual. Horizontal aim adjustment 1. With the hood open, locate the horizontal indicator and adjusting screw. Maintenance and care included in its factory alignment condition. They are located below the viewing window at the rear...
... the vehicle's front structure is in the vertical indication. If the vehicle has been in the vehicle's Service Manual. Horizontal aim adjustment 1. With the hood open, locate the horizontal indicator and adjusting screw. Maintenance and care included in its factory alignment condition. They are located below the viewing window at the rear...
Owner Guide 1st Printing
Page 179
...retractor) ...51,52 extension assembly ...54 for children ...61 for second row bench seats ...70,71,75,76 lap and shoulder belts ...50 maintenance ...55 proper use ...49 warning light and chime ...11,54,55 Safety seats for children attaching with tether straps ...68 automatic locking mode ...(retractor) ...65 tether anchorage hardware ...68 Seats ...45 adjusting the seat, manual ...45 folding rear seats ...48 head restraints ...45 Servicing your vehicle ...118 precautions when servicing ...118 Sliding moon roof (see Moonroof) ...33...
...retractor) ...51,52 extension assembly ...54 for children ...61 for second row bench seats ...70,71,75,76 lap and shoulder belts ...50 maintenance ...55 proper use ...49 warning light and chime ...11,54,55 Safety seats for children attaching with tether straps ...68 automatic locking mode ...(retractor) ...65 tether anchorage hardware ...68 Seats ...45 adjusting the seat, manual ...45 folding rear seats ...48 head restraints ...45 Servicing your vehicle ...118 precautions when servicing ...118 Sliding moon roof (see Moonroof) ...33...
