1998 Mercury Tracer Hood - 1998 Mercury Tracer
Research for this Mercury vehicle

View Results Below
Free 1998 Mercury Tracer manuals!
Problems with 1998 Mercury Tracer?
Ask a Question
Other Models
Free 1998 Mercury Tracer manuals!
Problems with 1998 Mercury Tracer?
Ask a Question
Other Models
Related Manual Pages


Similar Questions


Where Is The Oil Dip Stick Located Under The Hood?
Can't find my dip stick for the oil . Where is it under the hood?
Can't find my dip stick for the oil . Where is it under the hood?
(Posted by selky62 11 years ago)

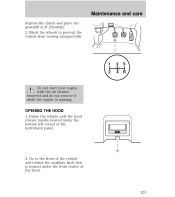
Cant Find Latch To Open Hood
trying to locate latch to open hood cant find it
trying to locate latch to open hood cant find it
(Posted by rotiss24 12 years ago)