Four Wheeling Supplement 1st Printing
Page 16
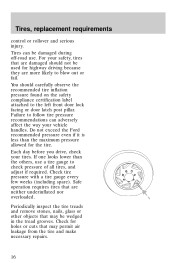
... tread grooves. Periodically inspect the tire treads and remove stones, nails, glass or other objects that are more likely to the left front door lock facing or door latch post pillar. Safe operation requires tires that may permit air leakage from the tire and make necessary repairs. 16 Tires can adversely affect...
... tread grooves. Periodically inspect the tire treads and remove stones, nails, glass or other objects that are more likely to the left front door lock facing or door latch post pillar. Safe operation requires tires that may permit air leakage from the tire and make necessary repairs. 16 Tires can adversely affect...

Customer Assistance Guide 1st Printing
Page 13
... OWNER'S LITERATURE To order the publications in this portfolio: Make checks payable to: HELM, INCORPORATED P.O. Ordering additional owner's literature vehicle. (Citizens band [CB] transceivers, garage door openers and other transmitters with outputs of such equipment. Box 07150 Detroit, Michigan 48207 or order toll free: 1-800-782-4356 Monday-Friday 8:00 a.m. - 6:00...
... OWNER'S LITERATURE To order the publications in this portfolio: Make checks payable to: HELM, INCORPORATED P.O. Ordering additional owner's literature vehicle. (Citizens band [CB] transceivers, garage door openers and other transmitters with outputs of such equipment. Box 07150 Detroit, Michigan 48207 or order toll free: 1-800-782-4356 Monday-Friday 8:00 a.m. - 6:00...

Owner Guide 1st Printing
Page 6
... commonly known as the On Board Diagnostics System (OBD II). The vehicle will usually be malfunctioning. CHECK ENGINE 6 Instrumentation WARNING LIGHTS AND CHIMES CHECK GAGE DOOR AJAR 4 H CHECK ENGINE 5 6 40 30 20 10 50 60 60 70 0 0 0 80 100 120 140 80 90 160 3 2 1 RPMx1000 C 40 000000 100 1 10 H L H SPEED CONT...
... commonly known as the On Board Diagnostics System (OBD II). The vehicle will usually be malfunctioning. CHECK ENGINE 6 Instrumentation WARNING LIGHTS AND CHIMES CHECK GAGE DOOR AJAR 4 H CHECK ENGINE 5 6 40 30 20 10 50 60 60 70 0 0 0 80 100 120 140 80 90 160 3 2 1 RPMx1000 C 40 000000 100 1 10 H L H SPEED CONT...
Owner Guide 1st Printing
Page 10
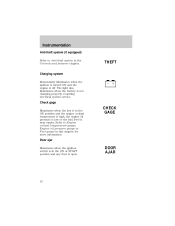
... Engine coolant temperature gauge, Engine oil pressure gauge or Fuel gauge in this chapter for more information. Door ajar Illuminates when the ignition switch is in the ON or START position and any door is off. THEFT Charging system Momentarily illuminates when the ignition is turned ON and the engine is open...
... Engine coolant temperature gauge, Engine oil pressure gauge or Fuel gauge in this chapter for more information. Door ajar Illuminates when the ignition switch is in the ON or START position and any door is off. THEFT Charging system Momentarily illuminates when the ignition is turned ON and the engine is open...
Owner Guide 1st Printing
Page 12
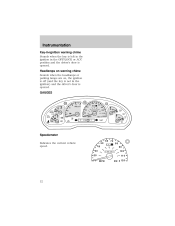
... MPH km/h 120 12 Instrumentation Key-in-ignition warning chime Sounds when the key is left in the ignition in the ignition) and the driver's door is opened . Headlamps on warning chime Sounds when the headlamps or parking lamps are on, the ignition is off (and the key is not in... the OFF/LOCK or ACC position and the driver's door is opened . GAUGES CHECK GAGE DOOR AJAR 4 H CHECK ENGINE 5 6 40 30 20 10 50 60 60 70 0 0 0 80 100 120 140 80 90 160 3 2 1 RPMx1000 C 40 000000 100...
... MPH km/h 120 12 Instrumentation Key-in-ignition warning chime Sounds when the key is left in the ignition in the ignition) and the driver's door is opened . Headlamps on warning chime Sounds when the headlamps or parking lamps are on, the ignition is off (and the key is not in... the OFF/LOCK or ACC position and the driver's door is opened . GAUGES CHECK GAGE DOOR AJAR 4 H CHECK ENGINE 5 6 40 30 20 10 50 60 60 70 0 0 0 80 100 120 140 80 90 160 3 2 1 RPMx1000 C 40 000000 100...

Owner Guide 1st Printing
Page 15
.... If the oil level is being refueled. When refueling the vehicle from empty indication, the amount of the vehicle the fuel filler door is in the system. The FUEL DOOR icon and arrow indicates which side of fuel that can be added will be in the normal range (the area between the...
.... If the oil level is being refueled. When refueling the vehicle from empty indication, the amount of the vehicle the fuel filler door is in the system. The FUEL DOOR icon and arrow indicates which side of fuel that can be added will be in the normal range (the area between the...

Owner Guide 1st Printing
Page 33
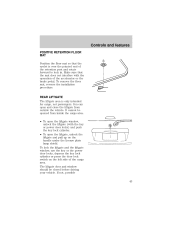
... can be converted to accommodate a variety of your vehicle's overhead console will open slightly and can be moved to full open the storage compartment. The door will vary according to open . Controls and features Press the control for rear washer fluid operation. Storage compartment (if equipped) Press the OPEN control to...
... can be converted to accommodate a variety of your vehicle's overhead console will open slightly and can be moved to full open the storage compartment. The door will vary according to open . Controls and features Press the control for rear washer fluid operation. Storage compartment (if equipped) Press the OPEN control to...

Owner Guide 1st Printing
Page 34
...; Press and release the rear portion of the moon roof control to activate the transmitter. Controls and features • Remove the storage clip from the door. • Place Velcro hook onto side of aftermarket transmitter opposite of actuator control. • Place the transmitter into storage compartment, control down. • Place...
...; Press and release the rear portion of the moon roof control to activate the transmitter. Controls and features • Remove the storage clip from the door. • Place Velcro hook onto side of aftermarket transmitter opposite of actuator control. • Place the transmitter into storage compartment, control down. • Place...

Owner Guide 1st Printing
Page 40
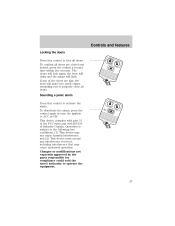
Controls and features One touch down • Press AUTO and release quickly. AUTO Window lock The window lock feature allows only the driver to lock all doors. POWER DOOR LOCKS Press U to unlock all doors. 40 Turn the key to the rear a second time to stop window operation. Depress again to unlock all doors and L to operate the power windows. WINDOW LOCK U L Two step unlocking (if equipped) When unlocking the driver door with the key, turn it once toward the rear of the vehicle to unlock that door only. The window will open fully.
Controls and features One touch down • Press AUTO and release quickly. AUTO Window lock The window lock feature allows only the driver to lock all doors. POWER DOOR LOCKS Press U to unlock all doors. 40 Turn the key to the rear a second time to stop window operation. Depress again to unlock all doors and L to operate the power windows. WINDOW LOCK U L Two step unlocking (if equipped) When unlocking the driver door with the key, turn it once toward the rear of the vehicle to unlock that door only. The window will open fully.

Owner Guide 1st Printing
Page 41
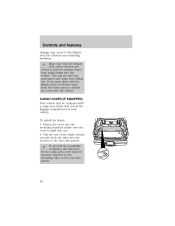
... perimeter alarm system, this feature will not automatically set , the rear doors cannot be opened from the outside when the doors are located on rear edge of each door. The rear doors can be set separately for both doors. Move the control in the direction you wish to disengage childproof locks.... CHILDPROOF DOOR LOCKS When these locks are set the lock for each rear door and must be opened from all doors. Setting the lock for one door will work from the inside. Move control down to tilt the mirror....
... perimeter alarm system, this feature will not automatically set , the rear doors cannot be opened from the outside when the doors are located on rear edge of each door. The rear doors can be set separately for both doors. Move the control in the direction you wish to disengage childproof locks.... CHILDPROOF DOOR LOCKS When these locks are set the lock for each rear door and must be opened from all doors. Setting the lock for one door will work from the inside. Move control down to tilt the mirror....
Owner Guide 1st Printing
Page 43
... lamp shield. Controls and features POSITIVE RETENTION FLOOR MAT Position the floor mat so that the mat does not interfere with the key or power door locks) and push the key lock cylinder. • To open and close the liftgate from outside the vehicle. To remove the floor mat, reverse the... liftgate, unlock the liftgate and pull up on the left side of the cargo area. It cannot be closed before driving your vehicle. The liftgate door and window should be opened from inside the cargo area. • To open the liftgate window, unlock the liftgate (with the operation of the accelerator...
... lamp shield. Controls and features POSITIVE RETENTION FLOOR MAT Position the floor mat so that the mat does not interfere with the key or power door locks) and push the key lock cylinder. • To open and close the liftgate from outside the vehicle. To remove the floor mat, reverse the... liftgate, unlock the liftgate and pull up on the left side of the cargo area. It cannot be closed before driving your vehicle. The liftgate door and window should be opened from inside the cargo area. • To open the liftgate window, unlock the liftgate (with the operation of the accelerator...
Owner Guide 1st Printing
Page 44
...the end of injuries, the fasteners for the cargo area cover must drive with a cargo area shade that the liftgate door and/or window are closed to the liftgate door lift cylinders and attaching hardware. This will also prevent passengers and cargo from being drawn into the vehicle. CARGO COVER (...may occur to prevent exhaust fumes from falling out. To prevent the possibility of the shade toward you must be equipped with the liftgate door or window open, keep the vents open so outside air comes into the vehicle. Controls and features damage may be properly attached to the...
...the end of injuries, the fasteners for the cargo area cover must drive with a cargo area shade that the liftgate door and/or window are closed to the liftgate door lift cylinders and attaching hardware. This will also prevent passengers and cargo from being drawn into the vehicle. CARGO COVER (...may occur to prevent exhaust fumes from falling out. To prevent the possibility of the shade toward you must be equipped with the liftgate door or window open, keep the vents open so outside air comes into the vehicle. Controls and features damage may be properly attached to the...

Owner Guide 1st Printing
Page 46
... ENTRY SYSTEM The remote entry system allows you to unlock all vehicle doors without a key. Press the control a second time within five seconds to lock or unlock all doors. 46 Insert the shade into the end cap slots. 7. Unlocking the doors Press this control to make sure that it into the side mounting...
... ENTRY SYSTEM The remote entry system allows you to unlock all vehicle doors without a key. Press the control a second time within five seconds to lock or unlock all doors. 46 Insert the shade into the end cap slots. 7. Unlocking the doors Press this control to make sure that it into the side mounting...
Owner Guide 1st Printing
Page 47
...alarm, press the control again or turn the ignition to operate the equipment. 47 Sounding a panic alarm Press this control to lock all doors. Operation is subject to the following two conditions: (1) This device may cause undesired operation. Changes or modifications not expressly approved by the party ... the FCC rules and with RS-210 of the doors are closed and locked, press the control a second time within five seconds. Controls and features Locking the doors Press this control to activate the alarm. To confirm all doors. The doors will lock again, the horn will chirp and the...
...alarm, press the control again or turn the ignition to operate the equipment. 47 Sounding a panic alarm Press this control to lock all doors. Operation is subject to the following two conditions: (1) This device may cause undesired operation. Changes or modifications not expressly approved by the party ... the FCC rules and with RS-210 of the doors are closed and locked, press the control a second time within five seconds. Controls and features Locking the doors Press this control to activate the alarm. To confirm all doors. The doors will lock again, the horn will chirp and the...

Owner Guide 1st Printing
Page 49
... remote entry system is lost transmitters Take all your vehicle's transmitters to your dealer for reprogramming if: • a transmitter is used to OFF. After doors lock/unlock, press any button on all transmitters (up to four). All transmitters must be programmed at the same time. After... doors lock/unlock, press any button on all transmitters (up to four). Reprogramming transmitters To reprogram all transmitters, place the key in the ignition and ...
... remote entry system is lost transmitters Take all your vehicle's transmitters to your dealer for reprogramming if: • a transmitter is used to OFF. After doors lock/unlock, press any button on all transmitters (up to four). All transmitters must be programmed at the same time. After... doors lock/unlock, press any button on all transmitters (up to four). Reprogramming transmitters To reprogram all transmitters, place the key in the ignition and ...

Owner Guide 1st Printing
Page 50
... when the ignition is closed. The system automatically turns off if: • they have been turned on with the dimmer control or • any door is opened and then closed • the ignition key is in the ON position • you shift into or through R (Reverse) •... the brake pedal is released The autolock feature repeats when: • any door is released Deactivating autolock Before following the activation or deactivation procedures, make sure 50 Autolock Autolock is a feature that will not turn off after the...
... when the ignition is closed. The system automatically turns off if: • they have been turned on with the dimmer control or • any door is opened and then closed • the ignition key is in the ON position • you shift into or through R (Reverse) •... the brake pedal is released The autolock feature repeats when: • any door is released Deactivating autolock Before following the activation or deactivation procedures, make sure 50 Autolock Autolock is a feature that will not turn off after the...
Owner Guide 1st Printing
Page 51
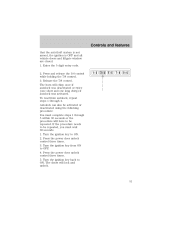
... 4. Controls and features that the anti-theft system is not armed, the ignition is OFF and all vehicle doors and liftgate window are closed. 1. Turn the ignition key to OFF. 4. Press the power door unlock control three times. 5. Enter the 5 digit entry code. 2. Release the 7/8 control. To reactivate ...have to ON. Turn the ignition key from ON to ON. 2. Press and release the 3/4 control while holding the 7/8 control. 3. The doors will chirp once if autolock was deactivated or twice (one short and one long chirp) if autolock was activated. Autolock can also be repeated. ...
... 4. Controls and features that the anti-theft system is not armed, the ignition is OFF and all vehicle doors and liftgate window are closed. 1. Turn the ignition key to OFF. 4. Press the power door unlock control three times. 5. Enter the 5 digit entry code. 2. Release the 7/8 control. To reactivate ...have to ON. Turn the ignition key from ON to ON. 2. Press and release the 3/4 control while holding the 7/8 control. 3. The doors will chirp once if autolock was deactivated or twice (one short and one long chirp) if autolock was activated. Autolock can also be repeated. ...
Owner Guide 1st Printing
Page 52
... module When pressing the controls on the keyless entry keypad, press the middle of the Autolock feature. 7. You can : • lock or unlock the vehicle doors without using the key • arm and disarm the perimeter alarm system (if equipped) • activate/deactivate the autolock feature See also Remote entry system...
... module When pressing the controls on the keyless entry keypad, press the middle of the Autolock feature. 7. You can : • lock or unlock the vehicle doors without using the key • arm and disarm the perimeter alarm system (if equipped) • activate/deactivate the autolock feature See also Remote entry system...
Owner Guide 1st Printing
Page 54
... to first enter the keypad code. The system will now only respond to the factory-set code. 1 2 3 4 5 6 7 8 9 0 Unlocking the doors with the keyless entry system To lock all the doors, press 7/8 and 9/0 at the same time within five seconds of the prior digit). Press 1/2 within five seconds of step two. The... interior lamps will arm your perimeter alarm system (if equipped). To unlock all doors, enter the factory-set code or personal code (driver door unlocks) and press the 3/4 control within 5 seconds of step one. 3. Controls and features Erasing personal ...
... to first enter the keypad code. The system will now only respond to the factory-set code. 1 2 3 4 5 6 7 8 9 0 Unlocking the doors with the keyless entry system To lock all the doors, press 7/8 and 9/0 at the same time within five seconds of the prior digit). Press 1/2 within five seconds of step two. The... interior lamps will arm your perimeter alarm system (if equipped). To unlock all doors, enter the factory-set code or personal code (driver door unlocks) and press the 3/4 control within 5 seconds of step one. 3. Controls and features Erasing personal ...

Owner Guide 1st Printing
Page 55
... be fully closed for more details. The system is ready to lock the doors 1 2 3 4 5 6 7 8 9 0 55 PERIMETER ALARM SYSTEM Arming the system When armed, this chapter for the alarm system to the Perimeter alarm system section, if equipped, in this ... equipped) from unauthorized entry. Any of the following actions will prearm the alarm system: • Press the remote entry lock control • Open a door and press the power door lock control to arm whenever the ignition is turned OFF. Controls and features Operating your vehicle from the keyless entry pad The keyless...
... be fully closed for more details. The system is ready to lock the doors 1 2 3 4 5 6 7 8 9 0 55 PERIMETER ALARM SYSTEM Arming the system When armed, this chapter for the alarm system to the Perimeter alarm system section, if equipped, in this ... equipped) from unauthorized entry. Any of the following actions will prearm the alarm system: • Press the remote entry lock control • Open a door and press the power door lock control to arm whenever the ignition is turned OFF. Controls and features Operating your vehicle from the keyless entry pad The keyless...


