
Warranty Guide 1st Printing
Page 13
...; Altitude Compensation System • Catalytic Converter • Cold Start Enrichment System • Cold Start Fuel Injector (1) • Controls for Deceleration • Distributor Assembly • Electronic Ignition System • Exhaust Pipe (Manifold to Catalyst) • Electronic Engine Control Sensors and Switches • Exhaust Gas Recirculation (EGR) Valve, Spacer, Plate and Associated Parts...
...; Altitude Compensation System • Catalytic Converter • Cold Start Enrichment System • Cold Start Fuel Injector (1) • Controls for Deceleration • Distributor Assembly • Electronic Ignition System • Exhaust Pipe (Manifold to Catalyst) • Electronic Engine Control Sensors and Switches • Exhaust Gas Recirculation (EGR) Valve, Spacer, Plate and Associated Parts...

Warranty Guide 1st Printing
Page 14
... Powertrain Control Module • Pulsed Secondary Air Injection Valve/Secondary Air Injection Pump and Associated Parts • Spark Control Components • Spark Plugs and Ignition Wires • Synchronizer Assembly • Throttle Air Control Bypass Valve • Turbocharger Assembly • TWC Air Control Valve • Volume Air Flow...; Fuel Tank (Gasoline Only) • Fuel Tank Pressure Control Valve (1) • Fuel Vapor Storage Canister, Liquid Separator and Associated Parts • Ignition Coil and/or Control Module • Intake Manifold • Intercooler Assembly -
... Powertrain Control Module • Pulsed Secondary Air Injection Valve/Secondary Air Injection Pump and Associated Parts • Spark Control Components • Spark Plugs and Ignition Wires • Synchronizer Assembly • Throttle Air Control Bypass Valve • Turbocharger Assembly • TWC Air Control Valve • Volume Air Flow...; Fuel Tank (Gasoline Only) • Fuel Tank Pressure Control Valve (1) • Fuel Vapor Storage Canister, Liquid Separator and Associated Parts • Ignition Coil and/or Control Module • Intake Manifold • Intercooler Assembly -
Warranty Guide 1st Printing
Page 17
..., neglect or improper maintenance of the following requirements: 1. In California, new motor vehicle must warrant the emission control system on your 1997-model vehicle. is defective, the part will be repaired or replaced by Ford to you including diagnosis, parts and labor. ' Manufacturers..., connectors and other state adopting both of your vehicle is registered in California, as the carburetor or fuel injection system, the ignition system, catalytic converter and the engine computer. Also included may include such parts as indicated on pages 17-18, provided there has...
..., neglect or improper maintenance of the following requirements: 1. In California, new motor vehicle must warrant the emission control system on your 1997-model vehicle. is defective, the part will be repaired or replaced by Ford to you including diagnosis, parts and labor. ' Manufacturers..., connectors and other state adopting both of your vehicle is registered in California, as the carburetor or fuel injection system, the ignition system, catalytic converter and the engine computer. Also included may include such parts as indicated on pages 17-18, provided there has...
Warranty Guide 1st Printing
Page 20
... Enrichment System • Cold Start Fuel Injector (2) • Controls for Deceleration • Distributor Assembly • Electronic Ignition System • Exhaust Pipe (Manifold to Catalyst) • Electronic Engine Control Sensors and Switches • Exhaust Gas ... Tank (Gasoline Only) • Fuel Tank Pressure Control Valve (2) • Fuel Vapor Storage Canister, Liquid Separator and Associated Parts • Ignition Coil and/or Control Module • Intake Manifold (1) • Intercooler Assembly - Engine Charger • Malfunction Indicator Lamp (MIL) System •...
... Enrichment System • Cold Start Fuel Injector (2) • Controls for Deceleration • Distributor Assembly • Electronic Ignition System • Exhaust Pipe (Manifold to Catalyst) • Electronic Engine Control Sensors and Switches • Exhaust Gas ... Tank (Gasoline Only) • Fuel Tank Pressure Control Valve (2) • Fuel Vapor Storage Canister, Liquid Separator and Associated Parts • Ignition Coil and/or Control Module • Intake Manifold (1) • Intercooler Assembly - Engine Charger • Malfunction Indicator Lamp (MIL) System •...
Owner Guide 1st Printing
Page 11
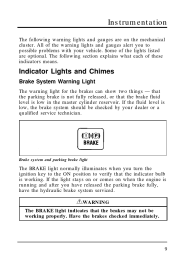
... that the brakes may not be checked by your vehicle. Brake system and parking brake light The BRAKE light normally illuminates when you turn the ignition key to the ON position to verify that the indicator bulb is running and after you to possible problems with your dealer or a qualified service...
... that the brakes may not be checked by your vehicle. Brake system and parking brake light The BRAKE light normally illuminates when you turn the ignition key to the ON position to verify that the indicator bulb is running and after you to possible problems with your dealer or a qualified service...
Owner Guide 1st Printing
Page 12
..., have your vehicle's electrical system checked immediately. Anti-Lock Brake System Warning Light (If Equipped) To check the anti-lock brake warning light, turn the ignition key to the ON position. NOTE: If a fault occurs in the anti-lock system, and the brake warning light is not lit, the anti-lock...
..., have your vehicle's electrical system checked immediately. Anti-Lock Brake System Warning Light (If Equipped) To check the anti-lock brake warning light, turn the ignition key to the ON position. NOTE: If a fault occurs in the anti-lock system, and the brake warning light is not lit, the anti-lock...
Owner Guide 1st Printing
Page 13
...bag system uses a readiness light to fasten your safety belt. s If the safety belt is not buckled when the ignition is turned to the ON position, the chime will sound for about six (6) seconds when the ignition switch is turned to the ON position. s If the safety belt is buckled before the... ignition is turned to the ON position, the chime does not sound, and the warning light will illuminate for four (4)...
...bag system uses a readiness light to fasten your safety belt. s If the safety belt is not buckled when the ignition is turned to the ON position, the chime will sound for about six (6) seconds when the ignition switch is turned to the ON position. s If the safety belt is buckled before the... ignition is turned to the ON position, the chime does not sound, and the warning light will illuminate for four (4)...
Owner Guide 1st Printing
Page 14
RWARNING If any of these things happen, even intermittently, have your Ford or Lincoln-Mercury dealer immediately. Check engine warning light This light illuminates briefly when you turn the ignition key to ON, but should turn the ignition to ON or if it will not light, or a group of the engine. Supplemental air bag...
RWARNING If any of these things happen, even intermittently, have your Ford or Lincoln-Mercury dealer immediately. Check engine warning light This light illuminates briefly when you turn the ignition key to ON, but should turn the ignition to ON or if it will not light, or a group of the engine. Supplemental air bag...
Owner Guide 1st Printing
Page 15
Charging System Light This light indicates that you turn your ignition key to have the electrical system checked as soon as possible. The light should go off when the engine starts and the alternator begins to ...
Charging System Light This light indicates that you turn your ignition key to have the electrical system checked as soon as possible. The light should go off when the engine starts and the alternator begins to ...
Owner Guide 1st Printing
Page 17
Instrumentation Door Ajar Warning Light If the ignition switch is in the ON position and any door or the liftgate is not completely closed, the light will illuminate when the speed control system ...
Instrumentation Door Ajar Warning Light If the ignition switch is in the ON position and any door or the liftgate is not completely closed, the light will illuminate when the speed control system ...
Owner Guide 1st Printing
Page 18
It may be necessary to have your dealer check the transaxle. Low Fuel Light The low fuel light illuminates when the fuel sensor indicates approximately 1/8 of a tank. It will remain illuminated until the tank is turned to ON, it means the transaxle control unit received an improper signal the last time the vehicle was operated. Low fuel light 16 Overdrive off indicator light If the light flashes for about 8 seconds when the ignition is filled with enough fuel to pass the 1/8 full level.
It may be necessary to have your dealer check the transaxle. Low Fuel Light The low fuel light illuminates when the fuel sensor indicates approximately 1/8 of a tank. It will remain illuminated until the tank is turned to ON, it means the transaxle control unit received an improper signal the last time the vehicle was operated. Low fuel light 16 Overdrive off indicator light If the light flashes for about 8 seconds when the ignition is filled with enough fuel to pass the 1/8 full level.
Owner Guide 1st Printing
Page 19
... will remain illuminated when the washer fluid sensor indicates that the washer fluid level is in the ignition. 17 Low washer fluid light High Beam Light This light illuminates when the headlamps are on. Ignition Key Chime The chime will sound if you flash the lights. High beam light "Headlamps On" Alert... to high beam or when you open the driver's door while the key is low. Never leave your vehicle unattended with the key in the ignition.
... will remain illuminated when the washer fluid sensor indicates that the washer fluid level is in the ignition. 17 Low washer fluid light High Beam Light This light illuminates when the headlamps are on. Ignition Key Chime The chime will sound if you flash the lights. High beam light "Headlamps On" Alert... to high beam or when you open the driver's door while the key is low. Never leave your vehicle unattended with the key in the ignition.
Owner Guide 1st Printing
Page 20
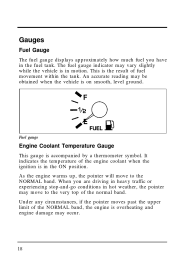
It indicates the temperature of the engine coolant when the ignition is overheating and engine damage may occur. 18 Under any circumstances, if the pointer moves past the upper limit of the NORMAL band, the engine ...
It indicates the temperature of the engine coolant when the ignition is overheating and engine damage may occur. 18 Under any circumstances, if the pointer moves past the upper limit of the NORMAL band, the engine ...
Owner Guide 1st Printing
Page 30
... button until the menu displays TO EMPTY. TO EMPTY The Distance to empty until you fill the fuel tank. 28 To ensure accuracy, turn the ignition to reset the fuel computer. To display the average fuel economy: 1.
... button until the menu displays TO EMPTY. TO EMPTY The Distance to empty until you fill the fuel tank. 28 To ensure accuracy, turn the ignition to reset the fuel computer. To display the average fuel economy: 1.
Owner Guide 1st Printing
Page 35
... will remain in the position it off. These functions are four ways for you can set above a certain listening level when the ignition switch is turned off, when the ignition switch is turned back on . You can manually locate the station by using the "TUNE" function, "SEEK" to the station, "SCAN" to...
... will remain in the position it off. These functions are four ways for you can set above a certain listening level when the ignition switch is turned off, when the ignition switch is turned back on . You can manually locate the station by using the "TUNE" function, "SEEK" to the station, "SCAN" to...
Owner Guide 1st Printing
Page 40
..., push the right (a) side of the tape can be selected anytime by pressing the "SIDE 1-2" button. Using the "SEEK" function with radio power (and/or ignition) on each tape selection for a five-second sampling. Using the "SCAN" button to scan cassette selections Press the "SCAN" button to enter the scan mode...
..., push the right (a) side of the tape can be selected anytime by pressing the "SIDE 1-2" button. Using the "SEEK" function with radio power (and/or ignition) on each tape selection for a five-second sampling. Using the "SCAN" button to scan cassette selections Press the "SCAN" button to enter the scan mode...
Owner Guide 1st Printing
Page 42
... maintain the best playback sound and proper tape operation. How to advance the minutes. NOTE: The clock displays 12-hour time with no A.M./P.M. Turn the ignition on or off). 2. s If a tape is loose inside the cassette, tighten it before changing back to the clock mode. Press and hold in the display...
... maintain the best playback sound and proper tape operation. How to advance the minutes. NOTE: The clock displays 12-hour time with no A.M./P.M. Turn the ignition on or off). 2. s If a tape is loose inside the cassette, tighten it before changing back to the clock mode. Press and hold in the display...
Owner Guide 1st Printing
Page 43
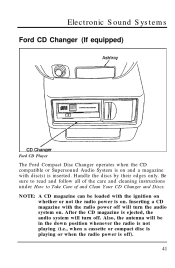
... whenever the radio is not playing (i.e., when a cassette or compact disc is playing or when the radio power is off . Inserting a CD magazine with the ignition on whether or not the radio power is on. Also, the antenna will turn off ). 41 Be sure to read and follow all of the...
... whenever the radio is not playing (i.e., when a cassette or compact disc is playing or when the radio power is off . Inserting a CD magazine with the ignition on whether or not the radio power is on. Also, the antenna will turn off ). 41 Be sure to read and follow all of the...
Owner Guide 1st Printing
Page 44
... there is set to the ON or ACCESSORY position, the CD changer will resume playing in the mode (radio/tape/CD) it was in when ignition was turned off. 42 For the remainder of the next disc and resumes playing. Insert the magazine into the magazine opening. Indicators for track 2). These...
... there is set to the ON or ACCESSORY position, the CD changer will resume playing in the mode (radio/tape/CD) it was in when ignition was turned off. 42 For the remainder of the next disc and resumes playing. Insert the magazine into the magazine opening. Indicators for track 2). These...
Owner Guide 1st Printing
Page 69
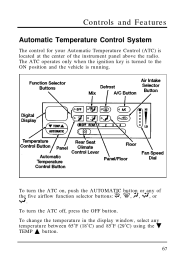
... button or any temperature between 65˚F (18˚C) and 85˚F (29˚C) using the d TEMP c button. 67 The ATC operates only when the ignition key is turned to the ON position and the vehicle is located at the center of the five airflow function selector buttons: P, V, Q, S, or R. To change...
... button or any temperature between 65˚F (18˚C) and 85˚F (29˚C) using the d TEMP c button. 67 The ATC operates only when the ignition key is turned to the ON position and the vehicle is located at the center of the five airflow function selector buttons: P, V, Q, S, or R. To change...
