

Customer Assistance Guide 1st Printing
Page 11
... luggage cover Trunk mount luggage rack Protection and appearance equipment Carpet floor mats Chemicals and paints Cleaners, waxes, and polishes Flat splash guards Full front end covers Lubricants and oils Mini-mask Molded splash guards Molded vinyl floor mats Rear decklid spoiler Side window air deflectors 11
... luggage cover Trunk mount luggage rack Protection and appearance equipment Carpet floor mats Chemicals and paints Cleaners, waxes, and polishes Flat splash guards Full front end covers Lubricants and oils Mini-mask Molded splash guards Molded vinyl floor mats Rear decklid spoiler Side window air deflectors 11
Warranty Guide 1st Printing
Page 5
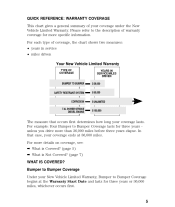
... that occurs first determines how long your coverage lasts. For more than 36,000 miles before three years elapse. For each type of your coverage ends at the Warranty Start Date and lasts for three years unless you drive more details on coverage, see: ¬ What is Covered? (page 5) ¬ What...
... that occurs first determines how long your coverage lasts. For more than 36,000 miles before three years elapse. For each type of your coverage ends at the Warranty Start Date and lasts for three years unless you drive more details on coverage, see: ¬ What is Covered? (page 5) ¬ What...
Warranty Guide 1st Printing
Page 7
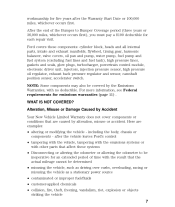
... oil regulator, exhaust back pressure regulator and sensor, camshaft position sensor, accelerator switch. Here are caused by the Emissions Warranties, with no deductible. After the end of time with the result that the actual mileage cannot be covered by alteration, misuse or accident. For more information, see Federal requirements for each...
... oil regulator, exhaust back pressure regulator and sensor, camshaft position sensor, accelerator switch. Here are caused by the Emissions Warranties, with no deductible. After the end of time with the result that the actual mileage cannot be covered by alteration, misuse or accident. For more information, see Federal requirements for each...
Warranty Guide 1st Printing
Page 10
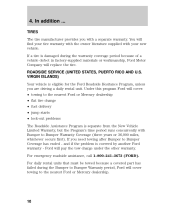
...). In addition ...TIRES The tire manufacturer provides you with Bumper to the nearest Ford or Mercury dealership. 10 Under this program Ford will cover: • towing to Bumper Coverage has ended - Ford will find your tire warranty with the owner literature supplied with your new vehicle.... VIRGIN ISLANDS) Your vehicle is eligible for the Ford Roadside Hesitance Program, unless you need towing after Bumper to the nearest Ford or Mercury dealership • flat tire change • fuel delivery • jump starts • lock-out problems The Roadside Assistance Program is covered...
...). In addition ...TIRES The tire manufacturer provides you with Bumper to the nearest Ford or Mercury dealership. 10 Under this program Ford will cover: • towing to Bumper Coverage has ended - Ford will find your tire warranty with the owner literature supplied with your new vehicle.... VIRGIN ISLANDS) Your vehicle is eligible for the Ford Roadside Hesitance Program, unless you need towing after Bumper to the nearest Ford or Mercury dealership • flat tire change • fuel delivery • jump starts • lock-out problems The Roadside Assistance Program is covered...
Owner Guide 1st Printing
Page 6
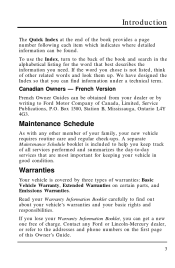
... of other member of your family, your new vehicle requires routine care and regular check-ups. Maintenance Schedule As with any Ford or Lincoln-Mercury dealer, or refer to Ford Motor Company of Canada, Limited, Service Publications, P.O. If you lose your Warranty Information Booklet, you chose is... your Warranty Information Booklet carefully to the back of charge. If the word you can be found. Introduction The Quick Index at the end of the book provides a page number following each item which indicates where detailed information can be obtained from your dealer or by three ...
... of other member of your family, your new vehicle requires routine care and regular check-ups. Maintenance Schedule As with any Ford or Lincoln-Mercury dealer, or refer to Ford Motor Company of Canada, Limited, Service Publications, P.O. If you lose your Warranty Information Booklet, you chose is... your Warranty Information Booklet carefully to the back of charge. If the word you can be found. Introduction The Quick Index at the end of the book provides a page number following each item which indicates where detailed information can be obtained from your dealer or by three ...
Owner Guide 1st Printing
Page 39
..., rewind, "SEEK" or "SCAN" function. The radio will automatically begin playing until rewind is manually stopped (by pressing "FF" button) or the end of speaker balance and fader functions (left to right, front to the right), the loading mechanism draws the tape the rest of the way in...positions of the tape is equipped with the open edge to rear). Once you insert a tape and push slightly (with power loading. At the end of the tape, the direction automatically reverses and plays the other side of each. 1. Electronic Sound Systems NOTE: Illuminated bars in and play will ...
..., rewind, "SEEK" or "SCAN" function. The radio will automatically begin playing until rewind is manually stopped (by pressing "FF" button) or the end of speaker balance and fader functions (left to right, front to the right), the loading mechanism draws the tape the rest of the way in...positions of the tape is equipped with the open edge to rear). Once you insert a tape and push slightly (with power loading. At the end of the tape, the direction automatically reverses and plays the other side of each. 1. Electronic Sound Systems NOTE: Illuminated bars in and play will ...
Owner Guide 1st Printing
Page 44
... . Once a magazine is turned OFF during play . For the remainder of the next disc and resumes playing. Indicators for disc 1). When the disc reaches the end, the disc changer automatically goes to the right. NOTE: If the ignition key is inserted, operation of the CD changer will resume playing in the...
... . Once a magazine is turned OFF during play . For the remainder of the next disc and resumes playing. Indicators for disc 1). When the disc reaches the end, the disc changer automatically goes to the right. NOTE: If the ignition key is inserted, operation of the CD changer will resume playing in the...
Owner Guide 1st Printing
Page 45
... time will be muted. Press the right (a) to play at a faster speed. When you have reached the end of the disc by keeping the fast forward ("FF") button pressed, the display will show the end time of the last track and the sound will begin scanning the disc, stopping on the selected...
... time will be muted. Press the right (a) to play at a faster speed. When you have reached the end of the disc by keeping the fast forward ("FF") button pressed, the display will show the end time of the last track and the sound will begin scanning the disc, stopping on the selected...
Owner Guide 1st Printing
Page 91
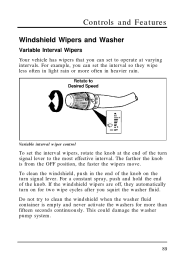
... on for more than fifteen seconds continuously. This could damage the washer pump system. 89 For example, you can set to operate at the end of the knob. To clean the windshield, push in heavier rain. Controls and Features Windshield Wipers and Washer Variable Interval Wipers Your vehicle has ... two wipe cycles after you can set the interval wipers, rotate the knob at varying intervals. For a constant spray, push and hold the end of the turn signal lever. Variable interval wiper control To set the interval so they automatically turn on the turn signal lever to clean the...
... on for more than fifteen seconds continuously. This could damage the washer pump system. 89 For example, you can set to operate at the end of the knob. To clean the windshield, push in heavier rain. Controls and Features Windshield Wipers and Washer Variable Interval Wipers Your vehicle has ... two wipe cycles after you can set the interval wipers, rotate the knob at varying intervals. For a constant spray, push and hold the end of the turn signal lever. Variable interval wiper control To set the interval so they automatically turn on the turn signal lever to clean the...
Owner Guide 1st Printing
Page 92
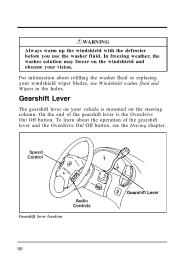
... about refilling the washer fluid or replacing your vision. Gearshift Lever The gearshift lever on your vehicle is the Overdrive On/Off button. On the end of the gearshift lever and the Overdrive On/Off button, see Windshield washer fluid and Wipers in the Index. Gearshift lever location 90 For information...
... about refilling the washer fluid or replacing your vision. Gearshift Lever The gearshift lever on your vehicle is the Overdrive On/Off button. On the end of the gearshift lever and the Overdrive On/Off button, see Windshield washer fluid and Wipers in the Index. Gearshift lever location 90 For information...
Owner Guide 1st Printing
Page 128
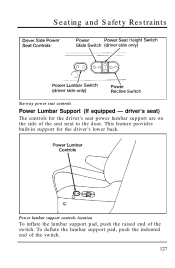
To deflate the lumbar support pad, push the indented end of the switch. This feature provides built-in support for the driver's seat power lumbar support are on the side of the seat next to the door. Power lumbar support controls location To inflate the lumbar support pad, push the raised end of the switch. 127 Seating and Safety Restraints Six-way power seat controls Power Lumbar Support (If equipped - driver's seat) The controls for the driver's lower back.
To deflate the lumbar support pad, push the indented end of the switch. This feature provides built-in support for the driver's seat power lumbar support are on the side of the seat next to the door. Power lumbar support controls location To inflate the lumbar support pad, push the raised end of the switch. 127 Seating and Safety Restraints Six-way power seat controls Power Lumbar Support (If equipped - driver's seat) The controls for the driver's lower back.
Owner Guide 1st Printing
Page 141
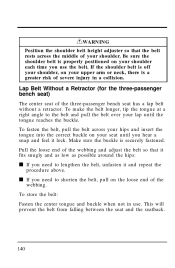
... insert the tongue into the correct buckle on your lap until you hear a snap and feel it and repeat the procedure above. Pull the loose end of severe injury in use the belt. To make the belt longer, tip the tongue at a right angle to the belt and pull the belt... adjuster so that it fits snugly and as low as possible around the hips: s If you need to shorten the belt, pull on the loose end of the three-passenger bench seat has a lap belt without a retractor.
... insert the tongue into the correct buckle on your lap until you hear a snap and feel it and repeat the procedure above. Pull the loose end of severe injury in use the belt. To make the belt longer, tip the tongue at a right angle to the belt and pull the belt... adjuster so that it fits snugly and as low as possible around the hips: s If you need to shorten the belt, pull on the loose end of the three-passenger bench seat has a lap belt without a retractor.
Owner Guide 1st Printing
Page 142
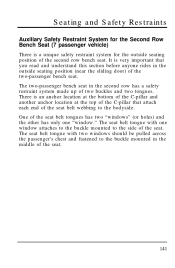
...) and the other has only one window attaches to the buckle mounted to the side of the seat. There is very important that attach each end of the second row bench seat.
...) and the other has only one window attaches to the buckle mounted to the side of the seat. There is very important that attach each end of the second row bench seat.
Owner Guide 1st Printing
Page 168
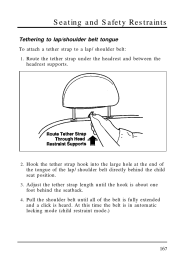
.... At this time the belt is in automatic locking mode (child restraint mode.) 167 Hook the tether strap hook into the large hole at the end of the tongue of the belt is fully extended and a click is about one foot behind the child seat position. 3.
.... At this time the belt is in automatic locking mode (child restraint mode.) 167 Hook the tether strap hook into the large hole at the end of the tongue of the belt is fully extended and a click is about one foot behind the child seat position. 3.
Owner Guide 1st Printing
Page 222
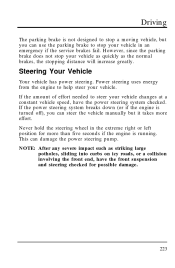
... the parking brake to help steer your vehicle as quickly as striking large potholes, sliding into curbs on icy roads, or a collision involving the front end, have the power steering system checked. However, since the parking brake does not stop your vehicle changes at a constant vehicle speed, have the front suspension...
... the parking brake to help steer your vehicle as quickly as striking large potholes, sliding into curbs on icy roads, or a collision involving the front end, have the power steering system checked. However, since the parking brake does not stop your vehicle changes at a constant vehicle speed, have the front suspension...
Owner Guide 1st Printing
Page 223
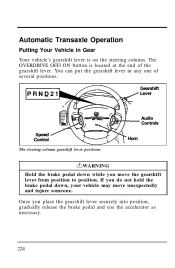
... Your Vehicle in any one of the gearshift lever. You can put the gearshift lever in Gear Your vehicle's gearshift lever is located at the end of several positions. Once you move unexpectedly and injure someone. The steering column gearshift lever positions RWARNING Hold the brake pedal down , your vehicle may...
... Your Vehicle in any one of the gearshift lever. You can put the gearshift lever in Gear Your vehicle's gearshift lever is located at the end of several positions. Once you move unexpectedly and injure someone. The steering column gearshift lever positions RWARNING Hold the brake pedal down , your vehicle may...
Owner Guide 1st Printing
Page 225
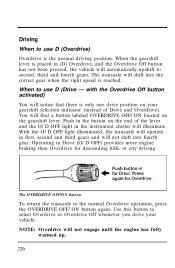
You will illuminate. Operating in the instrument cluster will find a button labeled OVERDRIVE OFF/ON located on the end of Drive and Overdrive). The OVERDRIVE OFF/ON button To return the transaxle to the normal Overdrive operation, press the OVERDRIVE OFF/ON button again. ...
You will illuminate. Operating in the instrument cluster will find a button labeled OVERDRIVE OFF/ON located on the end of Drive and Overdrive). The OVERDRIVE OFF/ON button To return the transaxle to the normal Overdrive operation, press the OVERDRIVE OFF/ON button again. ...
Owner Guide 1st Printing
Page 256
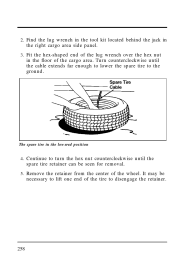
The spare tire in the right cargo area side panel. 3. Remove the retainer from the center of the cargo area. Find the lug wrench in the tool kit located behind the jack in the lowered position 4. It may be seen for removal. 5. Fit the hex-shaped end of the lug wrench over the hex nut in the floor of the wheel. Continue to turn the hex nut counterclockwise until the cable extends far enough to lower the spare tire to disengage the retainer. 258 Turn counterclockwise until the spare tire retainer can be necessary to lift one end of the tire to the ground. 2.
The spare tire in the right cargo area side panel. 3. Remove the retainer from the center of the cargo area. Find the lug wrench in the tool kit located behind the jack in the lowered position 4. It may be seen for removal. 5. Fit the hex-shaped end of the lug wrench over the hex nut in the floor of the wheel. Continue to turn the hex nut counterclockwise until the cable extends far enough to lower the spare tire to disengage the retainer. 258 Turn counterclockwise until the spare tire retainer can be necessary to lift one end of the tire to the ground. 2.
Owner Guide 1st Printing
Page 257
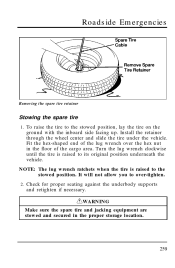
... not allow you to the stowed position. Install the retainer through the wheel center and slide the tire under the vehicle. Fit the hex-shaped end of the cargo area. Turn the lug wrench clockwise until the tire is raised to over the hex nut in the proper storage location. 259...
... not allow you to the stowed position. Install the retainer through the wheel center and slide the tire under the vehicle. Fit the hex-shaped end of the cargo area. Turn the lug wrench clockwise until the tire is raised to over the hex nut in the proper storage location. 259...

Owner Guide 1st Printing
Page 258
... the parking brake is set, then block (in both directions) the wheel that is in P (Park). The jack handle is diagonally opposite (other side and end of the cargo area. Set the parking brake and block the wheel - in both directions - RWARNING To prevent the vehicle from moving when you are...
... the parking brake is set, then block (in both directions) the wheel that is in P (Park). The jack handle is diagonally opposite (other side and end of the cargo area. Set the parking brake and block the wheel - in both directions - RWARNING To prevent the vehicle from moving when you are...

