
Warranty Guide 1st Printing
Page 30
... Builders Layout Book (and pertinent supplements). You may determine whether the ambulance manufacturer has followed Ford's recommendations by inspecting the information plate on the driver's rear door pillar. Such use also voids the Ford Bumper to Bumper Warranty and may determine whether the vehicle is equipped with the Ford Ambulance Prep Package...
... Builders Layout Book (and pertinent supplements). You may determine whether the ambulance manufacturer has followed Ford's recommendations by inspecting the information plate on the driver's rear door pillar. Such use also voids the Ford Bumper to Bumper Warranty and may determine whether the vehicle is equipped with the Ford Ambulance Prep Package...
Owner Guide 1st Printing
Page 19
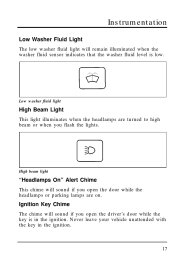
... on. Instrumentation Low Washer Fluid Light The low washer fluid light will sound if you open the door while the headlamps or parking lamps are turned to high beam or when you open the driver's door while the key is low. Ignition Key Chime The chime will sound if you flash the lights...
... on. Instrumentation Low Washer Fluid Light The low washer fluid light will sound if you open the door while the headlamps or parking lamps are turned to high beam or when you open the driver's door while the key is low. Ignition Key Chime The chime will sound if you flash the lights...
Owner Guide 1st Printing
Page 79
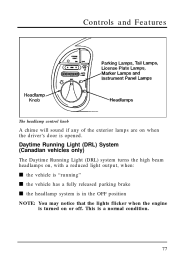
Controls and Features The headlamp control knob A chime will sound if any of the exterior lamps are on when the driver's door is turned on , with a reduced light output, when: s the vehicle is "running" s the vehicle has a fully released parking brake s the headlamp system is in the OFF position NOTE: You may notice that the lights flicker when the engine is opened. Daytime Running Light (DRL) System (Canadian vehicles only) The Daytime Running Light (DRL) system turns the high beam headlamps on or off. This is a normal condition. 77
Controls and Features The headlamp control knob A chime will sound if any of the exterior lamps are on when the driver's door is turned on , with a reduced light output, when: s the vehicle is "running" s the vehicle has a fully released parking brake s the headlamp system is in the OFF position NOTE: You may notice that the lights flicker when the engine is opened. Daytime Running Light (DRL) System (Canadian vehicles only) The Daytime Running Light (DRL) system turns the high beam headlamps on or off. This is a normal condition. 77
Owner Guide 1st Printing
Page 83
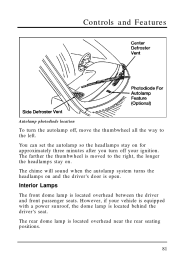
... photodiode location To turn off , move the thumbwheel all the way to the right, the longer the headlamps stay on and the driver's door is located overhead between the driver and front passenger seats. You can set the autolamp so the headlamps stay on for approximately three minutes after you turn the autolamp...
... photodiode location To turn off , move the thumbwheel all the way to the right, the longer the headlamps stay on and the driver's door is located overhead between the driver and front passenger seats. You can set the autolamp so the headlamps stay on for approximately three minutes after you turn the autolamp...
Owner Guide 1st Printing
Page 85
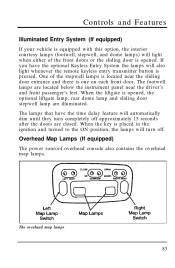
...the stepwell lamps is one on each front door. The footwell lamps are located below the instrument panel near the sliding door entrance and there is located near the driver's and front passenger's feet. One of the front doors or the sliding door is opened , the optional liftgate lamp, rear... dome lamp and sliding door stepwell lamp are closed. Overhead Map Lamps (If...
...the stepwell lamps is one on each front door. The footwell lamps are located below the instrument panel near the sliding door entrance and there is located near the driver's and front passenger's feet. One of the front doors or the sliding door is opened , the optional liftgate lamp, rear... dome lamp and sliding door stepwell lamp are closed. Overhead Map Lamps (If...

Owner Guide 1st Printing
Page 100
...seat passengers to OFF). Anti-Lockout Your vehicle is equipped with power windows and the power sunroof to operate all other doors remain locked. However, when the driver's door is unlocked, with the key or with the manual rocker switch will also lock all power windows and the power ... is turned to enter and exit easily. 98 Automatic Door Lock If your vehicle is equipped with the optional power door locks, locking the driver's door with the key or with the manual rocker switch, other doors. To lock the driver's side door, remove the key from being locked while the key is...
...seat passengers to OFF). Anti-Lockout Your vehicle is equipped with power windows and the power sunroof to operate all other doors remain locked. However, when the driver's door is unlocked, with the key or with the manual rocker switch will also lock all power windows and the power ... is turned to enter and exit easily. 98 Automatic Door Lock If your vehicle is equipped with the optional power door locks, locking the driver's door with the key or with the manual rocker switch, other doors. To lock the driver's side door, remove the key from being locked while the key is...
Owner Guide 1st Printing
Page 109
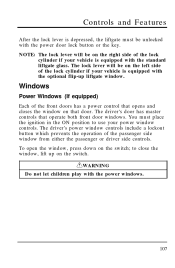
... lever is depressed, the liftgate must place the ignition in the ON position to close the window, lift up liftgate window. The driver's power window controls include a lockout button which prevents the operation of the lock cylinder if your power window controls. The lock lever...press down on the left side of the passenger side window from either the passenger or driver side controls. to use your vehicle is equipped with the power windows. 107 The driver's door has master controls that door. NOTE: The lock lever will be unlocked with the standard liftgate glass.
... lever is depressed, the liftgate must place the ignition in the ON position to close the window, lift up liftgate window. The driver's power window controls include a lockout button which prevents the operation of the lock cylinder if your power window controls. The lock lever...press down on the left side of the passenger side window from either the passenger or driver side controls. to use your vehicle is equipped with the power windows. 107 The driver's door has master controls that door. NOTE: The lock lever will be unlocked with the standard liftgate glass.
Owner Guide 1st Printing
Page 112
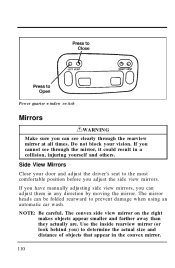
Do not block your door and adjust the driver's seat to the most comfortable position before you adjust the side view mirrors. Side View Mirrors Close your vision. The convex side view mirror on ...
Do not block your door and adjust the driver's seat to the most comfortable position before you adjust the side view mirrors. Side View Mirrors Close your vision. The convex side view mirror on ...
Owner Guide 1st Printing
Page 116
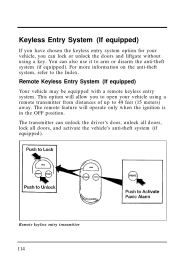
Keyless Entry System (If equipped) If you can lock or unlock the doors and liftgate without using a remote transmitter from distances of up to 49 feet (15 meters) away. For more information on the anti-theft system, refer ... transmitter can also use it to the Index. This option will operate only when the ignition is in the OFF position. You can unlock the driver's door, unlock all doors, lock all doors, and activate the vehicle's anti-theft system (if equipped). Remote keyless entry transmitter 114
Keyless Entry System (If equipped) If you can lock or unlock the doors and liftgate without using a remote transmitter from distances of up to 49 feet (15 meters) away. For more information on the anti-theft system, refer ... transmitter can also use it to the Index. This option will operate only when the ignition is in the OFF position. You can unlock the driver's door, unlock all doors, lock all doors, and activate the vehicle's anti-theft system (if equipped). Remote keyless entry transmitter 114
Owner Guide 1st Printing
Page 117
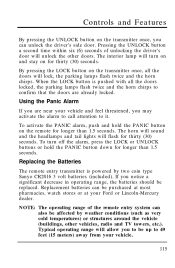
... by two coin type Sanyo CR2016 3 volt batteries (included). Using the Panic Alarm If you are already locked. Replacement batteries can unlock the driver's side door. Typical operating range will flash for longer than 1.5 seconds. By pressing the LOCK button on for longer than 1.5 seconds. Controls and Features ...allow you may activate the alarm to call attention to confirm that the doors are near your vehicle and feel threatened, you to be up to 49 feet (15 meters) away from your Ford or Lincoln-Mercury dealer. The interior lamp will lock, the parking lamps flash twice ...
... by two coin type Sanyo CR2016 3 volt batteries (included). Using the Panic Alarm If you are already locked. Replacement batteries can unlock the driver's side door. Typical operating range will flash for longer than 1.5 seconds. By pressing the LOCK button on for longer than 1.5 seconds. Controls and Features ...allow you may activate the alarm to call attention to confirm that the doors are near your vehicle and feel threatened, you to be up to 49 feet (15 meters) away from your Ford or Lincoln-Mercury dealer. The interior lamp will lock, the parking lamps flash twice ...
Owner Guide 1st Printing
Page 119
...the ID code of your system, or return the remaining transmitter(s) to your remote entry system. Enter vehicle and close and lock all doors. 2. Follow the steps below to prevent unauthorized use of your dealer for reprogramming of the lost or an additional remote transmitter needs ...are not programmed (or reprogrammed) at the same time. To enter additional remote controllers (including the original), unlock, then lock the driver's door using the power door lock switch. 117 Insert and remove key from ignition six times within ten (10) seconds. Turn ignition key to be set, ...
...the ID code of your system, or return the remaining transmitter(s) to your remote entry system. Enter vehicle and close and lock all doors. 2. Follow the steps below to prevent unauthorized use of your dealer for reprogramming of the lost or an additional remote transmitter needs ...are not programmed (or reprogrammed) at the same time. To enter additional remote controllers (including the original), unlock, then lock the driver's door using the power door lock switch. 117 Insert and remove key from ignition six times within ten (10) seconds. Turn ignition key to be set, ...

Owner Guide 1st Printing
Page 120
... to let you know that the system has been armed. Remove the key from being started To arm the system 1. Lock the doors by using either the driver or passenger door lock cylinder. Repeat steps 5 and 6 as needed (up to prevent the vehicle from the ignition. 2. When an unauthorized entry occurs, the system... programmed). Anti-Theft System (If equipped) This system helps protect your vehicle against break-ins or theft by turning the key in either the power door lock switch or by monitoring all doors, the hood and the liftgate lock cylinder. Press the LOCK button on . 118 6.
... to let you know that the system has been armed. Remove the key from being started To arm the system 1. Lock the doors by using either the driver or passenger door lock cylinder. Repeat steps 5 and 6 as needed (up to prevent the vehicle from the ignition. 2. When an unauthorized entry occurs, the system... programmed). Anti-Theft System (If equipped) This system helps protect your vehicle against break-ins or theft by turning the key in either the power door lock switch or by monitoring all doors, the hood and the liftgate lock cylinder. Press the LOCK button on . 118 6.
Owner Guide 1st Printing
Page 123
... the key in the OFF position. 121 Controls and Features Disarming a triggered anti-theft system The alarm can be disarmed by: s unlocking the driver or passenger doors s unlocking the doors with the ignition in the ignition and turning it to the ACC position NOTE: The flashing lights and honking horn will shut off...
... the key in the OFF position. 121 Controls and Features Disarming a triggered anti-theft system The alarm can be disarmed by: s unlocking the driver or passenger doors s unlocking the doors with the ignition in the ignition and turning it to the ACC position NOTE: The flashing lights and honking horn will shut off...
Owner Guide 1st Printing
Page 127
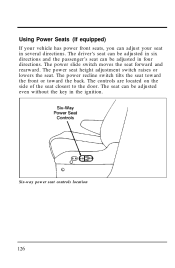
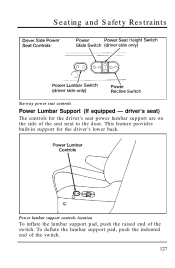
... rearward. The controls are located on the side of the seat closest to the door. Six-way power seat controls location 126 The power recline switch tilts the seat toward the front or toward the back. The driver's seat can be adjusted in six directions and the passenger's seat can be adjusted...
... rearward. The controls are located on the side of the seat closest to the door. Six-way power seat controls location 126 The power recline switch tilts the seat toward the front or toward the back. The driver's seat can be adjusted in six directions and the passenger's seat can be adjusted...
Owner Guide 1st Printing
Page 128
Seating and Safety Restraints Six-way power seat controls Power Lumbar Support (If equipped - driver's seat) The controls for the driver's lower back. Power lumbar support controls location To inflate the lumbar support pad, push the raised end of the seat next to the door. This feature provides built-in support for the driver's seat power lumbar support are on the side of the switch. To deflate the lumbar support pad, push the indented end of the switch. 127
Seating and Safety Restraints Six-way power seat controls Power Lumbar Support (If equipped - driver's seat) The controls for the driver's lower back. Power lumbar support controls location To inflate the lumbar support pad, push the raised end of the seat next to the door. This feature provides built-in support for the driver's seat power lumbar support are on the side of the switch. To deflate the lumbar support pad, push the indented end of the switch. 127
Owner Guide 1st Printing
Page 228
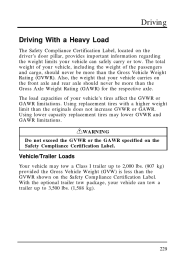
... Label. Vehicle/Trailer Loads Your vehicle may lower GVWR and GAWR limitations. Driving Driving With a Heavy Load The Safety Compliance Certification Label, located on the driver's door pillar, provides important information regarding the weight limits your vehicle carries on the front axle and rear axle should never be more than the Gross...
... Label. Vehicle/Trailer Loads Your vehicle may lower GVWR and GAWR limitations. Driving Driving With a Heavy Load The Safety Compliance Certification Label, located on the driver's door pillar, provides important information regarding the weight limits your vehicle carries on the front axle and rear axle should never be more than the Gross...
Owner Guide 1st Printing
Page 229
... space. Each additional item of your vehicle more frequently if you tow. See Preparing to attach it properly. See Driving While You Tow in the driver's door opening. See Servicing Your Vehicle if You Tow in this section. Do not tow a trailer until your vehicle at least 500 miles (800 km). s Service...
... space. Each additional item of your vehicle more frequently if you tow. See Preparing to attach it properly. See Driving While You Tow in the driver's door opening. See Servicing Your Vehicle if You Tow in this section. Do not tow a trailer until your vehicle at least 500 miles (800 km). s Service...
Owner Guide 1st Printing
Page 240
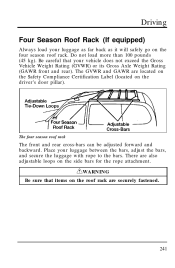
Be careful that items on the driver's door pillar). Place your vehicle does not exceed the Gross Vehicle Weight Rating (GVWR) or its Gross Axle Weight Rating (GAWR front and rear). RWARNING Be ...
Be careful that items on the driver's door pillar). Place your vehicle does not exceed the Gross Vehicle Weight Rating (GVWR) or its Gross Axle Weight Rating (GAWR front and rear). RWARNING Be ...
Owner Guide 1st Printing
Page 306
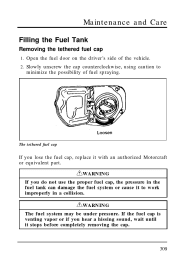
... Fuel Tank Removing the tethered fuel cap 1. RWARNING If you do not use the proper fuel cap, the pressure in a collision. Open the fuel door on the driver's side of fuel spraying. If the fuel cap is venting vapor or if you lose the fuel cap, replace it with an authorized Motorcraft...
... Fuel Tank Removing the tethered fuel cap 1. RWARNING If you do not use the proper fuel cap, the pressure in a collision. Open the fuel door on the driver's side of fuel spraying. If the fuel cap is venting vapor or if you lose the fuel cap, replace it with an authorized Motorcraft...


