Owner's Manual
Page 5
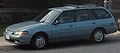
others available) (pg. 17) AM FM SEEK SCAN H TAPE M BASS TUNE VOL PUSH ON BAL 1 SIDE 1-2 2 3 4 5 6 EJ REW FF - TREB + FADE LO A/C MAX A/C OFF R.DEF HI Climate controls (pg. 17) * if equipped with cassette shown; Instrumentation Vents (pg. 18) Refer to Audio Guide (electronic stereo radio with air conditioning Rear window defroster (if equipped) (pg. 24) 5
others available) (pg. 17) AM FM SEEK SCAN H TAPE M BASS TUNE VOL PUSH ON BAL 1 SIDE 1-2 2 3 4 5 6 EJ REW FF - TREB + FADE LO A/C MAX A/C OFF R.DEF HI Climate controls (pg. 17) * if equipped with cassette shown; Instrumentation Vents (pg. 18) Refer to Audio Guide (electronic stereo radio with air conditioning Rear window defroster (if equipped) (pg. 24) 5
Owner's Manual
Page 22
...;F) or higher. 22 the air conditioning can be used for heating and ventilating and will clear ice or fog from the windshield and front side windows.
...;F) or higher. 22 the air conditioning can be used for heating and ventilating and will clear ice or fog from the windshield and front side windows.
Owner's Manual
Page 24
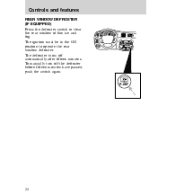
... FF - + TREB TAPE CD LO OFF HI *A/C *MAX A/C R.DEF 24 To manually turn off automatically after fifteen minutes. Controls and features REAR WINDOW DEFROSTER (IF EQUIPPED) Press the defroster switch to clear the rear window of thin ice and fog: The ignition must be in the ON position to operate the rear...
... FF - + TREB TAPE CD LO OFF HI *A/C *MAX A/C R.DEF 24 To manually turn off automatically after fifteen minutes. Controls and features REAR WINDOW DEFROSTER (IF EQUIPPED) Press the defroster switch to clear the rear window of thin ice and fog: The ignition must be in the ON position to operate the rear...

Owner's Manual
Page 30
... Rear washer on continuously. Washer Pull toward you for quick cleaning). Select: ON Rear wiper on OFF Rear wiper and washer off Washer For rear window washer fluid operation, pull toward you . MIST OFF ON INT OFF 1 2 INT PULL 30 MIST OFF INT 1 2 INT PULL MIST OFF INT 1 2 ...INT PULL Rear window wipers and washer (if equipped) Wipers For rear operation, rotate the rear window wiper and washer switch to wipe the windshield only once. Push up and release to the desired position. Controls...
... Rear washer on continuously. Washer Pull toward you for quick cleaning). Select: ON Rear wiper on OFF Rear wiper and washer off Washer For rear window washer fluid operation, pull toward you . MIST OFF ON INT OFF 1 2 INT PULL 30 MIST OFF INT 1 2 INT PULL MIST OFF INT 1 2 ...INT PULL Rear window wipers and washer (if equipped) Wipers For rear operation, rotate the rear window wiper and washer switch to wipe the windshield only once. Push up and release to the desired position. Controls...

Owner's Manual
Page 34
U L LOCK • Driver window LOCK • Front passenger window LOCK • Left rear passenger window LOCK 34 Controls and features Power windows (if equipped) Driver side controls Press the appropriate window switch to operate the power windows.
U L LOCK • Driver window LOCK • Front passenger window LOCK • Left rear passenger window LOCK 34 Controls and features Power windows (if equipped) Driver side controls Press the appropriate window switch to operate the power windows.

Owner's Manual
Page 35
Passenger controls Press the window switch to operate the power windows. Controls and features • Right rear passenger window LOCK To prevent passengers from operating the power windows, press the lock button. To stop the window while it is in motion, press the switch again. U L LOCK One-touch down feature To open the driver side window completely, press and release the lower portion of the driver side window switch. Press again to unlock and allow the passengers to operate the power window at each door position. 35
Passenger controls Press the window switch to operate the power windows. Controls and features • Right rear passenger window LOCK To prevent passengers from operating the power windows, press the lock button. To stop the window while it is in motion, press the switch again. U L LOCK One-touch down feature To open the driver side window completely, press and release the lower portion of the driver side window switch. Press again to unlock and allow the passengers to operate the power window at each door position. 35

Owner's Manual
Page 79
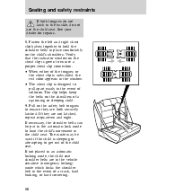
Verify that the indicator window on each tongue is green to ensure proper safety belt connections. 79 Insert the left safety belt tongue into the left side of the buckle. Seating and safety restraints 6. Place the child in the seat and position the shoulder belts. 7. Repeat for the right side.
Verify that the indicator window on each tongue is green to ensure proper safety belt connections. 79 Insert the left safety belt tongue into the left side of the buckle. Seating and safety restraints 6. Place the child in the seat and position the shoulder belts. 7. Repeat for the right side.
Owner's Manual
Page 80
The mode may be put in the automatic lock mode to limit the child's movement in the event of collision. Verify that the indicator window on the safety belt tongues to pull apart easily in the child seat. See your dealer for repairs. 8. The clip helps keep the belts on ... they are both tongues do not latch in the event of the tongues or the chest clip is unbuckled, the red color appears in the window. • The chest clip is sleeping or attempting to hold the shoulder belts in an automatic locking mode, the child seat shoulder belts are not...
The mode may be put in the automatic lock mode to limit the child's movement in the event of collision. Verify that the indicator window on the safety belt tongues to pull apart easily in the child seat. See your dealer for repairs. 8. The clip helps keep the belts on ... they are both tongues do not latch in the event of the tongues or the chest clip is unbuckled, the red color appears in the window. • The chest clip is sleeping or attempting to hold the shoulder belts in an automatic locking mode, the child seat shoulder belts are not...

Owner's Manual
Page 92
Starting If the engine is idling while the vehicle is stopped in an open area for long periods of time, open the windows at least 2.5 cm (1 in fresh air. 50 E FUEL FILL 60 70 100 120 1 / 2 40 F 80 140 3 80 C H 30 40 60 90 100 1 10 2 1 RPM x 1000 0 0 0 0 0 0 ...
Starting If the engine is idling while the vehicle is stopped in an open area for long periods of time, open the windows at least 2.5 cm (1 in fresh air. 50 E FUEL FILL 60 70 100 120 1 / 2 40 F 80 140 3 80 C H 30 40 60 90 100 1 10 2 1 RPM x 1000 0 0 0 0 0 0 ...

Owner's Manual
Page 106
... depressed • sudden stops • extended engine idling • use of speed control in hilly terrain • extended use of the air conditioner, defroster, rear window defroster and other accessories • underinflated tires • heavy loads • aftermarket add-ons such as an RV, unless front wheel dollies are used. Driving...
... depressed • sudden stops • extended engine idling • use of speed control in hilly terrain • extended use of the air conditioner, defroster, rear window defroster and other accessories • underinflated tires • heavy loads • aftermarket add-ons such as an RV, unless front wheel dollies are used. Driving...
Owner's Manual
Page 110
... of the instrument panel fuse panel. The (POWER WIND) 30A on the instrument panel fuse panel cover represents a circuit breaker that contols the vehicle's power windows.
... of the instrument panel fuse panel. The (POWER WIND) 30A on the instrument panel fuse panel cover represents a circuit breaker that contols the vehicle's power windows.
Owner's Manual
Page 113
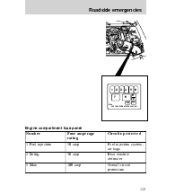
Roadside emergencies 1 2 7 3 4 8 5 6 BTAA 9 10 12 11 USE THE DESIGNATED FUSES ONLY Engine compartment fuse panel Number Fuse amperage rating 1 Fuel injection 2 Defog. 3 Main 30 amp 30 amp 100 amp Circuits protected Fuel injection system, air bags Rear window defroster Overall circuit protection 113
Roadside emergencies 1 2 7 3 4 8 5 6 BTAA 9 10 12 11 USE THE DESIGNATED FUSES ONLY Engine compartment fuse panel Number Fuse amperage rating 1 Fuel injection 2 Defog. 3 Main 30 amp 30 amp 100 amp Circuits protected Fuel injection system, air bags Rear window defroster Overall circuit protection 113

Owner's Manual
Page 147
... driver side wiper blade is 51 cm (20 in) long, and the passenger side wiper blade is 44.5 cm (17.5 in) long, and the rear window wiper is 35 cm (13.75 in the correct location. Lubricate the pivot points as necessary. There are three different lengths of the blade assembly...
... driver side wiper blade is 51 cm (20 in) long, and the passenger side wiper blade is 44.5 cm (17.5 in) long, and the rear window wiper is 35 cm (13.75 in the correct location. Lubricate the pivot points as necessary. There are three different lengths of the blade assembly...
Owner's Manual
Page 165
.... 4. Replace the bulb and ease the socket back into the housing. 5. To remove the liftgate lamp bulb assembly cover mounted on the liftgate's interior rear window: • press in the inner portion of the two mounting screws on either side of the cover • pull out the outer portion of the...
.... 4. Replace the bulb and ease the socket back into the housing. 5. To remove the liftgate lamp bulb assembly cover mounted on the liftgate's interior rear window: • press in the inner portion of the two mounting screws on either side of the cover • pull out the outer portion of the...

Owner's Manual
Page 169
Maintenance and care The side marker lamp assemblies are directly below the rear side windows. To replace the backup lamp bulbs: 1. The right assembly (when facing the front of the vehicle. Both access panels are accessible through the interior of the vehicle) is located behind the same interior panel as the liftgate washer fluid; Open the liftgate and lean inside the vehicle. Access the backup bulb assemblies by carefully pulling open the interior panel. 169 the left assembly is behind a similar-looking interior panel directly opposite the right panel.
Maintenance and care The side marker lamp assemblies are directly below the rear side windows. To replace the backup lamp bulbs: 1. The right assembly (when facing the front of the vehicle. Both access panels are accessible through the interior of the vehicle) is located behind the same interior panel as the liftgate washer fluid; Open the liftgate and lean inside the vehicle. Access the backup bulb assemblies by carefully pulling open the interior panel. 169 the left assembly is behind a similar-looking interior panel directly opposite the right panel.
Owner's Manual
Page 189
... release ...38 operation ...94 warning light ...8 Parts (see Motorcraft Parts) ...179 Power door locks ...31 Power features door locks ...31 windows ...34 Power steering fluid, checking and adding ...139 Rear window defroster ...24 washer ...30 wiper ...30 Refill capacities for fluids ...179 Relays ...109 Remote control ...45 Remote entry system ...45 illuminated...
... release ...38 operation ...94 warning light ...8 Parts (see Motorcraft Parts) ...179 Power door locks ...31 Power features door locks ...31 windows ...34 Power steering fluid, checking and adding ...139 Rear window defroster ...24 washer ...30 wiper ...30 Refill capacities for fluids ...179 Relays ...109 Remote control ...45 Remote entry system ...45 illuminated...
Owner's Manual
Page 190
...,19,23 Warning chimes ...10 headlamps on ...11 key in ignition ...11 safety belt ...10 Washer fluid ...134 reservoir ...135 windshield ...30 Windows one-touch down ...35 power windows, operating ...34 Windshield washing ...30 Windshield washer fluid and wipers checking and adding fluid ...134 checking and replacing wiper blades ...146 liftgate reservoir...
...,19,23 Warning chimes ...10 headlamps on ...11 key in ignition ...11 safety belt ...10 Washer fluid ...134 reservoir ...135 windshield ...30 Windows one-touch down ...35 power windows, operating ...34 Windshield washing ...30 Windshield washer fluid and wipers checking and adding fluid ...134 checking and replacing wiper blades ...146 liftgate reservoir...

Customer Assistance Guide 1st Printing
Page 11
..., and polishes Flat splash guards Full front end covers Lubricants and oils Mini-mask Molded splash guards Molded vinyl floor mats Rear decklid spoiler Side window air deflectors 11
..., and polishes Flat splash guards Full front end covers Lubricants and oils Mini-mask Molded splash guards Molded vinyl floor mats Rear decklid spoiler Side window air deflectors 11
