Audio Guide 1st Printing
Page 10
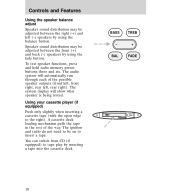
Speaker sound distribution may be adjusted between the right (+) and left , rear right). You can switch from CD (if equipped) to insert a tape. The system display will automatically run through each of the way. BASS - The audio system will show what speaker is ... and six. The ignition and radio do not need to be on to tape play by inserting a tape into the cassette deck. Using your cassette player (if equipped) Push only slightly when inserting a cassette tape (with the open edge to the right). A cassette deck loading mechanism pulls the tape in the...
Speaker sound distribution may be adjusted between the right (+) and left , rear right). You can switch from CD (if equipped) to insert a tape. The system display will automatically run through each of the way. BASS - The audio system will show what speaker is ... and six. The ignition and radio do not need to be on to tape play by inserting a tape into the cassette deck. Using your cassette player (if equipped) Push only slightly when inserting a cassette tape (with the open edge to the right). A cassette deck loading mechanism pulls the tape in the...
Audio Guide 1st Printing
Page 14
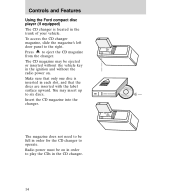
... and without the radio power on in order to play the CDs in the CD changer. 14 The CD magazine may insert up to eject the CD magazine from the changer. Controls and Features Using the Ford compact disc player (if equipped) The CD changer is inserted in each slot, and that only one disc... is located in the trunk of your vehicle. To access the CD changer magazine, slide the magazine's left...
... and without the radio power on in order to play the CDs in the CD changer. 14 The CD magazine may insert up to eject the CD magazine from the changer. Controls and Features Using the Ford compact disc player (if equipped) The CD changer is inserted in each slot, and that only one disc... is located in the trunk of your vehicle. To access the CD changer magazine, slide the magazine's left...
Audio Guide 1st Printing
Page 16
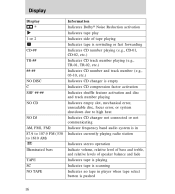
...and disc and track number playing Indicates empty slot, mechanical error, unreadable disc, focus error, or system shutdown due to high heat Indicates CD changer not connected or not communicating Indicate frequency band audio system is in Indicates currently playing radio station Indicates stereo operation Indicate volume, relative ...level of bass and treble, and relative levels of speaker balance and fade Indicates tape is playing Indicates tape is scanning Indicates no tape in player when tape select button is pushed NO DJ AM, FM1, FM2 87.9 to 107.9 FM (530 to 1610 AM) ST Illuminated bars ...
...and disc and track number playing Indicates empty slot, mechanical error, unreadable disc, focus error, or system shutdown due to high heat Indicates CD changer not connected or not communicating Indicate frequency band audio system is in Indicates currently playing radio station Indicates stereo operation Indicate volume, relative ...level of bass and treble, and relative levels of speaker balance and fade Indicates tape is playing Indicates tape is scanning Indicates no tape in player when tape select button is pushed NO DJ AM, FM1, FM2 87.9 to 107.9 FM (530 to 1610 AM) ST Illuminated bars ...

Audio Guide 1st Printing
Page 17
... moisture is condensed on a rough road or playing badly scratched discs. Allow the player to evaporate. Never touch the playing surface. 17 If the CD player does not work: • the disc is already loaded into the player. • the disc is inserted with the label surface downward. • the... disc is dusty or defective. • the player's internal temperature is above 75°C (167...
... moisture is condensed on a rough road or playing badly scratched discs. Allow the player to evaporate. Never touch the playing surface. 17 If the CD player does not work: • the disc is already loaded into the player. • the disc is inserted with the label surface downward. • the... disc is dusty or defective. • the player's internal temperature is above 75°C (167...
Audio Guide 1st Printing
Page 18
...or less. • Do not expose tapes to reach a moderate temperature before inserting tapes. • Do not leave tapes in the cassette player for extended periods of time. • Do not insert more than one disc into the hole and turning the hub. • Remove loose... labels before playing. • Tighten very loose tapes by inserting a finger or pencil into the CD player's CD slot. Caring for your cassettes and cassette player (if applicable) • Only use cassettes that may have been exposed to extreme temperatures to direct sunlight, high humidity, extreme...
...or less. • Do not expose tapes to reach a moderate temperature before inserting tapes. • Do not leave tapes in the cassette player for extended periods of time. • Do not insert more than one disc into the hole and turning the hub. • Remove loose... labels before playing. • Tighten very loose tapes by inserting a finger or pencil into the CD player's CD slot. Caring for your cassettes and cassette player (if applicable) • Only use cassettes that may have been exposed to extreme temperatures to direct sunlight, high humidity, extreme...

Audio Guide 1st Printing
Page 21
Index AM/FM select ...6 Audio power ...6 Bass adjust ...9 Cassette player operation ...10,18 CD select ...11 Cleaning your vehicle CD player and discs ...17 Clock setting the clock ...13 Compact disc changer care ...17 operation ...14 troubleshooting ...17 Compression adjust ...12 Display ...16 Dolby noise ...
Index AM/FM select ...6 Audio power ...6 Bass adjust ...9 Cassette player operation ...10,18 CD select ...11 Cleaning your vehicle CD player and discs ...17 Clock setting the clock ...13 Compact disc changer care ...17 operation ...14 troubleshooting ...17 Compression adjust ...12 Display ...16 Dolby noise ...