Owner's Manual
Page 2
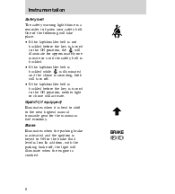
... miles) of city driving. 2 indicates that vehicle information related to yourself, your vehicle Your new vehicle goes through an adjustment or breaking-in period for brake linings lasts for a long time. • use special "break-in those areas where carelessness can cause damage to your vehicle's speed often as you to...
... miles) of city driving. 2 indicates that vehicle information related to yourself, your vehicle Your new vehicle goes through an adjustment or breaking-in period for brake linings lasts for a long time. • use special "break-in those areas where carelessness can cause damage to your vehicle's speed often as you to...
Owner's Manual
Page 6
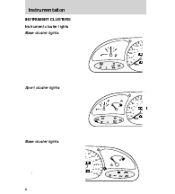
... INSTRUMENT CLUSTERS Instrument cluster lights Base cluster lights 60 7 100 80 1 50 E FUEL FILL 12 / F 40 30 40 60 0 0 0 0 0 0 20 20 SERVICE ENGINE SOON 10 BRAKE P ! ABS 0 0 0 0 MPH km/h Sport cluster lights 60 70 100 80 12 50 E FUEL FILL 12 / 40 F C H 30 40 60 0 0 0 0 0 0 20 20 LOW... FUEL SERVICE ENGINE SOON 10 BRAKE P ABS 0 0 0 0 MPH km/h Base cluster lights 60 70 100 80 120 50 E FUEL FILL 1 / 2 40 F 80 140 C H 30 40 60 90 100 1 10 C H 0 0 0 0 ...
... INSTRUMENT CLUSTERS Instrument cluster lights Base cluster lights 60 7 100 80 1 50 E FUEL FILL 12 / F 40 30 40 60 0 0 0 0 0 0 20 20 SERVICE ENGINE SOON 10 BRAKE P ! ABS 0 0 0 0 MPH km/h Sport cluster lights 60 70 100 80 12 50 E FUEL FILL 12 / 40 F C H 30 40 60 0 0 0 0 0 0 20 20 LOW... FUEL SERVICE ENGINE SOON 10 BRAKE P ABS 0 0 0 0 MPH km/h Base cluster lights 60 70 100 80 120 50 E FUEL FILL 1 / 2 40 F 80 140 C H 30 40 60 90 100 1 10 C H 0 0 0 0 ...
Owner's Manual
Page 7
... lights 60 70 100 80 120 50 E FUEL FILL 1 / 2 40 F 80 140 3 4 5 6 7 8 C H 30 40 60 90 2 1 RPM x 1000 0 0 0 0 0 0 160 100 20 20 SERVICE ENGINE SOON BRAKE !
... lights 60 70 100 80 120 50 E FUEL FILL 1 / 2 40 F 80 140 3 4 5 6 7 8 C H 30 40 60 90 2 1 RPM x 1000 0 0 0 0 0 0 160 100 20 20 SERVICE ENGINE SOON BRAKE !
Owner's Manual
Page 8
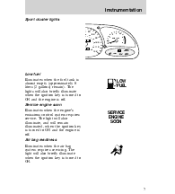
...the lap/shoulder belt is not buckled before the key is turned to fasten your safety belt. Brake Illuminates when the parking brake is activated and the ignition is keyed to ON or the brake fluid level is a reminder to the ON position, neither light or chime will illuminate when the... engine is sounding, both will turn off , the light will activate. BRAKE P ! 8 Instrumentation Safety belt The safety ...
...the lap/shoulder belt is not buckled before the key is turned to fasten your safety belt. Brake Illuminates when the parking brake is activated and the ignition is keyed to ON or the brake fluid level is a reminder to the ON position, neither light or chime will illuminate when the... engine is sounding, both will turn off , the light will activate. BRAKE P ! 8 Instrumentation Safety belt The safety ...
Owner's Manual
Page 9
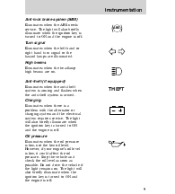
... anti-theft system is arming and flashes when the anti-theft system is off . 9 ABS THEFT Charging Illuminates when there is off . Instrumentation Anti-lock brake system (ABS) Illuminates when the ABS needs service.
... anti-theft system is arming and flashes when the anti-theft system is off . 9 ABS THEFT Charging Illuminates when there is off . Instrumentation Anti-lock brake system (ABS) Illuminates when the ABS needs service.
Owner's Manual
Page 26
... For more information on the high beam headlamps, with a reduced light output, when: • the vehicle is running • the vehicle has a fully released parking brake • the headlamp system is released. Headlamps on Parking lamps, side marker lamps, instrument panel lamps, license lamps, and tail lamps on OFF Lamps off...
... For more information on the high beam headlamps, with a reduced light output, when: • the vehicle is running • the vehicle has a fully released parking brake • the headlamp system is released. Headlamps on Parking lamps, side marker lamps, instrument panel lamps, license lamps, and tail lamps on OFF Lamps off...
Owner's Manual
Page 28
Hold the CST portion of the SET ACC / CST button to increase speed; Speed control can be canceled by pressing the brake pedal or clutch pedal (if equipped). Hold SET ACC to decrease speed; tap to prevent speed control malfunctions. 28 20 40 20 160 100 1 10 ...
Hold the CST portion of the SET ACC / CST button to increase speed; Speed control can be canceled by pressing the brake pedal or clutch pedal (if equipped). Hold SET ACC to decrease speed; tap to prevent speed control malfunctions. 28 20 40 20 160 100 1 10 ...

Owner's Manual
Page 38
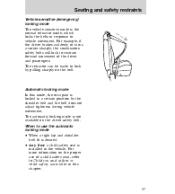
Controls and features Parking brake For information on the parking brake, refer to Preparing to start the vehicle in the Driving chapter. 38
Controls and features Parking brake For information on the parking brake, refer to Preparing to start the vehicle in the Driving chapter. 38
Owner's Manual
Page 57
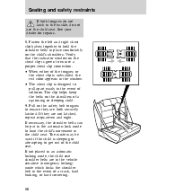
... position by pulling sharply on the belt. When to Children and infant or child safety seats later in the vehicle. For example, if the driver brakes suddenly or turns a corner sharply, the combination safety belts will lock to restrain forward movement of a child safety seat, refer to use of the driver...
... position by pulling sharply on the belt. When to Children and infant or child safety seats later in the vehicle. For example, if the driver brakes suddenly or turns a corner sharply, the combination safety belts will lock to restrain forward movement of a child safety seat, refer to use of the driver...
Owner's Manual
Page 80
... in an automatic locking mode, the child seat shoulder belts are not latched, repeat steps seven and eight. Pull on the shoulders of a crash, hard braking, or hard cornering. 80
... in an automatic locking mode, the child seat shoulder belts are not latched, repeat steps seven and eight. Pull on the shoulders of a crash, hard braking, or hard cornering. 80
Owner's Manual
Page 86
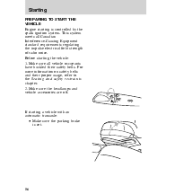
Before starting a vehicle with an automatic transaxle: • Make sure the parking brake is controlled by the spark ignition system. Make sure the headlamps and vehicle accessories are off. OFF If starting the vehicle: 1. Make sure all Canadian ...
Before starting a vehicle with an automatic transaxle: • Make sure the parking brake is controlled by the spark ignition system. Make sure the headlamps and vehicle accessories are off. OFF If starting the vehicle: 1. Make sure all Canadian ...

Owner's Manual
Page 88
... ON position. 2. Do not press the accelerator. • The key will return to START and release. After idling for a few seconds, apply the brake and release the parking brake. 88 K AC C LOC 0 I ON II T AR ST III 5 40 30 40 60 80 20 20 LOW FUEL SERVICE ENGINE SOON ABS 10 MP...
... ON position. 2. Do not press the accelerator. • The key will return to START and release. After idling for a few seconds, apply the brake and release the parking brake. 88 K AC C LOC 0 I ON II T AR ST III 5 40 30 40 60 80 20 20 LOW FUEL SERVICE ENGINE SOON ABS 10 MP...
Owner's Manual
Page 93
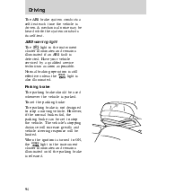
...down a long or steep hill, shift to a lower gear and do not apply the brakes continuously. Significantly increased squeal is an indicator that brake service is needed. • Apply the brakes gently several times after driving through standing water or washing your vehicle to dry them less ...effective. • Occasional brake squeal during light to moderate stops is normal. Do not pump the brakes in a panic stop. Driving BRAKES Power-assisted brakes Apply the brake pedal gradually to avoid locking up on a hill could lock up the...
...down a long or steep hill, shift to a lower gear and do not apply the brakes continuously. Significantly increased squeal is an indicator that brake service is needed. • Apply the brakes gently several times after driving through standing water or washing your vehicle to dry them less ...effective. • Occasional brake squeal during light to moderate stops is normal. Do not pump the brakes in a panic stop. Driving BRAKES Power-assisted brakes Apply the brake pedal gradually to avoid locking up on a hill could lock up the...
Owner's Manual
Page 94
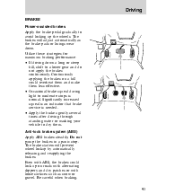
...soon as possible. However, if the normal brakes fail, the parking brake can be used whenever the vehicle is released. Parking brake The parking brake should be set the parking brake: The parking brake is not designed to ON, the BRAKE light in the instrument cluster illuminates and remains... in the instrument cluster illuminates and remains illuminated until the parking brake is parked. Normal braking operation is still effective unless the BRAKE light is detected. When the ignition is driven. Driving The ABS brake system conducts a self-test each time the vehicle is turned...
...soon as possible. However, if the normal brakes fail, the parking brake can be used whenever the vehicle is released. Parking brake The parking brake should be set the parking brake: The parking brake is not designed to ON, the BRAKE light in the instrument cluster illuminates and remains... in the instrument cluster illuminates and remains illuminated until the parking brake is parked. Normal braking operation is still effective unless the BRAKE light is detected. When the ignition is driven. Driving The ABS brake system conducts a self-test each time the vehicle is turned...

Owner's Manual
Page 95
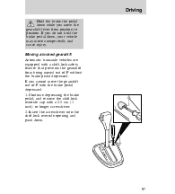
P ! To release the parking brake: • While pressing the release button, pull the handle upward to release the brake. • Push handle downward to the off position. 95 Driving If the parking brake is securely latched in P (automatic transaxle) or first gear (manual transaxle). Always set the parking brake fully and make sure that the gearshift is fully released but the BRAKE warning light remains on, have the brakes checked immediately. They may not be working properly.
P ! To release the parking brake: • While pressing the release button, pull the handle upward to release the brake. • Push handle downward to the off position. 95 Driving If the parking brake is securely latched in P (automatic transaxle) or first gear (manual transaxle). Always set the parking brake fully and make sure that the gearshift is fully released but the BRAKE warning light remains on, have the brakes checked immediately. They may not be working properly.

Owner's Manual
Page 96
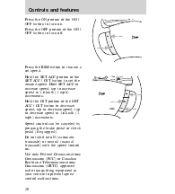
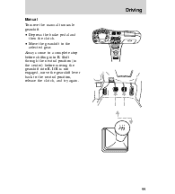
Driving TRANSAXLES Automatic The normal driving position for best fuel economy D - Drive: more engine braking than D L - Low: more engine braking than D at speeds up to 60 km/h (38 mph) P R N D D L 96 MIRROR 50 E FUEL FILL 60 70 100 120 12 / 40 F 80 140 3 80 C H 30 40 ...
Driving TRANSAXLES Automatic The normal driving position for best fuel economy D - Drive: more engine braking than D L - Low: more engine braking than D at speeds up to 60 km/h (38 mph) P R N D D L 96 MIRROR 50 E FUEL FILL 60 70 100 120 12 / 40 F 80 140 3 80 C H 30 40 ...
Owner's Manual
Page 97
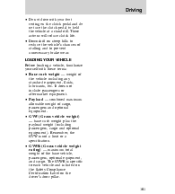
Continue depressing the brake pedal, and remove the shift-lock override cap with a shift-lock safety feature that prevents the gearshift from position to position. Insert the screwdriver into ... you move the gearshift lever from being moved out of P with the brake pedal depressed: 1. Driving Hold the brake the pedal down while you cannot move the gearshift out of P without the brake pedal depressed. P R N D D L 97 If you do not hold the brake pedal down . Moving a locked gearshift Automatic transaxle vehicles are equipped with...
Continue depressing the brake pedal, and remove the shift-lock override cap with a shift-lock safety feature that prevents the gearshift from position to position. Insert the screwdriver into ... you move the gearshift lever from being moved out of P with the brake pedal depressed: 1. Driving Hold the brake the pedal down while you cannot move the gearshift out of P without the brake pedal depressed. P R N D D L 97 If you do not hold the brake pedal down . Moving a locked gearshift Automatic transaxle vehicles are equipped with...
Owner's Manual
Page 99
If R is not engaged, move the manual transaxle gearshift: • Depress the brake pedal and then the clutch. • Move the gearshift to the selected gear. Shift through the neutral position (in the center) before shifting into R. Driving ...
If R is not engaged, move the manual transaxle gearshift: • Depress the brake pedal and then the clutch. • Move the gearshift to the selected gear. Shift through the neutral position (in the center) before shifting into R. Driving ...

Owner's Manual
Page 100
.../h (22 mph) 51 km/h (32 mph) 66 km/h (41 mph) Upshift light (if equipped) The light in the instrument cluster illuminates to indicate when to brake the vehicle • seeking more fuel.
.../h (22 mph) 51 km/h (32 mph) 66 km/h (41 mph) Upshift light (if equipped) The light in the instrument cluster illuminates to indicate when to brake the vehicle • seeking more fuel.
Owner's Manual
Page 101
... the driver's door pillar. 101 It does not include passengers or aftermarket equipment. • Payload - combined maximum allowable weight of stalling and to prevent unnecessary brake wear. These actions will reduce clutch life. • Downshift on the clutch pedal and do not use the clutch pedal to hold the vehicle at...
... the driver's door pillar. 101 It does not include passengers or aftermarket equipment. • Payload - combined maximum allowable weight of stalling and to prevent unnecessary brake wear. These actions will reduce clutch life. • Downshift on the clutch pedal and do not use the clutch pedal to hold the vehicle at...


