Owner's Manual
Page 24
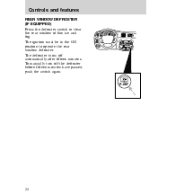
... rear window of thin ice and fog: The ignition must be in the ON position to operate the rear window defroster. To manually turn off automatically after fifteen minutes. The defroster turns off the defroster before fifteen minutes have passed, push the switch again. 50 E FUEL FILL 60 70 100 120...
... rear window of thin ice and fog: The ignition must be in the ON position to operate the rear window defroster. To manually turn off automatically after fifteen minutes. The defroster turns off the defroster before fifteen minutes have passed, push the switch again. 50 E FUEL FILL 60 70 100 120...
Owner's Manual
Page 25
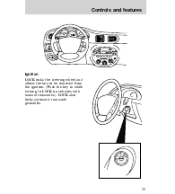
... allows the key to be removed from the ignition. (Push the key in while turning to LOCK on vehicles with manual transaxles.) LOCK also locks automatic transaxle gearshifts.
... allows the key to be removed from the ignition. (Push the key in while turning to LOCK on vehicles with manual transaxles.) LOCK also locks automatic transaxle gearshifts.
Owner's Manual
Page 28
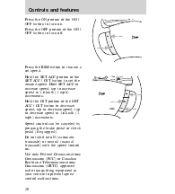
... the ON / OFF button to turn on . Hold SET ACC to increase speed in 1.6 km/h (1 mph) increments. tap to increase speed; Do not shift into N (automatic transaxle) or neutral (manual transaxle) with the speed control on . Press the OFF portion of the SET ACC / CST button to set speed. Speed control...
... the ON / OFF button to turn on . Hold SET ACC to increase speed in 1.6 km/h (1 mph) increments. tap to increase speed; Do not shift into N (automatic transaxle) or neutral (manual transaxle) with the speed control on . Press the OFF portion of the SET ACC / CST button to set speed. Speed control...

Owner's Manual
Page 36
Controls and features • Front passenger side L U • Rear passengers CONSOLE CONTROLS Gearshift For information about the gearshift on vehicles with automatic or manual transaxles, refer to the Transaxles section of the Driving chapter. 36
Controls and features • Front passenger side L U • Rear passengers CONSOLE CONTROLS Gearshift For information about the gearshift on vehicles with automatic or manual transaxles, refer to the Transaxles section of the Driving chapter. 36

Owner's Manual
Page 37
Controls and features • Automatic • Manual 1 3 5 2 4 R 37
Controls and features • Automatic • Manual 1 3 5 2 4 R 37
Owner's Manual
Page 57
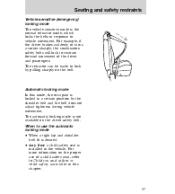
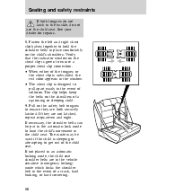
...not available on the belt. The retractor can be made to use of the driver and passengers. For more information on the proper use the automatic locking mode • When a tight lap and shoulder belt fit is desired. • Any time a child safety seat is installed in a...pulling sharply on the driver safety belt. When to lock by the shoulder belt and the belt does not adjust tightness during vehicle movement. Automatic locking mode In this chapter. 57 Seating and safety restraints Vehicle sensitive (emergency) locking mode The vehicle sensitive mode is the normal retractor...
...not available on the belt. The retractor can be made to use of the driver and passengers. For more information on the proper use the automatic locking mode • When a tight lap and shoulder belt fit is desired. • Any time a child safety seat is installed in a...pulling sharply on the driver safety belt. When to lock by the shoulder belt and the belt does not adjust tightness during vehicle movement. Automatic locking mode In this chapter. 57 Seating and safety restraints Vehicle sensitive (emergency) locking mode The vehicle sensitive mode is the normal retractor...
Owner's Manual
Page 58
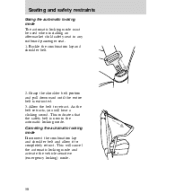
... and pull downward until the entire belt is now in any outboard passenger seat. 1. As the belt retracts, you will cancel the automatic locking mode and activate the vehicle sensitive (emergency locking) mode. 58 This indicates that the safety belt is extracted. 3. This will ...hear a clicking sound. Canceling the automatic locking mode Disconnect the combination lap and shoulder belt and allow it to retract. Allow the belt to completely retract. Seating and safety...
... and pull downward until the entire belt is now in any outboard passenger seat. 1. As the belt retracts, you will cancel the automatic locking mode and activate the vehicle sensitive (emergency locking) mode. 58 This indicates that the safety belt is extracted. 3. This will ...hear a clicking sound. Canceling the automatic locking mode Disconnect the combination lap and shoulder belt and allow it to retract. Allow the belt to completely retract. Seating and safety...
Owner's Manual
Page 59
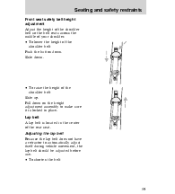
... belt Because the lap belt does not have a retractor to make sure it is located in place. Pull down on the height adjustment assembly to automatically adjust itself during vehicle movement, the lap belt should be adjusted before use. • To shorten the belt: 59 Seating and safety restraints Front seat...
... belt Because the lap belt does not have a retractor to make sure it is located in place. Pull down on the height adjustment assembly to automatically adjust itself during vehicle movement, the lap belt should be adjusted before use. • To shorten the belt: 59 Seating and safety restraints Front seat...

Owner's Manual
Page 68
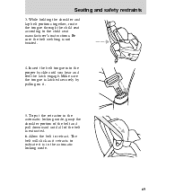
If you choose to Using the automatic locking mode in the front passenger seat, move the seat as far back as possible. 2. Pull down on the shoulder belt and then grasp the shoulder belt and lap belt together. 68 Refer to install a child safety seat in this chapter. Position the child safety seat in combination lap and shoulder belt seating positions 1. Installing child safety seats in a seat with a combination lap and shoulder belt. Seating and safety restraints • put the safety belt in the automatic locking mode.
If you choose to Using the automatic locking mode in the front passenger seat, move the seat as far back as possible. 2. Pull down on the shoulder belt and then grasp the shoulder belt and lap belt together. 68 Refer to install a child safety seat in this chapter. Position the child safety seat in combination lap and shoulder belt seating positions 1. Installing child safety seats in a seat with a combination lap and shoulder belt. Seating and safety restraints • put the safety belt in the automatic locking mode.
Owner's Manual
Page 69
... holding the shoulder and lap belt portions together, route the tongue through the child seat according to retract. Make sure the tongue is in the automatic locking mode, grasp the shoulder portion of the belt and pull downward until you hear and feel the latch engage. Allow the belt to the... seat manufacturer's instructions. Insert the belt tongue into the proper buckle until all of the belt is not twisted. 4. To put the retractor in the automatic locking mode. 69 Be sure the belt webbing is extracted. 6.
... holding the shoulder and lap belt portions together, route the tongue through the child seat according to retract. Make sure the tongue is in the automatic locking mode, grasp the shoulder portion of the belt and pull downward until you hear and feel the latch engage. Allow the belt to the... seat manufacturer's instructions. Insert the belt tongue into the proper buckle until all of the belt is not twisted. 4. To put the retractor in the automatic locking mode. 69 Be sure the belt webbing is extracted. 6.

Owner's Manual
Page 70
... the seat from side to side and forward and back to remove any slack in the center seating position. 3. Installing child safety seats in the automatic locking mode (you should not be able to make sure the seat is properly secured before each use. Pull the lap belt portion across the...
... the seat from side to side and forward and back to remove any slack in the center seating position. 3. Installing child safety seats in the automatic locking mode (you should not be able to make sure the seat is properly secured before each use. Pull the lap belt portion across the...
Owner's Manual
Page 80
If not placed in an automatic locking mode, the child seat shoulder belts are in the vehicle sensitive (emergency locking) mode which locks the shoulder belt in the child seat. See ... used if the child is designed to limit the child's movement in the event of the child seat. The mode may be put in the automatic lock mode to pull apart easily in the buckle, do not latch in the event of a squirming or sleeping child. 9. Verify that the indicator window...
If not placed in an automatic locking mode, the child seat shoulder belts are in the vehicle sensitive (emergency locking) mode which locks the shoulder belt in the child seat. See ... used if the child is designed to limit the child's movement in the event of the child seat. The mode may be put in the automatic lock mode to pull apart easily in the buckle, do not latch in the event of a squirming or sleeping child. 9. Verify that the indicator window...
Owner's Manual
Page 81
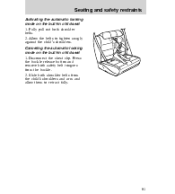
Slide both shoulder belts from the buckle. 2. Disconnect the chest clip. Canceling the automatic locking mode on the built-in child seat 1. Press the buckle release button and remove both shoulder belts. 2. Allow the belts to retract fully. 81 Seating and safety restraints Activating the automatic locking mode on the built-in child seat 1. Fully pull out both safety belt tongues from the child's shoulders and arm and allow them to tighten snugly against the child's shoulders.
Slide both shoulder belts from the buckle. 2. Disconnect the chest clip. Canceling the automatic locking mode on the built-in child seat 1. Press the buckle release button and remove both shoulder belts. 2. Allow the belts to retract fully. 81 Seating and safety restraints Activating the automatic locking mode on the built-in child seat 1. Fully pull out both safety belt tongues from the child's shoulders and arm and allow them to tighten snugly against the child's shoulders.
Owner's Manual
Page 85
... engine running. Never sit in dry grass or other dry ground cover. Do not start a fire. If the engine idle speed does not slow down automatically, have the vehicle checked. Exhaust fumes are toxic. For more than when the engine is warm. Starting A computer system controls the engine's idle revolutions per...
... engine running. Never sit in dry grass or other dry ground cover. Do not start a fire. If the engine idle speed does not slow down automatically, have the vehicle checked. Exhaust fumes are toxic. For more than when the engine is warm. Starting A computer system controls the engine's idle revolutions per...
Owner's Manual
Page 86
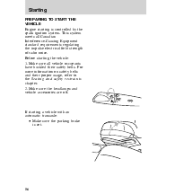
Before starting a vehicle with an automatic transaxle: • Make sure the parking brake is controlled by the spark ignition system. Make sure all Canadian Interference-Causing Equipment standard requirements regulating the ...
Before starting a vehicle with an automatic transaxle: • Make sure the parking brake is controlled by the spark ignition system. Make sure all Canadian Interference-Causing Equipment standard requirements regulating the ...
Owner's Manual
Page 87
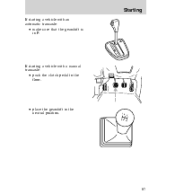
P R N D D L If starting a vehicle with a manual transaxle: • push the clutch pedal to the floor. • place the gearshift in P. Starting If starting a vehicle with an automatic transaxle: • make sure that the gearshift is in the neutral position. 1 3 5 2 4 R 87
P R N D D L If starting a vehicle with a manual transaxle: • push the clutch pedal to the floor. • place the gearshift in P. Starting If starting a vehicle with an automatic transaxle: • make sure that the gearshift is in the neutral position. 1 3 5 2 4 R 87
Owner's Manual
Page 93
...; If driving down . Do not pump the brakes in a panic stop. Anti-lock brake system (ABS) Apply ABS brakes steadily. The brake system will adjust automatically as snow or gravel. Be careful when braking. 93 Continuously applying the brakes on roads with alternating slippery and dry patches or with ABS, the... and do not apply the brakes continuously. Significantly increased squeal is an indicator that brake service is normal. The brakes will prevent wheel lockup by automatically releasing and reapplying the brakes.
...; If driving down . Do not pump the brakes in a panic stop. Anti-lock brake system (ABS) Apply ABS brakes steadily. The brake system will adjust automatically as snow or gravel. Be careful when braking. 93 Continuously applying the brakes on roads with alternating slippery and dry patches or with ABS, the... and do not apply the brakes continuously. Significantly increased squeal is an indicator that brake service is normal. The brakes will prevent wheel lockup by automatically releasing and reapplying the brakes.

Owner's Manual
Page 95
P ! To release the parking brake: • While pressing the release button, pull the handle upward to release the brake. • Push handle downward to the off position. 95 They may not be working properly. Always set the parking brake fully and make sure that the gearshift is fully released but the BRAKE warning light remains on, have the brakes checked immediately. Driving If the parking brake is securely latched in P (automatic transaxle) or first gear (manual transaxle).
P ! To release the parking brake: • While pressing the release button, pull the handle upward to release the brake. • Push handle downward to the off position. 95 They may not be working properly. Always set the parking brake fully and make sure that the gearshift is fully released but the BRAKE warning light remains on, have the brakes checked immediately. Driving If the parking brake is securely latched in P (automatic transaxle) or first gear (manual transaxle).

Owner's Manual
Page 96
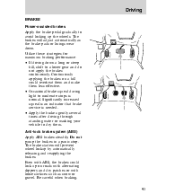
Driving TRANSAXLES Automatic The normal driving position for best fuel economy D - Drive: more engine braking than D L - Low: more engine braking than D at speeds up to 60 km/h (38 ... TUNE DISCS VOL- PUSH ON BAL 1 SIDE 1-2 2 3 4 5 COMP 1 SIDE 1-2 FADE SCAN BASS EJ REW FF - + TREB TAPE CD LO OFF HI *A/C *MAX A/C To move the automatic transaxle gearshift: P - Park R - Reverse N - Neutral D - Overdrive: the normal driving position for the...
Driving TRANSAXLES Automatic The normal driving position for best fuel economy D - Drive: more engine braking than D L - Low: more engine braking than D at speeds up to 60 km/h (38 ... TUNE DISCS VOL- PUSH ON BAL 1 SIDE 1-2 2 3 4 5 COMP 1 SIDE 1-2 FADE SCAN BASS EJ REW FF - + TREB TAPE CD LO OFF HI *A/C *MAX A/C To move the automatic transaxle gearshift: P - Park R - Reverse N - Neutral D - Overdrive: the normal driving position for the...
Owner's Manual
Page 97
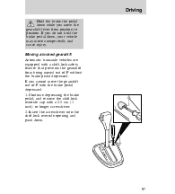
... depressed. Insert the screwdriver into the shift-lock override opening and push down , your vehicle may move unexpectedly and cause injury. P R N D D L 97 Moving a locked gearshift Automatic transaxle vehicles are equipped with a shift-lock safety feature that prevents the gearshift from position to position. If you do not hold the brake pedal...
... depressed. Insert the screwdriver into the shift-lock override opening and push down , your vehicle may move unexpectedly and cause injury. P R N D D L 97 Moving a locked gearshift Automatic transaxle vehicles are equipped with a shift-lock safety feature that prevents the gearshift from position to position. If you do not hold the brake pedal...


