Owner's Manual
Page 8
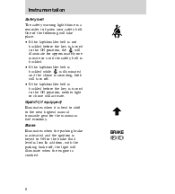
Upshift (if equipped) Illuminates when it is best to shift to the next highest manual transaxle gear for approximately one minute or until the safety belt is buckled. • If the lap/shoulder belt is is illuminated buckled while and ...
Upshift (if equipped) Illuminates when it is best to shift to the next highest manual transaxle gear for approximately one minute or until the safety belt is buckled. • If the lap/shoulder belt is is illuminated buckled while and ...
Owner's Manual
Page 17
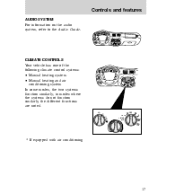
... EJ REW FF - + TREB TAPE CD LO OFF HI *A/C *MAX A/C CLIMATE CONTROLS Your vehicle has one of the following climate control systems: • Manual heating system • Manual heating and air conditioning system In some modes, the two systems function similarly; in modes where the systems do not function similarly, the different...
... EJ REW FF - + TREB TAPE CD LO OFF HI *A/C *MAX A/C CLIMATE CONTROLS Your vehicle has one of the following climate control systems: • Manual heating system • Manual heating and air conditioning system In some modes, the two systems function similarly; in modes where the systems do not function similarly, the different...
Owner's Manual
Page 19
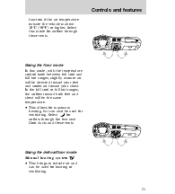
... outside the vehicle is noisier but more economical than A/C; Controls and features Turn the air distribution dial to the back seat area. * If equipped with manual heating systems, the modes can be used for heating, ventilating, or air conditioning; Do not put objects under the front seats that interfere with the...
... outside the vehicle is noisier but more economical than A/C; Controls and features Turn the air distribution dial to the back seat area. * If equipped with manual heating systems, the modes can be used for heating, ventilating, or air conditioning; Do not put objects under the front seats that interfere with the...

Owner's Manual
Page 20
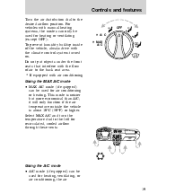
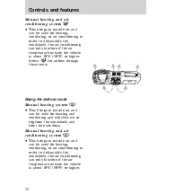
Controls and features conditioning can only 20 Manual heating and air conditioning system • This mode brings in outside air and can be used for airflow through these vents: E FUEL FILL 50 1 / 2 60 ... mode, outside the vehicle is shut out and the fan will not operate. Select for heating, ventilating, or air conditioning; Using the panel/floor mode Manual heating system • This mode brings in outside air and can be used for heating and ventilating. the air conditioning can only function if the...
Controls and features conditioning can only 20 Manual heating and air conditioning system • This mode brings in outside air and can be used for airflow through these vents: E FUEL FILL 50 1 / 2 60 ... mode, outside the vehicle is shut out and the fan will not operate. Select for heating, ventilating, or air conditioning; Using the panel/floor mode Manual heating system • This mode brings in outside air and can be used for heating and ventilating. the air conditioning can only function if the...
Owner's Manual
Page 21
... VOL- PUSH ON BAL 1 SIDE 1-2 2 3 4 5 COMP 1 SIDE 1-2 FADE SCAN BASS EJ REW FF - + TREB TAPE CD LO OFF HI *A/C *MAX A/C Using the defrost/floor mode Manual heating system • This brings in outside the vehicle is about 10°C (50°F) or higher. In the full cool or full hot ranges...
... VOL- PUSH ON BAL 1 SIDE 1-2 2 3 4 5 COMP 1 SIDE 1-2 FADE SCAN BASS EJ REW FF - + TREB TAPE CD LO OFF HI *A/C *MAX A/C Using the defrost/floor mode Manual heating system • This brings in outside the vehicle is about 10°C (50°F) or higher. In the full cool or full hot ranges...
Owner's Manual
Page 22
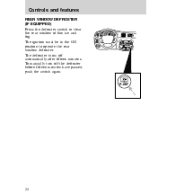
...VOL- PUSH ON BAL 1 SIDE 1-2 2 3 4 5 COMP 1 SIDE 1-2 FADE SCAN BASS EJ REW FF - + TREB TAPE CD LO OFF HI *A/C *MAX A/C Using the defrost mode Manual heating system • This brings in outside air and can be used for heating, ventilating, or air conditioning in order to dehumidify the windshield... air and can be used for heating and ventilating and will clear ice or fog from the windshield and front side windows. Controls and features Manual heating and air conditioning system • This brings in outside the vehicle is about 10°C (50°F) or higher. 22 the air ...
...VOL- PUSH ON BAL 1 SIDE 1-2 2 3 4 5 COMP 1 SIDE 1-2 FADE SCAN BASS EJ REW FF - + TREB TAPE CD LO OFF HI *A/C *MAX A/C Using the defrost mode Manual heating system • This brings in outside air and can be used for heating, ventilating, or air conditioning in order to dehumidify the windshield... air and can be used for heating and ventilating and will clear ice or fog from the windshield and front side windows. Controls and features Manual heating and air conditioning system • This brings in outside the vehicle is about 10°C (50°F) or higher. 22 the air ...
Owner's Manual
Page 24
... to clear the rear window of thin ice and fog: The ignition must be in the ON position to operate the rear window defroster. To manually turn off automatically after fifteen minutes.
... to clear the rear window of thin ice and fog: The ignition must be in the ON position to operate the rear window defroster. To manually turn off automatically after fifteen minutes.
Owner's Manual
Page 25
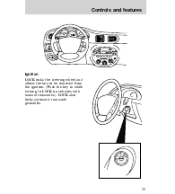
... locks the steering wheel and allows the key to be removed from the ignition. (Push the key in while turning to LOCK on vehicles with manual transaxles.) LOCK also locks automatic transaxle gearshifts. K AC C LOC 0 I ON II T AR ST III 25
... locks the steering wheel and allows the key to be removed from the ignition. (Push the key in while turning to LOCK on vehicles with manual transaxles.) LOCK also locks automatic transaxle gearshifts. K AC C LOC 0 I ON II T AR ST III 25
Owner's Manual
Page 28
... desired speed. Speed control can be canceled by pressing the brake pedal or clutch pedal (if equipped). Do not shift into N (automatic transaxle) or neutral (manual transaxle) with the speed control on . tap to decrease speed; Hold the CST portion of the SET ACC / CST button to set speed. ON 20...
... desired speed. Speed control can be canceled by pressing the brake pedal or clutch pedal (if equipped). Do not shift into N (automatic transaxle) or neutral (manual transaxle) with the speed control on . tap to decrease speed; Hold the CST portion of the SET ACC / CST button to set speed. ON 20...

Owner's Manual
Page 36
Controls and features • Front passenger side L U • Rear passengers CONSOLE CONTROLS Gearshift For information about the gearshift on vehicles with automatic or manual transaxles, refer to the Transaxles section of the Driving chapter. 36
Controls and features • Front passenger side L U • Rear passengers CONSOLE CONTROLS Gearshift For information about the gearshift on vehicles with automatic or manual transaxles, refer to the Transaxles section of the Driving chapter. 36

Owner's Manual
Page 37
Controls and features • Automatic • Manual 1 3 5 2 4 R 37
Controls and features • Automatic • Manual 1 3 5 2 4 R 37

Owner's Manual
Page 41
Hook the shade into the notches in the rear trim panels. Rewinding the sliding shade If the shade is a two-person operation: 41 The following procedure is damaged or loses its spring tension from excessive use, manual rewind of the shade may be necessary. Controls and features Wagon sliding shade Pull the shade to cover the cargo area.
Hook the shade into the notches in the rear trim panels. Rewinding the sliding shade If the shade is a two-person operation: 41 The following procedure is damaged or loses its spring tension from excessive use, manual rewind of the shade may be necessary. Controls and features Wagon sliding shade Pull the shade to cover the cargo area.
Owner's Manual
Page 48
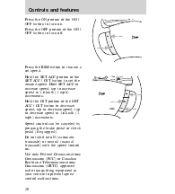
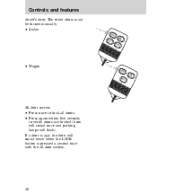
Controls and features driver's door. If a door is pressed a second time with the all-door system. 48 The other doors must be locked manually. • Sedan LO CK U LO N CK NIC TR UN K PA • Wagon LO CK U LO N CK PA NIC All-door system • Press once to lock all doors. • Press again within five seconds to verify doors are locked (horn will sound once and parking lamps will sound twice when the LOCK button is ajar, the horn will flash).
Controls and features driver's door. If a door is pressed a second time with the all-door system. 48 The other doors must be locked manually. • Sedan LO CK U LO N CK NIC TR UN K PA • Wagon LO CK U LO N CK PA NIC All-door system • Press once to lock all doors. • Press again within five seconds to verify doors are locked (horn will sound once and parking lamps will sound twice when the LOCK button is ajar, the horn will flash).
Owner's Manual
Page 87
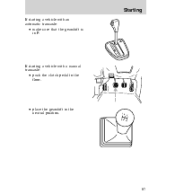
Starting If starting a vehicle with an automatic transaxle: • make sure that the gearshift is in the neutral position. 1 3 5 2 4 R 87 P R N D D L If starting a vehicle with a manual transaxle: • push the clutch pedal to the floor. • place the gearshift in P.
Starting If starting a vehicle with an automatic transaxle: • make sure that the gearshift is in the neutral position. 1 3 5 2 4 R 87 P R N D D L If starting a vehicle with a manual transaxle: • push the clutch pedal to the floor. • place the gearshift in P.

Owner's Manual
Page 95
They may not be working properly. P ! Driving If the parking brake is securely latched in P (automatic transaxle) or first gear (manual transaxle). Always set the parking brake fully and make sure that the gearshift is fully released but the BRAKE warning light remains on, have the brakes checked immediately. To release the parking brake: • While pressing the release button, pull the handle upward to release the brake. • Push handle downward to the off position. 95
They may not be working properly. P ! Driving If the parking brake is securely latched in P (automatic transaxle) or first gear (manual transaxle). Always set the parking brake fully and make sure that the gearshift is fully released but the BRAKE warning light remains on, have the brakes checked immediately. To release the parking brake: • While pressing the release button, pull the handle upward to release the brake. • Push handle downward to the off position. 95
Owner's Manual
Page 99
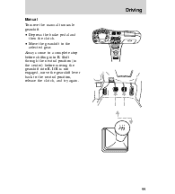
... gearshift: • Depress the brake pedal and then the clutch. • Move the gearshift to the selected gear. Driving Manual To move the gearshift lever back to the neutral position, release the clutch, and try again. 50 E FUEL FILL 60 70 100 120 1 / 2 40 F 80 ...
... gearshift: • Depress the brake pedal and then the clutch. • Move the gearshift to the selected gear. Driving Manual To move the gearshift lever back to the neutral position, release the clutch, and try again. 50 E FUEL FILL 60 70 100 120 1 / 2 40 F 80 ...
Owner's Manual
Page 104
... in the instrument cluster may not have enough braking power and your chances of having a collision greatly increase. Using trailer brakes Use electric brakes or manual, automatic, or surge-type hydraulic brakes that meet federal and local regulations. Using trailer lamps See your vehicle's brake system. Do not connect a trailer's hydraulic...
... in the instrument cluster may not have enough braking power and your chances of having a collision greatly increase. Using trailer brakes Use electric brakes or manual, automatic, or surge-type hydraulic brakes that meet federal and local regulations. Using trailer lamps See your vehicle's brake system. Do not connect a trailer's hydraulic...

Owner's Manual
Page 105
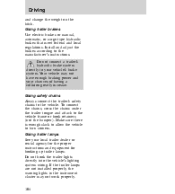
... towing a trailer Do not drive faster than 72 km/h (45 mph) with any weight trailer while towing in first or second gear. If driving with a manual transaxle: • select a gear that avoids jerking or excessive engine speed. • avoid driving excessively in hilly country or on very long, steep grades. Servicing...
... towing a trailer Do not drive faster than 72 km/h (45 mph) with any weight trailer while towing in first or second gear. If driving with a manual transaxle: • select a gear that avoids jerking or excessive engine speed. • avoid driving excessively in hilly country or on very long, steep grades. Servicing...
Owner's Manual
Page 115
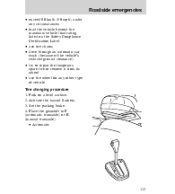
... • load the vehicle beyond the maximum vehicle load rating listed on a level surface. 2. Activate the hazard flashers. 3. Place the gearshift in P (automatic transaxle) or R (manual transaxle). • Automatic P R N D D L 115
... • load the vehicle beyond the maximum vehicle load rating listed on a level surface. 2. Activate the hazard flashers. 3. Place the gearshift in P (automatic transaxle) or R (manual transaxle). • Automatic P R N D D L 115
Owner's Manual
Page 116
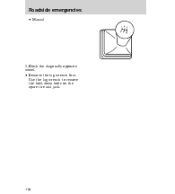
Block the diagonally opposite wheel. • Remove the lug wrench first. Roadside emergencies • Manual 1 3 5 2 4 R 5. Use the lug wrench to remove the hold-down bolts on the spare tire and jack. 116
Block the diagonally opposite wheel. • Remove the lug wrench first. Roadside emergencies • Manual 1 3 5 2 4 R 5. Use the lug wrench to remove the hold-down bolts on the spare tire and jack. 116

