
Owner's Manual
Page 11
Headlamps-on warning chime A warning chime sounds when the headlamps are on, the ignition is off, and a door is opened . 11 Instrumentation Key-in-ignition warning chime A warning chime sounds when the key is left in the ignition and any door is opened .
Headlamps-on warning chime A warning chime sounds when the headlamps are on, the ignition is off, and a door is opened . 11 Instrumentation Key-in-ignition warning chime A warning chime sounds when the key is left in the ignition and any door is opened .

Owner's Manual
Page 31
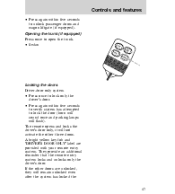
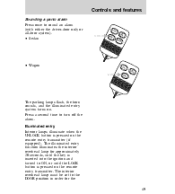
Controls and features OVERHEAD CONTROLS Overhead Lamps Move the overhead lamp switch to the desired position: OFF Overhead lamp off DOOR Overhead lamp illuminates when a door is opened ON Overhead lamp on and off. OFF DOOR ON DOOR MOUNTED CONTROLS Power door locks (if equipped) Push to turn the map lamps on Map lamps (if equipped) Press to lock or unlock the doors. L All doors locked U All doors unlocked U L LOCK 31
Controls and features OVERHEAD CONTROLS Overhead Lamps Move the overhead lamp switch to the desired position: OFF Overhead lamp off DOOR Overhead lamp illuminates when a door is opened ON Overhead lamp on and off. OFF DOOR ON DOOR MOUNTED CONTROLS Power door locks (if equipped) Push to turn the map lamps on Map lamps (if equipped) Press to lock or unlock the doors. L All doors locked U All doors unlocked U L LOCK 31

Owner's Manual
Page 33
Controls and features Childproof locks The rear doors can be set the lock for each door. To set the rear childproof locks: The childproof lock must be set to Illuminated entry under Remote entry system in this chapter. 33 Illuminated entry (if equipped) For more information on one door will not set separately for both rear doors. Setting the lock on the illuminated entry system, refer to prevent children from opening the doors from the inside. To return the rear doors to normal operation, return the lever to the raised position.
Controls and features Childproof locks The rear doors can be set the lock for each door. To set the rear childproof locks: The childproof lock must be set to Illuminated entry under Remote entry system in this chapter. 33 Illuminated entry (if equipped) For more information on one door will not set separately for both rear doors. Setting the lock on the illuminated entry system, refer to prevent children from opening the doors from the inside. To return the rear doors to normal operation, return the lever to the raised position.

Owner's Manual
Page 35
U L LOCK One-touch down feature To open the driver side window completely, press and release the lower portion of the driver side window switch. To stop the window while it is in motion, press the switch again. Controls and features • Right rear passenger window LOCK To prevent passengers from operating the power windows, press the lock button. Passenger controls Press the window switch to operate the power windows. Press again to unlock and allow the passengers to operate the power window at each door position. 35
U L LOCK One-touch down feature To open the driver side window completely, press and release the lower portion of the driver side window switch. To stop the window while it is in motion, press the switch again. Controls and features • Right rear passenger window LOCK To prevent passengers from operating the power windows, press the lock button. Passenger controls Press the window switch to operate the power windows. Press again to unlock and allow the passengers to operate the power window at each door position. 35

Owner's Manual
Page 45
... the ignition is in the OFF position. The operating range of the remote entry system may be affected by weather conditions (such as an all-door system. The remote entry features only operate with the ignition in ON or ACC, the system is disarmed. Controls and features REMOTE ENTRY AND ANTI... NIC TR UN K PA • Wagon LO CK U LO N CK PA NIC Remote entry system (if equipped) The remote entry system is available as a driver-door only or as very 45 If the vehicle is left running and locked, the system will not allow reentry using the remote entry transmitter.
... the ignition is in the OFF position. The operating range of the remote entry system may be affected by weather conditions (such as an all-door system. The remote entry features only operate with the ignition in ON or ACC, the system is disarmed. Controls and features REMOTE ENTRY AND ANTI... NIC TR UN K PA • Wagon LO CK U LO N CK PA NIC Remote entry system (if equipped) The remote entry system is available as a driver-door only or as very 45 If the vehicle is left running and locked, the system will not allow reentry using the remote entry transmitter.
Owner's Manual
Page 46
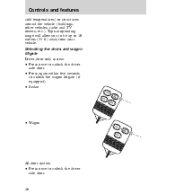
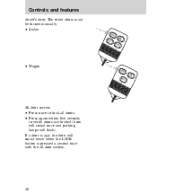
Controls and features cold temperatures) or structures around the vehicle (buildings, other vehicles, radio and TV towers, etc.). Typical operating range will allow you to be up to unlock the driver side door. 46 Unlocking the doors and wagon liftgate Driver-door only system • Press once to unlock the driver side door. • Press again within five seconds to unlock the wagon liftgate (if equipped) • Sedan LO CK U LO N CK NIC TR UN K PA • Wagon LO CK U LO N CK PA NIC All-door system • Press once to 10 meters (33 ft) away from your vehicle.
Controls and features cold temperatures) or structures around the vehicle (buildings, other vehicles, radio and TV towers, etc.). Typical operating range will allow you to be up to unlock the driver side door. 46 Unlocking the doors and wagon liftgate Driver-door only system • Press once to unlock the driver side door. • Press again within five seconds to unlock the wagon liftgate (if equipped) • Sedan LO CK U LO N CK NIC TR UN K PA • Wagon LO CK U LO N CK PA NIC All-door system • Press once to 10 meters (33 ft) away from your vehicle.
Owner's Manual
Page 47
...47 Controls and features • Press again within five seconds to verify system has attempted to unlock passenger doors and wagon liftgate (if equipped). If the other doors are provided with your remote entry system. They provide an additional reminder that the remote entry system locks and... unlocks only the driver's door. A bright yellow key fob and ''DRIVER'S DOOR ONLY'' label are unlocked, they will not activate the other three doors. Opening the trunk (if equipped) Press once to open the trunk. • Sedan...
...47 Controls and features • Press again within five seconds to verify system has attempted to unlock passenger doors and wagon liftgate (if equipped). If the other doors are provided with your remote entry system. They provide an additional reminder that the remote entry system locks and... unlocks only the driver's door. A bright yellow key fob and ''DRIVER'S DOOR ONLY'' label are unlocked, they will not activate the other three doors. Opening the trunk (if equipped) Press once to open the trunk. • Sedan...
Owner's Manual
Page 48
The other doors must be locked manually. • Sedan LO CK U LO N CK NIC TR UN K PA • Wagon LO CK U LO N CK PA NIC All-door system • Press once to verify doors are locked (horn will sound once and parking lamps will flash). If a door is ajar, the horn will sound twice when the LOCK button is pressed a second time with the all doors. • Press again within five seconds to lock all -door system. 48 Controls and features driver's door.
The other doors must be locked manually. • Sedan LO CK U LO N CK NIC TR UN K PA • Wagon LO CK U LO N CK PA NIC All-door system • Press once to verify doors are locked (horn will sound once and parking lamps will flash). If a door is ajar, the horn will sound twice when the LOCK button is pressed a second time with the all doors. • Press again within five seconds to lock all -door system. 48 Controls and features driver's door.
Owner's Manual
Page 49
Press a second time to the DOOR position in order for approximately 20 seconds, until the LOCK button is pressed on the remote entry transmitter (if equipped). The illuminated entry function illuminates ... alarm Press once to ON, or until the key is inserted into the ignition and turned to sound an alarm (with either the driver-door only or all-door system). • Sedan LO CK U LO N CK PA NIC TR UN K • Wagon LO CK U LO N CK PA NIC The parking lamps flash...
Press a second time to the DOOR position in order for approximately 20 seconds, until the LOCK button is pressed on the remote entry transmitter (if equipped). The illuminated entry function illuminates ... alarm Press once to ON, or until the key is inserted into the ignition and turned to sound an alarm (with either the driver-door only or all-door system). • Sedan LO CK U LO N CK PA NIC TR UN K • Wagon LO CK U LO N CK PA NIC The parking lamps flash...
Owner's Manual
Page 50
... activates and: • flashes the parking lamps and anti-theft indicator light • sounds the horn The horn and parking lamps shut off • all doors are closed 50 The lights and horn will remain off unless another unauthorized entry is off after approximately three minutes. Controls and features illuminated entry...
... activates and: • flashes the parking lamps and anti-theft indicator light • sounds the horn The horn and parking lamps shut off • all doors are closed 50 The lights and horn will remain off unless another unauthorized entry is off after approximately three minutes. Controls and features illuminated entry...

Owner's Manual
Page 51
... disarmed by using the key in the instrument cluster illuminates until the arming procedure is complete, the THEFT light flashes. The THEFT light in any door/trunk lock cylinder. The system will not disarm by inserting the key and turning the ignition to ON.
... disarmed by using the key in the instrument cluster illuminates until the arming procedure is complete, the THEFT light flashes. The THEFT light in any door/trunk lock cylinder. The system will not disarm by inserting the key and turning the ignition to ON.
Owner's Manual
Page 101
... allowable weight of the base vehicle, passengers, optional equipment, and cargo. Remember, the GVW is listed on the Safety Compliance Certification Label on the driver's door pillar. 101 Driving • Do not drive with these terms: • Base curb weight - weight of the vehicle including any standard equipment, fluids, lubricants, etc...
... allowable weight of the base vehicle, passengers, optional equipment, and cargo. Remember, the GVW is listed on the Safety Compliance Certification Label on the driver's door pillar. 101 Driving • Do not drive with these terms: • Base curb weight - weight of the vehicle including any standard equipment, fluids, lubricants, etc...

Owner's Manual
Page 102
.... The trailer should have 18.6 m2 (20 ft2) or less frontal area. This amount is listed on the Safety Compliance Certification Label on the driver's door pillar.
.... The trailer should have 18.6 m2 (20 ft2) or less frontal area. This amount is listed on the Safety Compliance Certification Label on the driver's door pillar.
Owner's Manual
Page 111
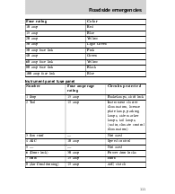
... lock Instrument cluster illumination, license plate lamp, parking lamps, side marker lamps, tail lamps, (radio, climate control illumination) Not used Speed control Not used Power door locks Horn A/C, clutch 3 Sun roof 4 ASC 5- 6 (Door lock) 7 Horn 8 (Air Conditioning) - 10 amp - 30 amp 15 amp 15 amp 111
... lock Instrument cluster illumination, license plate lamp, parking lamps, side marker lamps, tail lamps, (radio, climate control illumination) Not used Speed control Not used Power door locks Horn A/C, clutch 3 Sun roof 4 ASC 5- 6 (Door lock) 7 Horn 8 (Air Conditioning) - 10 amp - 30 amp 15 amp 15 amp 111

Owner's Manual
Page 144
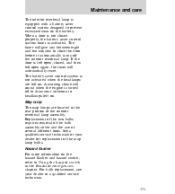
... becomes low, refill the battery with tap water that is electronically controlled, some control conditions are maintained by power from accidental wear down due to doors left ajar. Let the engine idle for a possible malfunction. If necessary, distilled water may be substituted with distilled water. When the battery is disconnected or...
... becomes low, refill the battery with tap water that is electronically controlled, some control conditions are maintained by power from accidental wear down due to doors left ajar. Let the engine idle for a possible malfunction. If necessary, distilled water may be substituted with distilled water. When the battery is disconnected or...

Owner's Manual
Page 150
... and care The temperature grade for this tire is established for a tire that is listed on the Safety Compliance Certification Label located on the passenger's door inside latch pillar. Improperly inflated tires can affect vehicle handling and can cause heat build up and possible tire failure. Excessive speed, underinflation, or excessive...
... and care The temperature grade for this tire is established for a tire that is listed on the Safety Compliance Certification Label located on the passenger's door inside latch pillar. Improperly inflated tires can affect vehicle handling and can cause heat build up and possible tire failure. Excessive speed, underinflation, or excessive...
Owner's Manual
Page 170
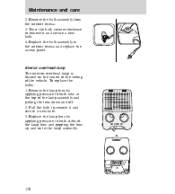
... bulb to remove it and secure a new bulb. 4. Replace the lamp lens by applying pressure to remove it and secure a new bulb. 3. OFF DOOR ON 170 OFF DOOR ON Remove the bulb assembly form the interior recess. 3. Twist the bulb counterclockwise to both sides of the lamp lens and popping the lens...
... bulb to remove it and secure a new bulb. 4. Replace the lamp lens by applying pressure to remove it and secure a new bulb. 3. OFF DOOR ON 170 OFF DOOR ON Remove the bulb assembly form the interior recess. 3. Twist the bulb counterclockwise to both sides of the lamp lens and popping the lens...
Owner's Manual
Page 171
... bulb replacement, see your attention to headlamps left open again, the timer will give you between eight and ten minutes to close the door before it automatically turns off to draw your dealer or a qualified service technician. 171 The timer will automatically reset. See a qualified ...service technician or your dealer for replacement of the interior overhead lamp assembly. When a door is not closed , and then left on the battery. Hazard flasher For more information on the hazard flasher and hazard switch, refer to ...
... bulb replacement, see your attention to headlamps left open again, the timer will give you between eight and ten minutes to close the door before it automatically turns off to draw your dealer or a qualified service technician. 171 The timer will automatically reset. See a qualified ...service technician or your dealer for replacement of the interior overhead lamp assembly. When a door is not closed , and then left on the battery. Hazard flasher For more information on the hazard flasher and hazard switch, refer to ...
Owner's Manual
Page 180
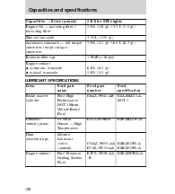
...) 3.35 L (3.55 qt) 3.9 L (4.1 qt) / 6.3 L (6.7 qt) 110 kPa (16 psi) 6.0 L (6.3 qt) 5.0 L (5.3 qt) Ford part number C6AZ-19542-AB Ford specification ESA-M6C25-A, DOT 3 Constant velocity joints Door weatherstrips E43Z-19590-A ESP-MIC207-A COAZ-19553-AA ESR-M13P4-A D7AZ-19553-AA ESR-M13P4-A E2FZ-19549-AA, ESE-M97B44-A -B Engine coolant 180
...) 3.35 L (3.55 qt) 3.9 L (4.1 qt) / 6.3 L (6.7 qt) 110 kPa (16 psi) 6.0 L (6.3 qt) 5.0 L (5.3 qt) Ford part number C6AZ-19542-AB Ford specification ESA-M6C25-A, DOT 3 Constant velocity joints Door weatherstrips E43Z-19590-A ESP-MIC207-A COAZ-19553-AA ESR-M13P4-A D7AZ-19553-AA ESR-M13P4-A E2FZ-19549-AA, ESE-M97B44-A -B Engine coolant 180

Owner's Manual
Page 185
... located in the following areas of your vehicle for maximum theft protection: • left and right front fenders • hood • left and right front doors • front and rear bumper • left and right rear quarter panels • decklid • liftgate • engine compartment • transaxle Engine number The engine...
... located in the following areas of your vehicle for maximum theft protection: • left and right front fenders • hood • left and right front doors • front and rear bumper • left and right rear quarter panels • decklid • liftgate • engine compartment • transaxle Engine number The engine...

