Owner's Manual
Page 48
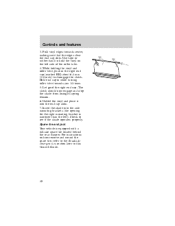
... a full-size spare tire located behind the rear bumper. For instructions on the left ). Insert the shade into the end cap slots. 7. Spare tire and jack Your vehicle is narrower than the left side of the right end cap. Use tape or rubber band to disengage the clutch. While holding the...
... a full-size spare tire located behind the rear bumper. For instructions on the left ). Insert the shade into the end cap slots. 7. Spare tire and jack Your vehicle is narrower than the left side of the right end cap. Use tape or rubber band to disengage the clutch. While holding the...
Owner's Manual
Page 128
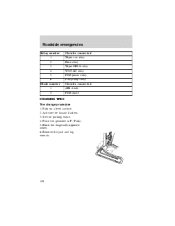
Circuits connected Wiper run relay Horn relay Wiper HI/LO relay WOT A/C relay PCM power relay Fuel pump relay Circuits connected ABS diode PCM diode 128 Remove the jack and lug wrench. Roadside emergencies Relay number 1 2 3 4 5 6 Diode number 1 2 CHANGING TIRES Tire change procedure 1. Park on a level surface. 2. Place the gearshift in P (Park). 5. Block the diagonally opposite wheel. 6. Activate the hazard flashers. 3. Set the parking brake. 4.
Circuits connected Wiper run relay Horn relay Wiper HI/LO relay WOT A/C relay PCM power relay Fuel pump relay Circuits connected ABS diode PCM diode 128 Remove the jack and lug wrench. Roadside emergencies Relay number 1 2 3 4 5 6 Diode number 1 2 CHANGING TIRES Tire change procedure 1. Park on a level surface. 2. Place the gearshift in P (Park). 5. Block the diagonally opposite wheel. 6. Activate the hazard flashers. 3. Set the parking brake. 4.

Owner's Manual
Page 129
Slide spare tire rearward and remove retainer. 129 Roadside emergencies 7. Remove the jack handle (located underneath rear seat). 8. Insert drive section of the jack handle into the actuator hole and turn counterclockwise until the cable is slack enough to allow spare tire to the lug wrench. 9. Assemble the jack handle to be pulled rearward from under the vehicle. 10.
Slide spare tire rearward and remove retainer. 129 Roadside emergencies 7. Remove the jack handle (located underneath rear seat). 8. Insert drive section of the jack handle into the actuator hole and turn counterclockwise until the cable is slack enough to allow spare tire to the lug wrench. 9. Assemble the jack handle to be pulled rearward from under the vehicle. 10.

Owner's Manual
Page 130
Roadside emergencies 11. Insert tapered end of the wheel and ornament. 12. Not using the tapered end of the lug nut wrench at the pry-off notches may result in damage to raise front wheel. 130 Position the jack on the lower suspension arm to the finish of the lug nut wrench behind hubcaps and twist off. Loosen the wheel lug nuts with the lug wrench about one half turn. 13.
Roadside emergencies 11. Insert tapered end of the wheel and ornament. 12. Not using the tapered end of the lug nut wrench at the pry-off notches may result in damage to raise front wheel. 130 Position the jack on the lower suspension arm to the finish of the lug nut wrench behind hubcaps and twist off. Loosen the wheel lug nuts with the lug wrench about one half turn. 13.

Owner's Manual
Page 131
... and lug wrench away. 1 3 4 5 2 Stowing flat tires Stow aluminum wheel and tire with valve stem down. 131 Roadside emergencies Position the jack under the rear axle to come off while the vehicle is in motion. 17. Lower the vehicle and tighten the wheel lug nuts as shown. ... other than original equipment could cause damage to the wheel or mounting system and allow the wheels to raise the rear wheel. 14. Turn the jack handle clockwise and raise the vehicle until snug. Remove the wheel lug nuts and flat tire, and install the spare. 16.
... and lug wrench away. 1 3 4 5 2 Stowing flat tires Stow aluminum wheel and tire with valve stem down. 131 Roadside emergencies Position the jack under the rear axle to come off while the vehicle is in motion. 17. Lower the vehicle and tighten the wheel lug nuts as shown. ... other than original equipment could cause damage to the wheel or mounting system and allow the wheels to raise the rear wheel. 14. Turn the jack handle clockwise and raise the vehicle until snug. Remove the wheel lug nuts and flat tire, and install the spare. 16.

Owner's Manual
Page 137
The cooling fan is securely latched in P (Park). 2. If you must work under a vehicle supported only by a jack. Working with the engine off and remove the key from the ignition. 3. Turn the engine off 1. always turn the engine off and let it cool. ...
The cooling fan is securely latched in P (Park). 2. If you must work under a vehicle supported only by a jack. Working with the engine off and remove the key from the ignition. 3. Turn the engine off 1. always turn the engine off and let it cool. ...

Audio Guide 1st Printing
Page 18
... Press the + button to decrease volume. VOLUME + BAND SEEK MEMORY Using headphones Plug a 3.5 mm headphone (not included) into the jack to operate headphones with speakers turned off. / Plug headphone jack into the jack to turn all speakers off . button to increase volume. See Turning speakers on . - Press again to turn all speakers on...
... Press the + button to decrease volume. VOLUME + BAND SEEK MEMORY Using headphones Plug a 3.5 mm headphone (not included) into the jack to operate headphones with speakers turned off. / Plug headphone jack into the jack to turn all speakers off . button to increase volume. See Turning speakers on . - Press again to turn all speakers on...


