Owner's Manual
Page 4
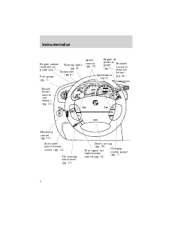
Instrumentation Engine coolant temperature gauge (pg. 7 ) Fuel gauge (pg. 7) Hazard flasher control (not shown) (pg. 27) Warning lights (pg. 8) Tachometer (pg. 6) Speed control (pg. 23) Engine oil pressure Gearshift gauge (includes (pg. 7) overdrive button) Speedometer (pg. ...
Instrumentation Engine coolant temperature gauge (pg. 7 ) Fuel gauge (pg. 7) Hazard flasher control (not shown) (pg. 27) Warning lights (pg. 8) Tachometer (pg. 6) Speed control (pg. 23) Engine oil pressure Gearshift gauge (includes (pg. 7) overdrive button) Speedometer (pg. ...

Owner's Manual
Page 27
... UNLEADED FUEL ONLY 90 180 H L 0 0 0 0 0 0 160 20 10 0 100 110 120 20 km/h H - + P R N D 2 1 L RSM ON SET ACC OFF COAST SRS 27 To stop the flashers, push the flasher button again. 4 H C 2 1 F E 0 3 5 6 40 30 40 50 60 70 o o o o 100 80 60 120 80 140 UNLEADED FUEL ONLY 90 180 H L 0 0 0 0 0 0 160 20 10 0 100 110... x 1000 km/h H - + P R N D 2 1 L RSM ON SET ACC OFF COAST SRS Tilt steering Never adjust the steering column while the vehicle is moving. Controls and features Hazard flasher Push the hazard...
... UNLEADED FUEL ONLY 90 180 H L 0 0 0 0 0 0 160 20 10 0 100 110 120 20 km/h H - + P R N D 2 1 L RSM ON SET ACC OFF COAST SRS 27 To stop the flashers, push the flasher button again. 4 H C 2 1 F E 0 3 5 6 40 30 40 50 60 70 o o o o 100 80 60 120 80 140 UNLEADED FUEL ONLY 90 180 H L 0 0 0 0 0 0 160 20 10 0 100 110... x 1000 km/h H - + P R N D 2 1 L RSM ON SET ACC OFF COAST SRS Tilt steering Never adjust the steering column while the vehicle is moving. Controls and features Hazard flasher Push the hazard...
Owner's Manual
Page 118
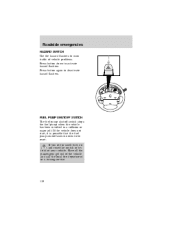
Roadside emergencies HAZARD SWITCH Use the hazard flashers to warn traffic of the vehicle and call the local fire department or a towing service. 118 If you see or smell ..., do not reset the switch or try to be reset. Have all the passengers get out of vehicle problems. Press button down to deactivate hazard flashers. 4 H C 2 1 F E 0 3 5 6 40 30 40 50 60 70 o o o o 100 80 60 120 80 140 UNLEADED FUEL ONLY 90 180 H L 0 0 0 0 0 0 160 20 10 0 ..., it is possible that the fuel pump shutoff switch needs to start your vehicle. Press button again to activate hazard flashers.
Roadside emergencies HAZARD SWITCH Use the hazard flashers to warn traffic of the vehicle and call the local fire department or a towing service. 118 If you see or smell ..., do not reset the switch or try to be reset. Have all the passengers get out of vehicle problems. Press button down to deactivate hazard flashers. 4 H C 2 1 F E 0 3 5 6 40 30 40 50 60 70 o o o o 100 80 60 120 80 140 UNLEADED FUEL ONLY 90 180 H L 0 0 0 0 0 0 160 20 10 0 ..., it is possible that the fuel pump shutoff switch needs to start your vehicle. Press button again to activate hazard flashers.
Owner's Manual
Page 122
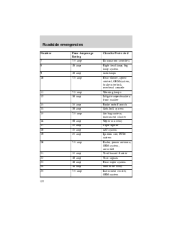
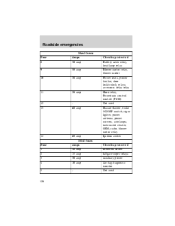
... system Air bag system, instrument cluster Wiper run relay Cigar lighter A/C system Ignition coil, PCM system Radio, power antenna, GEM system, anti-theft Turn/hazard flasher Turn signals Rear wiper system Anti-theft relay Instrument cluster, GEM system 11 12 13 14 15 16 17 18 19 20 7.5 amp 10 amp...
... system Air bag system, instrument cluster Wiper run relay Cigar lighter A/C system Ignition coil, PCM system Radio, power antenna, GEM system, anti-theft Turn/hazard flasher Turn signals Rear wiper system Anti-theft relay Instrument cluster, GEM system 11 12 13 14 15 16 17 18 19 20 7.5 amp 10 amp...
Owner's Manual
Page 126
... Blower motor relay, blower motor Power seats, power lumbar, door lock/unlock relays, accessory delay relay Horn relay, Powertrain control module (PCM) Not used Hazard flasher, brake ON/OFF switch, cigar lighter, power antenna, power mirrors, autolamps, instrument cluster, GEM, radio, blower motor relay Ignition switch Circuits protected Premium sound Liftgate...
... Blower motor relay, blower motor Power seats, power lumbar, door lock/unlock relays, accessory delay relay Horn relay, Powertrain control module (PCM) Not used Hazard flasher, brake ON/OFF switch, cigar lighter, power antenna, power mirrors, autolamps, instrument cluster, GEM, radio, blower motor relay Ignition switch Circuits protected Premium sound Liftgate...
Owner's Manual
Page 128
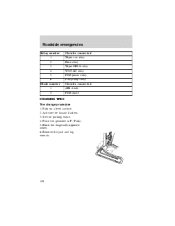
Place the gearshift in P (Park). 5. Set the parking brake. 4. Activate the hazard flashers. 3. Circuits connected Wiper run relay Horn relay Wiper HI/LO relay WOT A/C relay PCM power relay Fuel pump relay Circuits connected ABS diode PCM diode 128 Remove the jack and lug wrench. Park on a level surface. 2. Block the diagonally opposite wheel. 6. Roadside emergencies Relay number 1 2 3 4 5 6 Diode number 1 2 CHANGING TIRES Tire change procedure 1.
Place the gearshift in P (Park). 5. Set the parking brake. 4. Activate the hazard flashers. 3. Circuits connected Wiper run relay Horn relay Wiper HI/LO relay WOT A/C relay PCM power relay Fuel pump relay Circuits connected ABS diode PCM diode 128 Remove the jack and lug wrench. Park on a level surface. 2. Block the diagonally opposite wheel. 6. Roadside emergencies Relay number 1 2 3 4 5 6 Diode number 1 2 CHANGING TIRES Tire change procedure 1.

Owner's Manual
Page 172
Maintenance and care EXTERIOR LAMPS Replacing the exterior bulbs It is a good idea to check the operation of the following lights frequently: • Headlamps • High-mount brakelamp • Tail lamps • Brakelamps • Backup lamps • Hazard flasher 172
Maintenance and care EXTERIOR LAMPS Replacing the exterior bulbs It is a good idea to check the operation of the following lights frequently: • Headlamps • High-mount brakelamp • Tail lamps • Brakelamps • Backup lamps • Hazard flasher 172

Owner's Manual
Page 175
Remove socket from socket. Install bulb in the Roadside emergencies chapter. Hazard flasher For more information on the hazard flasher and hazard switch, refer to lamp. Remove bulb from lamp. For bulb replacement, see your dealer. 175 Install socket to Hazard switch in socket. Remove rear lamp by pulling rearward to vehicle. 2. Replace rear lamp. Maintenance and care remove and replace any of the bulbs. 1. Remove the two (2) screws retaining rear lamp to disengage two lower barbed retainers. 3. 4. 5. 6. 7.
Remove socket from socket. Install bulb in the Roadside emergencies chapter. Hazard flasher For more information on the hazard flasher and hazard switch, refer to lamp. Remove bulb from lamp. For bulb replacement, see your dealer. 175 Install socket to Hazard switch in socket. Remove rear lamp by pulling rearward to vehicle. 2. Replace rear lamp. Maintenance and care remove and replace any of the bulbs. 1. Remove the two (2) screws retaining rear lamp to disengage two lower barbed retainers. 3. 4. 5. 6. 7.
Owner's Manual
Page 194
... checking and replacing ...121 Gauges, Mechanical battery voltage gauge ...7 engine coolant temperature gauge ...7 engine oil pressure gauge ...7 fuel gauge ...7 odometer ...7 speedometer ...6 tachometer ...6 trip odometer ...7 Hazard flashers ...27,118,175 Headlamps ...13 autolamp system ...13,33 daytime running lights ...14 warning chime ...12 Hitch ...112 Hood ...138 Ignition positions of the ignition...
... checking and replacing ...121 Gauges, Mechanical battery voltage gauge ...7 engine coolant temperature gauge ...7 engine oil pressure gauge ...7 fuel gauge ...7 odometer ...7 speedometer ...6 tachometer ...6 trip odometer ...7 Hazard flashers ...27,118,175 Headlamps ...13 autolamp system ...13,33 daytime running lights ...14 warning chime ...12 Hitch ...112 Hood ...138 Ignition positions of the ignition...
