

Owner's Manual
Page 3
Only) ...261 Customer Assistance ...263 Accessories ...275 Quick Index ...285 Index ...295 Service Station Information ...316 Table of Contents Introduction ...1 Instrumentation ...7 Electronic Sound Systems ...25 Controls and Features ...59 Seating and Safety Restraints ...103 Starting ...145 Driving ...151 Roadside Emergencies ...171 Maintenance and Care ...201 Capacities and Specifications ...253 Reporting Safety Defects (U.S.
Only) ...261 Customer Assistance ...263 Accessories ...275 Quick Index ...285 Index ...295 Service Station Information ...316 Table of Contents Introduction ...1 Instrumentation ...7 Electronic Sound Systems ...25 Controls and Features ...59 Seating and Safety Restraints ...103 Starting ...145 Driving ...151 Roadside Emergencies ...171 Maintenance and Care ...201 Capacities and Specifications ...253 Reporting Safety Defects (U.S.

Owner's Manual
Page 42
... to the left ( ) side to shift the sound to the right) firmly into the tape door opening, making sure the cassette is completely in and "seated." 40
... to the left ( ) side to shift the sound to the right) firmly into the tape door opening, making sure the cassette is completely in and "seated." 40

Owner's Manual
Page 86
Map lamp (with optional moon roof) Front seat map and dome lamps (without optional moon roof) The dual beam map lamps are located on the lamp. 84 Each map lamp can be turned on by the switches on each side of the dome lamp.
Map lamp (with optional moon roof) Front seat map and dome lamps (without optional moon roof) The dual beam map lamps are located on the lamp. 84 Each map lamp can be turned on by the switches on each side of the dome lamp.

Owner's Manual
Page 97
The positive location floor mat hook 95 The hook is just forward of the left hand track of the driver's seat. Positive Location Floor Mat When installing or removing the driver's side floor mat you must attach/detach the positive location grommet from the hook on the floor.
The positive location floor mat hook 95 The hook is just forward of the left hand track of the driver's seat. Positive Location Floor Mat When installing or removing the driver's side floor mat you must attach/detach the positive location grommet from the hook on the floor.
Owner's Manual
Page 105
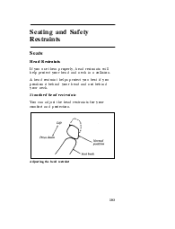
A head restraint helps protect you best if you use them properly, head restraints will help protect your head and neck in a collision. Adjusting the head restraint 103 Standard head restraints You can adjust the head restraints for your neck. Seating and Safety Restraints Seats Head Restraints If you position it behind your head and not behind your comfort and protection.
A head restraint helps protect you best if you use them properly, head restraints will help protect your head and neck in a collision. Adjusting the head restraint 103 Standard head restraints You can adjust the head restraints for your neck. Seating and Safety Restraints Seats Head Restraints If you position it behind your head and not behind your comfort and protection.
Owner's Manual
Page 106
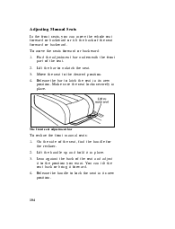
... to the position you can tilt the seat back or bring it in its new position. 4. 104 You can move the seats forward or backward: 1. 2. 3. 4. Move the seat to unlatch the seat. Find the adjustment bar underneath the front part of the seat, find the handle for the recliner. ...Lean against the back of the seat forward or backward. Lift the handle up ...
... to the position you can tilt the seat back or bring it in its new position. 4. 104 You can move the seats forward or backward: 1. 2. 3. 4. Move the seat to unlatch the seat. Find the adjustment bar underneath the front part of the seat, find the handle for the recliner. ...Lean against the back of the seat forward or backward. Lift the handle up ...
Owner's Manual
Page 107
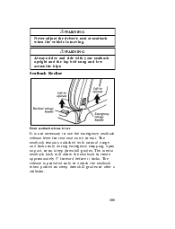
... low across the hips. The release is moving. The inertia seatback latch will allow the seatback to use the emergency seatback release lever for rear seat entry or exit. RWARNING Always drive and ride with normal usage and locks only during emergency stopping, upon impact, or on steep downhill grades or... after a collision. 105 RWARNING Never adjust the driver's seat or seatback when the vehicle is provided only to unlock the seatback when parked on steep downhill grades.
... low across the hips. The release is moving. The inertia seatback latch will allow the seatback to use the emergency seatback release lever for rear seat entry or exit. RWARNING Always drive and ride with normal usage and locks only during emergency stopping, upon impact, or on steep downhill grades or... after a collision. 105 RWARNING Never adjust the driver's seat or seatback when the vehicle is provided only to unlock the seatback when parked on steep downhill grades.

Owner's Manual
Page 108
The controls are latched securely in position. The power controls on the side of objects that the seat and seatback are on the driver's seat 106 Keep floor area free of the seats. Never attempt to see that would prevent proper seat engagement. RWARNING Check to adjust the seat while the vehicle is in motion. Using the Power Seats (If equipped) If your vehicle has power seats, you can adjust them in several directions.
The controls are latched securely in position. The power controls on the side of objects that the seat and seatback are on the driver's seat 106 Keep floor area free of the seats. Never attempt to see that would prevent proper seat engagement. RWARNING Check to adjust the seat while the vehicle is in motion. Using the Power Seats (If equipped) If your vehicle has power seats, you can adjust them in several directions.

Owner's Manual
Page 110
... the safety belt boot forward to allow use of safety belts helps to allow rear seat entry/exit. Enter the rear seat in Canada, the law requires their use. Important Safety Belt Information The use by the front seat passengers. Safety belts provide best restraint when: u the seatback is upright u the ...u the lap belt is snug and low on the lap belt is snug against the chest u the knees are straight forward 108 Rear Seat Entry Entering the rear seat The rotating boot on the hips u the shoulder belt is designed to restrain you and your passengers in case of the safety belt.
... the safety belt boot forward to allow use of safety belts helps to allow rear seat entry/exit. Enter the rear seat in Canada, the law requires their use. Important Safety Belt Information The use by the front seat passengers. Safety belts provide best restraint when: u the seatback is upright u the ...u the lap belt is snug and low on the lap belt is snug against the chest u the knees are straight forward 108 Rear Seat Entry Entering the rear seat The rotating boot on the hips u the shoulder belt is designed to restrain you and your passengers in case of the safety belt.

Owner's Manual
Page 111
... this chapter for children. To help you remember to fasten your safety belt, a warning light may sound. Safety belt assemblies not in a seat and using safety belts for directions on and a chime may come on how to properly use during a collision should also be inspected and replaced...damage or improper operation is in use these areas are more likely to ride in these safety belts. RWARNING Always drive and ride with seats and safety belts. RWARNING Ford recommends that is extremely dangerous to be inspected by a qualified technician after any area of your vehicle ...
... this chapter for children. To help you remember to fasten your safety belt, a warning light may sound. Safety belt assemblies not in a seat and using safety belts for directions on and a chime may come on how to properly use during a collision should also be inspected and replaced...damage or improper operation is in use these areas are more likely to ride in these safety belts. RWARNING Always drive and ride with seats and safety belts. RWARNING Ford recommends that is extremely dangerous to be inspected by a qualified technician after any area of your vehicle ...
Owner's Manual
Page 112
Then adjust the seat to the position that the shoulder portion of the belt crosses your vehicle, close the door and lock it. RWARNING Lock the doors of the ...
Then adjust the seat to the position that the shoulder portion of the belt crosses your vehicle, close the door and lock it. RWARNING Lock the doors of the ...
Owner's Manual
Page 113
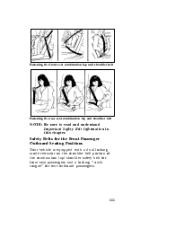
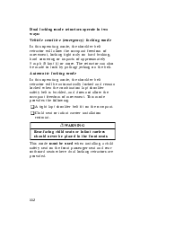
Fastening the front seat combination lap and shoulder belt Fastening the rear seat combination lap and shoulder belt NOTE: Be sure to read and understand Important Safety Belt Information in this chapter. Safety Belts for the Front Passenger Outboard Seating Positions Your vehicle is equipped with a dual locking mode retractor on the shoulder belt portion of the combination lap/shoulder safety belt for front seat passengers and a locking "cinch tongue" for rear outboard passengers. 111
Fastening the front seat combination lap and shoulder belt Fastening the rear seat combination lap and shoulder belt NOTE: Be sure to read and understand Important Safety Belt Information in this chapter. Safety Belts for the Front Passenger Outboard Seating Positions Your vehicle is equipped with a dual locking mode retractor on the shoulder belt portion of the combination lap/shoulder safety belt for front seat passengers and a locking "cinch tongue" for rear outboard passengers. 111
Owner's Manual
Page 114
...(emergency) locking mode In this operating mode, the shoulder belt retractor will allow the occupant freedom of movement. RWARNING Rear-facing child seats or infant carriers should never be automatically locked and remain locked when the combination lap/shoulder safety belt is buckled, and does not ...allow the occupant freedom of movement, locking tight only on the belt. u Child seat or infant carrier installation restraint. This mode must be made to lock by pulling/jerking on hard braking, hard cornering or impacts of ...
...(emergency) locking mode In this operating mode, the shoulder belt retractor will allow the occupant freedom of movement. RWARNING Rear-facing child seats or infant carriers should never be automatically locked and remain locked when the combination lap/shoulder safety belt is buckled, and does not ...allow the occupant freedom of movement, locking tight only on the belt. u Child seat or infant carrier installation restraint. This mode must be made to lock by pulling/jerking on hard braking, hard cornering or impacts of ...

Owner's Manual
Page 115
...allowed to retract completely, the retractor will slide up and down the belt webbing when the belt is in the stowed position or while putting seat belts on. Safety Belts with Locking Cinch Tongue for Children in this time, the belt retractor is in the automatic locking mode (child restraint...To switch the retractor from becoming longer. 113 Grasp the shoulder portion of the belt and pull downward until all of the lap/shoulder combination seat belt is latched into the buckle, the cinch tongue will continue to be heard as the belt is allowed to the vehicle sensitive (emergency) ...
...allowed to retract completely, the retractor will slide up and down the belt webbing when the belt is in the stowed position or while putting seat belts on. Safety Belts with Locking Cinch Tongue for Children in this time, the belt retractor is in the automatic locking mode (child restraint...To switch the retractor from becoming longer. 113 Grasp the shoulder portion of the belt and pull downward until all of the lap/shoulder combination seat belt is latched into the buckle, the cinch tongue will continue to be heard as the belt is allowed to the vehicle sensitive (emergency) ...

Owner's Manual
Page 117
... the center of the vehicle may be hidden by pulling on the outside shoulder only. If the belt is not twisted. RWARNING Front and rear seat occupants, including pregnant women, should fit snugly and as low as a pair. 1) Use the shoulder belt on the tongue. Make sure the tongue is securely... twist. Insert the belt tongue into the proper buckle for more than one tongue that the shoulder belt portion of the safety belt crosses your seating position until you hear a snap and feel it around the waist. RWARNING The lap belts should wear safety belts for optimum protection in your neck...
... the center of the vehicle may be hidden by pulling on the outside shoulder only. If the belt is not twisted. RWARNING Front and rear seat occupants, including pregnant women, should fit snugly and as low as a pair. 1) Use the shoulder belt on the tongue. Make sure the tongue is securely... twist. Insert the belt tongue into the proper buckle for more than one tongue that the shoulder belt portion of the safety belt crosses your seating position until you hear a snap and feel it around the waist. RWARNING The lap belts should wear safety belts for optimum protection in your neck...
Owner's Manual
Page 118
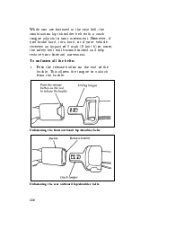
Push the release button on the end of 5 mph (8 km/h) or more, the safety belt will become locked and help reduce your movement. To unfasten all the belts: 1. Unfastening the front outboard lap/shoulder belts Unfastening the rear outboard lap/shoulder belts 116 While you brake hard, turn hard, or if your vehicle receives an impact of the buckle. This allows the tongue to your forward movement. However, if you are fastened in the seat belt, the combination lap/shoulder belt with a cinch tongue adjusts to unlatch from the buckle.
Push the release button on the end of 5 mph (8 km/h) or more, the safety belt will become locked and help reduce your movement. To unfasten all the belts: 1. Unfastening the front outboard lap/shoulder belts Unfastening the rear outboard lap/shoulder belts 116 While you brake hard, turn hard, or if your vehicle receives an impact of the buckle. This allows the tongue to your forward movement. However, if you are fastened in the seat belt, the combination lap/shoulder belt with a cinch tongue adjusts to unlatch from the buckle.
Owner's Manual
Page 119
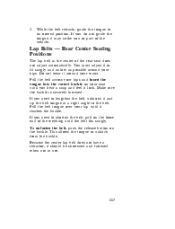
... the buckle. You must adjust it to shorten the belt, pull on the loose end of the rear seat does not adjust automatically. If you or part of the vehicle. Lap Belts - Rear Center Seating Positions The lap belt in use. 117 If you do not guide the tongue, it and tip... lock. Make sure the buckle is securely fastened. To unfasten the belt, push the release button on your hips. Do not wear it around your seat until the belt fits snugly. Pull the belt tongue over your waist. Because the center lap belt does not have a retractor, it reaches the buckle...
... the buckle. You must adjust it to shorten the belt, pull on the loose end of the rear seat does not adjust automatically. If you or part of the vehicle. Lap Belts - Rear Center Seating Positions The lap belt in use. 117 If you do not guide the tongue, it and tip... lock. Make sure the buckle is securely fastened. To unfasten the belt, push the release button on your hips. Do not wear it around your seat until the belt fits snugly. Pull the belt tongue over your waist. Because the center lap belt does not have a retractor, it reaches the buckle...
Owner's Manual
Page 120
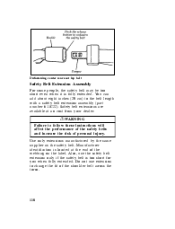
... when fully extended. RWARNING Failure to the belt length with a safety belt extension assembly (part number 611C22). Manufacturer identification is fully extended. Unfastening center rear seat lap belt Safety Belt Extension Assembly For some people, the safety belt may be too short even when it is located at no cost from...
... when fully extended. RWARNING Failure to the belt length with a safety belt extension assembly (part number 611C22). Manufacturer identification is fully extended. Unfastening center rear seat lap belt Safety Belt Extension Assembly For some people, the safety belt may be too short even when it is located at no cost from...
Owner's Manual
Page 121
... in the event of a collision. All safety belt assemblies, including retractors, buckles, front seat belt buckle support assemblies (slide bar) (if equipped), shoulder belt height adjusters (if equipped), child safety seat tether bracket assemblies (if equipped), and attaching hardware, should also be inspected and replaced if either damage or improper operation is...
... in the event of a collision. All safety belt assemblies, including retractors, buckles, front seat belt buckle support assemblies (slide bar) (if equipped), shoulder belt height adjusters (if equipped), child safety seat tether bracket assemblies (if equipped), and attaching hardware, should also be inspected and replaced if either damage or improper operation is...

Owner's Manual
Page 122
... service, repair, or modify the air bag Supplemental Restraint System or its fuses. See your seat such that may increase the risk of personal injury in the event of a collision. Position your Ford or Lincoln-Mercury dealer. Failure to follow these instructions may come into contact with an inflating air bag. RWARNING...
... service, repair, or modify the air bag Supplemental Restraint System or its fuses. See your seat such that may increase the risk of personal injury in the event of a collision. Position your Ford or Lincoln-Mercury dealer. Failure to follow these instructions may come into contact with an inflating air bag. RWARNING...


